4
Tempest MasterBelt Operating Manual
MasterBelt Overview
The Tempest MasterBelt is a 2-Channel Tempest BeltStation that serves as a Tempest BaseStation. The MasterBelt is compatible with existing
2-Channel Tempest BeltStations. Like a Tempest BaseStation, the MasterBelt is capable of hosting and supporting up to five standard
BeltStations in full duplex communication when operating in Normal mode. When operating in Shared or Split mode, the MasterBelt can
support an unlimited number of standard BeltStations in a listen/push-to-talk capacity.
The MasterBelt can be situated in a fixed location (like a BaseStation) or worn in a mobile capacity (like a BeltStation). This type of flexibility and
mobility enables users to overcome challenges associated with AC power needs, fixed antenna placement and limited coverage area. With a
MasterBelt, groups of Tempest users can effectively move together and maintain wireless communication with one another without the need of
a traditional BaseStation or fixed antenna.
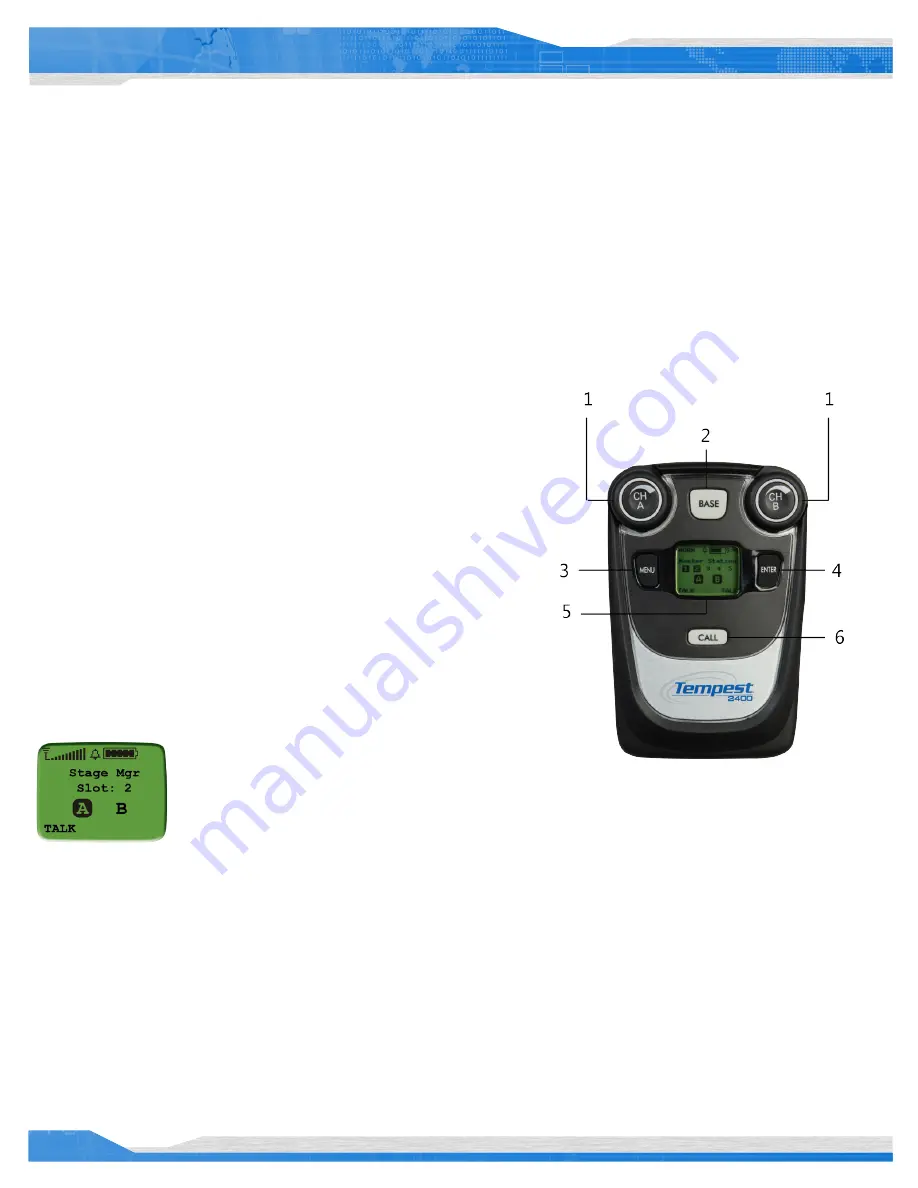
A MasterBelt has many of the same functional and cosmetic characteristics of a standard BeltStation. Talk buttons, channel buttons, volume
knobs, and many other features remain the same.
1- Volume- CH A and CH B
In Operational Mode, turning the Volume control adjusts the volume of the audio.
Volume indicators appear on the display during adjustment and are expressed in
Decibels (dB).
The Volume control has an option to be set to “Volume Press” where it requires a
“press and turn” to adjust the volume level. The “Volume Press” option can be
adjusted under the “Set Controls” section of the MasterBelt menu.
Pressing the Volume control in “Dual-listen” mode does nothing. In “Single-listen”
mode, pressing “CH A” enables channel A, and pressing “CH B” enables channel B .
The Volume control has a channel “Delay Switch” option which requires the knob to
be pressed and held slightly longer in order to switch from one channel to the other.
This feature can be enabled under the “Set Controls” section of the MasterBelt
menu.
In Menu Mode, turning either Volume control allows the user to scroll the options of
the current menu screen. Pressing the Volume control selects the option.
2- Base Button
The BASE button (when pressed) changes the
MasterBelt’s display to show the telemetry status of all current BeltStations logged into the MasterBelt. Once on
this screen, pressing the BASE button will cycle through each BeltStation’s telemetry based on their assigned slot
position.
3- MENU Button
Pressing MENU while the MasterBelt is in Operational mode will select Menu Mode, and the Main Menu screen will be displayed. Once in Menu
Mode, pressing MENU again will act as an escape key and will back out of the current menu screen moving the user up one level. Pressing the
MENU button while at the Main Menu screen will exit Menu Mode and return to Operational mode. The menu can be locked via a “Menu Lock”
feature per MasterBelt.
4- ENTER Button
The ENTER button operates differently depending on the mode of the MasterBelt. In Menu Mode, pressing the ENTER button selects the current
menu option and is the same as pressing a Volume control. A menu item is not selected until the ENTER button (or Volume control) is pressed.
The ENTER button can also activate Wireless ISO (wireless talk around).
BASE Button Display


