TeleEye JN308 User Manual Download Page 29

22 


                                                                                    Fig 4-5 Basic Configuration-DST   
                                                                                                                                       

4.2  Live Configuration 

Live configuration includes four submenus: live, main monitor, spot and mask. 
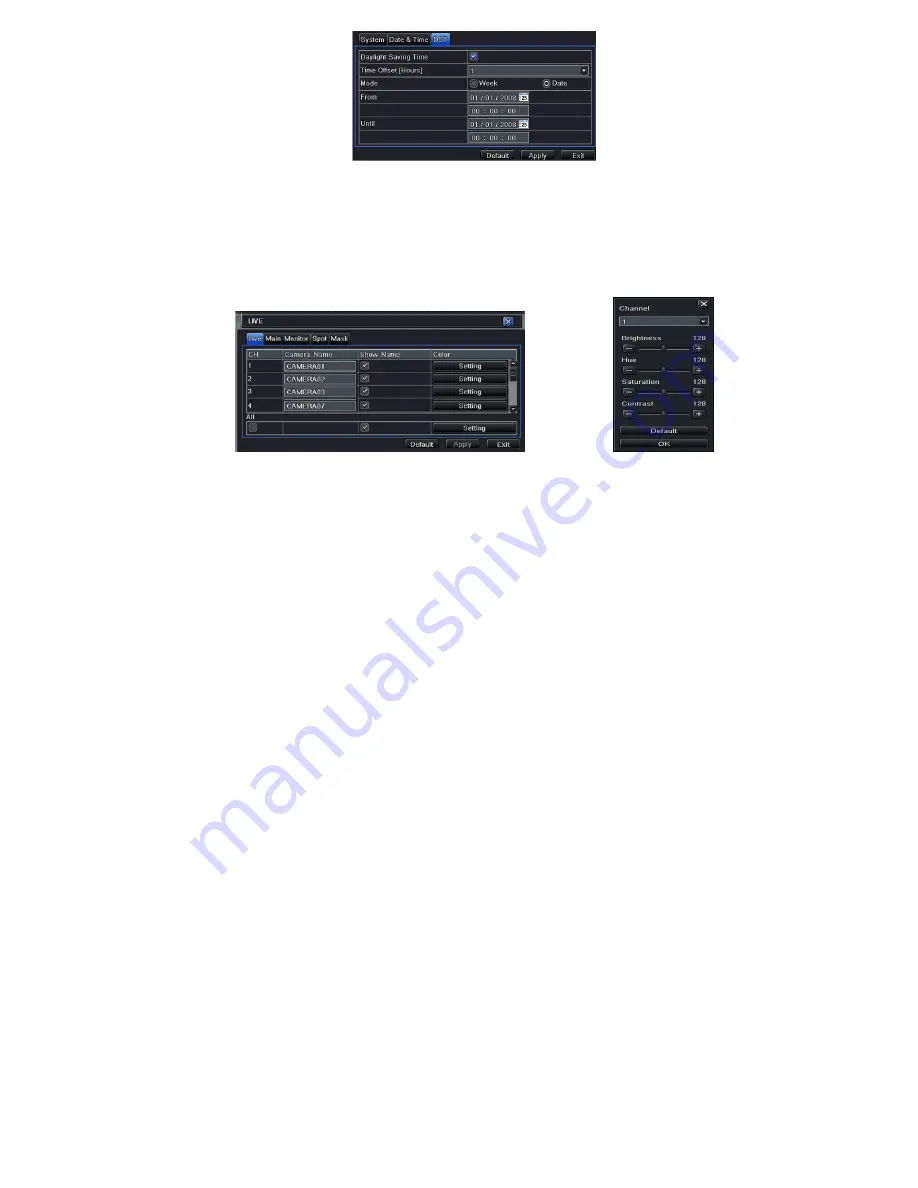
4.2.1  Live   

In this interface, user can setup camera name, adjust colors: brightness, hue, saturation and contrast. 
Step1: Enter into Menu

Setup

Live

Live tab. Refer to Fig 4-6: 


                      Fig 4-6 Live Configuration

Live                                    Fig 4-7 Live-Color Adjustment 

Note: A soft keyboard will pop up by clicking the camera name. User can self-define the camera name. 
Step2: For a particular camera/channel setting, please click “setting” button to see a window as Fig 4-7: 
Step3: In this interface, user can adjust brightness, hue, saturation and contrast in live; Click “Default” button to restore default 

Summary of Contents for JN308

Page 1: ...1 JN308 JN316 User Manual v1 00 00 For H 264 4 8 16 channel digital video recorder All rights reserved...

Page 2: ...Do not install this device near water Clean only with a dry cloth Do not block any ventilation openings and ensure proper ventilation around the machine Do not power off the DVR when the device is fun...

Page 3: ...2 1 1 Install Hard Drive 11 2 1 2 Install DVD Writer 12 2 2 Front Panel Descriptions 13 2 3 Rear Panel Instructions 15 2 4 Remote Controller 18 2 5 Control with Mouse Control 21 2 5 1 Connect Mouse 21...

Page 4: ...ion 22 4 2 1 Live 22 4 2 2 Main Monitor 23 4 2 3 Spot 23 4 2 4 Mask 23 4 3 Record Configuration 24 4 3 1 Enable 24 4 3 2 Record Bitrate 25 4 3 3 Time 25 4 3 4 Stamp 26 4 3 5 Recycle Record 26 4 3 6 Sn...

Page 5: ...m 35 4 6 3 Email 35 4 6 4 Server 36 4 7 User Management Configuration 36 4 8 P T Z Configuration 38 4 9 Advanced 42 4 9 1 Reset 42 4 9 2 Import Export 42 4 9 3 Block Allow list 42 5 Search Playback Ba...

Page 6: ...ion 49 6 1 6 Record Information 50 6 2 Manual Alarm 50 6 3 Disk Management 50 6 4 Upgrade 50 6 5 Logoff 51 7 Remote Surveillance 52 7 1 IE Remote Surveillance 52 7 1 1 On LAN 52 7 1 2 On WAN 52 7 2 Re...

Page 7: ...7 Appendix B Calculate Recording Capacity 67 Appendix D 4 CH Specifications 70 Appendix E 8 CH Specifications 71 Appendix F 16 CH Specifications 72...

Page 8: ...nd high stability Due to these distinctive characteristics it is widely used in banks telecommunication transportation factories warehouse and irrigation and so on 1 2 Main Features COMPRESSION FORMAT...

Page 9: ...LARM 4 channel alarm output and 4 8 16 channel alarm input available Support schedule for motion detection and sensor alarm Support pre recording and post recording Support linked channels recording o...

Page 10: ...stable independently to fit the network bandwidth and environment Support picture snap and color adjustment in remote live Support remote time and event search and channel playback with picture snap S...

Page 11: ...2 Please calculate HDD capacity according to the recording setting Please refer to Appendix B Calculate Recording Capacity Step 1 Unscrew and open the case and then unscrew the screws in the both side...

Page 12: ...the back cover of the device and screw firmly 2 1 2 Install DVD Writer Step 1 Unscrew and open the case and then unscrew the screws in the both sides to take out of the upper iron bar as shown below...

Page 13: ...es of the case aim at the holder s Next screw them firmly Step 4 Connect the power and data cables and install the upper iron bar Then screw firmly with screws in the both sides Note If the user insta...

Page 14: ...mode in live 2 Decrease the value in setup MENU Enter menu in live INFO Check recording data BACKUP Enter backup mode in live SEARCH Enter search mode Record manually Play Pause Exit Rewind 2 Compound...

Page 15: ...would be displayed without OSD 3 Video in Video input channels from 1 4 4 Audio in 4 CH Audio input 5 Audio out Audio output connect to the sound box 6 MIC IN Talk 7 LAN Network port 8 VGA port VGA ou...

Page 16: ...ut Connect to monitor 2 Spot Connect to monitor as an AUX output to display channel by channel Video would be displayed without OSD 3 Video in Video input channels from 1 8 4 Audio in 8 CH Audio input...

Page 17: ...is TX 16 E SATA Connect to HDD for backup 17 LOOP OUT For outputting 1 8 CH image independently Fig 2 3 Rear Panel for 16 CH Item Name Description 1 Video out Connect to monitor 2 Spot Connect to moni...

Page 18: ...ATA Connect to HDD for backup 17 LOOP OUT For outputting 1 16 CH image independently 2 4 Remote Controller It uses two AAA size batteries Open the battery cover of the Remote Controller Place batterie...

Page 19: ...screen display mode Next Button To switch the live image SEQ To enter into auto dwell mode Audio To enable audio output in live mode Switch To switch the output between BNC and VGA Direction button To...

Page 20: ...utton again to hide the P T Z control panel Then you can press preset cruise track wiper or light button to enable the relevant function Operation processes with remote controller to control multi DVR...

Page 21: ...ight click to reveal the control menu on the screen Right click to hide the control menu In Configuration Click to enter a particular option Right click to cancel the option or to return to the previo...

Page 22: ...on and drag to set schedule time In Playback Click to choose the options Right click to return to live mode In Backup Click to choose the options Right click to return to previous picture In PTZ Contr...

Page 23: ...izard please click Exit button to exit Note This DVR can only display options on either VGA HDMI monitor or CVBS monitor at a given point of time If there is live image display without menu options th...

Page 24: ...omplete operational steps for changing password adding or deleting users please refer to section 4 7 User Management Configuration Fig 3 1 Login 3 3 Live Preview Fig 3 2 Live Preview Interface 3 4 Liv...

Page 25: ...25 Fig 3 3 Live Playback...

Page 26: ...different cameras Dwell mode is enabled only when the chosen display mode is not able to display all the available cameras Color If this button is enabled you can adjust the color of live images E Zo...

Page 27: ...splay on the client end or on CMS This would help the user to recognize the device remotely Device ID This ID is used to map the DVR with IR remote controller and speed dome cameras Video Format Two m...

Page 28: ...e login interface No Image When Logout If selected there will be no image showing when logout 4 1 2 Date Time Step1 Enter into Menu Setup Basic Date Time tab Refer to Fig 4 4 Step2 Set the date format...

Page 29: ...p1 Enter into Menu Setup Live Live tab Refer to Fig 4 6 Fig 4 6 Live Configuration Live Fig 4 7 Live Color Adjustment Note A soft keyboard will pop up by clicking the camera name User can self define...

Page 30: ...1 and map the channel Step3 Set the dwell time Step4 Select the split mode and then setup current picture group Click button to setup the previous channel groups of dwell picture Click button to set t...

Page 31: ...ime recycle record stamp and snap 4 3 1 Enable Step1 Enter into Menu Setup Record Enable tab Refer to Fig 4 11 Fig 4 11 Record Configuration Enable Step2 Checkmark record and audio Step3 Select All to...

Page 32: ...ord time before motion detection or a sensor alarm was triggered Fig 4 13 Record Configuration Time Post alarm record Set the post recording time after the alarm is finished five options 10s 15s 20s 3...

Page 33: ......

Page 34: ...er can use cursor to drag the camera name and time stamp at random positions Refer to below Figures Step3 Select All to setup all channels with the same parameters Fig 4 14 Record Configuration Stamp...

Page 35: ...edule for normal recording for seven days of a week 24 hours of a day Every row denotes an hourly timeline for a day Click the grid to do relevant setup A highlighted area denotes selected timeline St...

Page 36: ...ording are similar to normal schedule setup You can refer to 4 4 1 Schedule for details Note The default schedule of motion based recording is 24x7 that is the color of schedule settings interface is...

Page 37: ...hapter 4 5 1 for more details Fig 4 18 Schedule Configuration Sensor 4 5 Alarm Configuration Alarm configuration includes five sub menus sensor motion video loss other alarm and alarm out 4 5 1 Sensor...

Page 38: ...m and save them in the HDD automatically Step 7 Enter into To Record tab Select recoding channels It would be recorded in case of an alarm Click OK button to save the setting Step 8 Enter into To PTZ...

Page 39: ...4 23 Alarm Configuration Motion Step2 Enable motion alarm set alarm hold time which refers to the time till which the system will wait for further detection of motion Eg If the holding time is set to...

Page 40: ...ea Click icon to test the sensitivity as per the local conditions Once motion is sensed it displays a figure icon Click icon to save the setting Click icon to exit the current interface Fig 4 24 Motio...

Page 41: ...sk Lost Step1 Enter into Menu Setup Other alarm tab Refer to Fig 4 27 Step 2 Use the dropdown menu and select the event or the alarm Step 3 Check the required trigger options If the selected event is...

Page 42: ...monitoring over network 4 6 1 Network Step 1 Enter into Menu Setup Network network tab Refer to Fig4 29 Step 2 HTTP port the default value is 80 If the value changed you need to modify the IP address...

Page 43: ...the same parameters Fig 4 30 Network Configuration Sub Stream 4 6 3 Email Step 1 Enter into Menu Setup Network Email tab Refer to Fig 4 31 SMTP Server Port The name and port number of SMTP server Che...

Page 44: ...to report in the ECMS when adding a new device Then input the remaining information of the device in the ECMS After that the system will auto allot a Device ID Please check it in the ECMS Step 4 Input...

Page 45: ...y tab and then assign the operation rights for particular user Refer to fig 4 36 Fig 4 36 Add User Authority If you want to delete the user please select the user you want to delete in the user list b...

Page 46: ...Menu Setup P T Z Serial port tab Refer to Fig 4 37 Step 2 Select enable and setup the value of address baud rate and protocol according to the settings of the speed dome Step 3 Configure all channels...

Page 47: ...ng up down left right and adjust the rotating speed zoom focus and iris of the dome Select the serial number of the preset point Click button to Parameter Meaning Address The address of the PTZ device...

Page 48: ...ax 8 cruise line can be added select a cruise line and click Setup button to see a dialog box as Fig 4 42 Click Add icon to set the speed and time of preset point select a preset point and then click...

Page 49: ...DVR User Manual 41 Fig 4 42 Cruise Setting Modify Cruise Line Fig 4 43 Track Setting...

Page 50: ...Click icon to exit the current tab Step 6 After the completion of settings click Apply button to save settings 4 9 Advanced Advanced configuration includes three submenus Reset Import Export and Bloc...

Page 51: ...hin IP address range from 196 168 000 002 to 196 168 000 004 to access the DVR he can checkmark Block list option and then input such IP address range If it is required that computer users within a ce...

Page 52: ...1 Search configuration time search Step2 Select date and channels on the right hand side and press Search button A date with highlighted borderline indicates presence of data Step3 Set the start time...

Page 53: ...playback interface Only four channels at most can be selected to display live images The method of record backup during a certain period in the playback interface Select the start time by dragging the...

Page 54: ...sed recording and sensor based recording Step 4 Press Search button to display the searched event information in the event list box Step 5 Double click the event item to play the record 5 3 File Manag...

Page 55: ...tem to playback 5 4 Search by Image Step 1 Enter into Menu Search Image tab Step 2 Select data and channels on the right hand side Step 3 Press Search button to search for a recorded image Step 4 Once...

Page 56: ...ckup list box Step 3 Select a required file or checkmark All to select all data files Click Backup button to display Backup information window Step 4 In the backup information interface user can check...

Page 57: ...a channel based search This report can further be saved on a USB flash drive as an html file using the export button 6 1 3 Log Information In this tab you can search for relevant logs as per the set d...

Page 58: ...e recording If not formatted it will show the status of the disk free space and total space at the bottom of screen Step 2 Click Refresh button to refresh the disk information in the list box Step 3 S...

Page 59: ...st box Step 4 Select that software and then click upgrade button It will upgrade automatically Note Please wait for a while when the system reboots Never cut off power during upgrading The original co...

Page 60: ...eed add the port number after IP address For example set HTTP port as 82 need input IP address like 192 168 0 25 82 User name and password here are the same with that used on the DVR The default is ad...

Page 61: ...er to view Note If you cannot download and install ActiveX please refer to FAQ Q8 7 2 Remote Playback Backup 7 2 1 Remote Playback Click button to enter into record playback interface Refer to Fig 7 5...

Page 62: ...arch Time search Refer to Fig 7 6 Fig 7 6 Time Search Interface Step2 The highlight date in the area indicates recorded data Select the date in the area and record channels in area Step3 Click Search...

Page 63: ...Step 6 Click the relevant buttons in the interface for operation like FF pause change channel mode research etc Please refer to Fig 7 7 Fig 7 7 Playback by Event Search By Event Search Step1 Enter in...

Page 64: ...tep 3 Checkmark the event type motion and sensor Step 4 The events will be display in the event list box by clicking Search button Step 5 Double click certain item to playback File Management Step 1 E...

Page 65: ...ox and then click Lock button to lock this file that ca not be deleted or overlaid Unlock Select a locked file and then click unlock button to unlock this file Delete Select an unlock file and then cl...

Page 66: ...on user s PC 7 3 Remote System Configuration You can do remote setup of the device which includes functions like basic configuration live configuration record configuration schedule configuration ala...

Page 67: ...u can view the status of the HDD change view the read write properties and can also format the HDD remotely 7 5 Remote Information The Info tab provides a web based interface to access the general inf...

Page 68: ...g 7 12 Remote Information Search Note There may be slight differences with respect to functions of remote surveillance between through IE and through Apple PC Here we only take IE remote access as exa...

Page 69: ...ease remove the HDD or change an adapter to try b The video format of the DVR is different from that of the monitor c Connection problem Please check the cable and the ports of monitor and DVR Q4 Why...

Page 70: ...se a wait 1 2 minutes after mouse connected b Not detected Plug unplug several times c The mouse is incompatible Please change a mouse Q8 Cannot download ActiveX control a IE browser blocks ActiveX Pl...

Page 71: ...e reason It is forced to stop because hard disk has disabled track which causes the system checking hard disk cannot skip Solution Change another new hard disk or reformat the broken one Q10 How to in...

Page 72: ...type they will be identified to be two or more new hard disks and all of them need to format In general please do not try using more disks removed from different DVRs into another one in case the dat...

Page 73: ...player box before doing backup Then double click to open your USB disk to find your backup files and backup player Double click icon to install backup player After you install it open this player and...

Page 74: ...66...

Page 75: ...450 WD1 25 PAL 30 NTSC Lowest 768 338 The calculation format is Total Recording capacity Used space per hour MB h coverage rate of hard disk recording time hour channel numbers For instance one custom...

Page 76: ...after test Brand Capacity SSK 512MB 1G 2GB Netac 4GB Kingston 2GB Aigo 2GB Smatter vider 1GB SanDisk 4GB 2 Compatible SATA CD DVD writers after test Brand Model TECLAST GH22NP20 TL 22XD BENQ DW220S 0K...

Page 77: ...ST31000340SV 1T Seagate Pipeline HD 2 500G Seagate Barracuda 7200 10 320G Seagate Barracuda 7200 10 ST3250310AS 250G Seagate Barracuda 7200 11 ST3160813AS 160G Seagate Barracuda 7200 10 ST380815AS 80G...

Page 78: ...S PAL 120FPS NTSC Record Frame Rate 100FPS PAL 120FPS NTSC Audio input RCA X4 Audio output RCA X1 Alarm input NO or NC 4CH Alarm output 4CH Record Mode Manual Sensor Timer Motion detection Simplex Dup...

Page 79: ...S PAL 240FPS NTSC Record Frame Rate 200FPS PAL 240FPS NTSC Audio input RCA X8 Audio output RCA X1 Alarm input NO or NC 8CH Alarm output 4CH Record Mode Manual Sensor Timer Motion detection Simplex Dup...

Page 80: ...S PAL 480FPS NTSC Record Frame Rate 400FPS PAL 480FPS NTSC Audio Input RCA X16 Audio output RCA X1 Alarm Input NO or NC 16CH Alarm output 4CH Record Mode Manual Sensor Timer Motion detection Simplex D...

Reviews: