background image

Operation

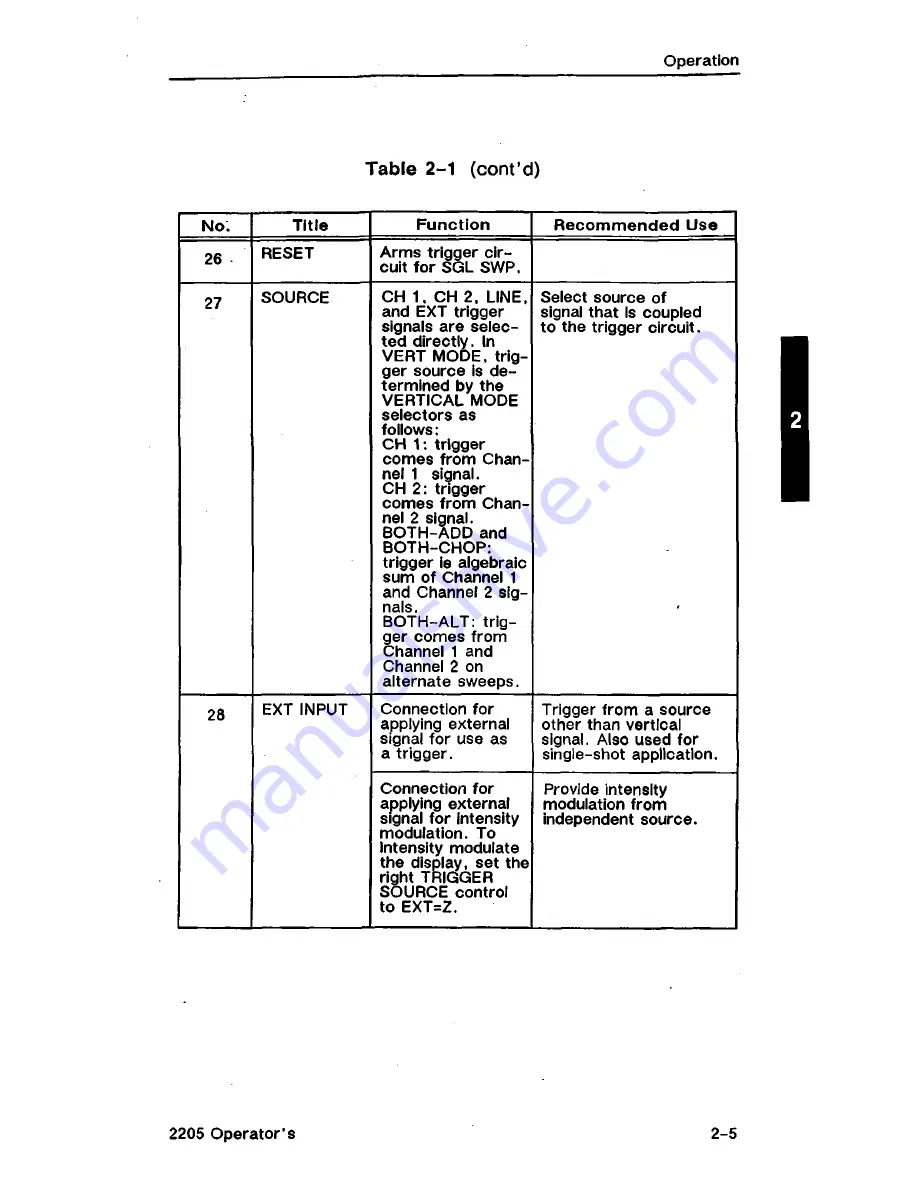
Table  2-1  (cont’d)

No.

Title

Function

Recom m ended  Use

26

RESET

Arms  trigger  cir­
cuit  for  SGL  SWP.

27

SOURCE

CH  1.  CH  2,  LINE,


and  EXT  trigger


signals  are  selec­
ted  directly.  In


VERT  MODE,  trig­
ger  source  is  de­
termined  by  the


VERTICAL  MODE


selectors  as


follows:

CH  1:  trigger


comes  from  Chan­

nel  1  signal.
CH  2:  trigger


comes  from  Chan­
nel  2  signal.


BOTH-ADD  and


BOTH-CHOP:


trigger  ie  algebraic


sum  of  Channel  1


and  Channel  2  sig­
nals.

BOTH-ALT:  trig­

ger  comes  from


Channel  1  and


Channel  2  on


alternate  sweeps.

Select  source  of


signal  that  Is  coupled


to  the  trigger  circuit.

28

EXT  INPUT

Connection  for


applying  external


signal  for  use  as


a  trigger.

Trigger  from  a  source


other  than  vertical


signal.  Also  used  for


single-shot  application.

Connection  for


applying  external


signal  for Intensity


modulation.  To


Intensity  modulate


the  display,  set  the


right  TRIGGER


SOURCE  control


to  EXT=Z.

Provide  intensity


modulation  from


independent  source.

2205  Operator’s

2-5

Summary of Contents for 2205

Page 1: ......

Page 2: ...TEK 070 6717 00 PRODUCT GROUP 46 2205 OSCILLOSCOPE OPERATOR S MANUAL First Printing October 1987 Tektronix COMMITTED TO EXCELLENCE ...

Page 3: ...rate Offices P O Box 500 Beaver ton OR 97077 Phone 503 627 7111 TWX 910 467 8708 TLX 151754 Subsidiaries and distributors worldwide Printed in Hong Kong INSTRUMENT SERIAL NUMBERS Each instrument has a serial number on a panel insert tag or stamped on the chassis The first number or letter designates the country of manufacture The last five digits of the serial number are assigned sequentially and ...

Page 4: ... Gerat eingesetzt wird mud ebenfalls den Voraussetzungen nach Par 2 Ziff 1 der Vfg 1046 1984 genugen NOTICE to the user operator The German Postal Service requires that this equipment when used in a test setup may only be operated if the requirements of Postal Regulation Vfg 1046 1984 Par 2 Sect 1 7 1 are complied with HINWEIS flir den Benutzer Betreiber Dies Gerat darf in Meflaufbauten nur betrie...

Page 5: ...eing marketed The German Postal Service has the right to re test the series and to verify that it complies TEKTRONIX Bescheinigung des Herstellers lmporteurs Hiermit wird bescheinigt da3 der die das 2205 o scillo sco pe_______ AND ALL INSTALLED OPTIONS in Ubereinstimmung mit den Bestimmungen der Amtsblatt Verfugung 1046 1984 funkentstort ist Der Deutschen Bundespost wurde das Inverkehrbringen dies...

Page 6: ...trument Cooling 1 4 Initial Start Up 1 5 SECTION 2 OPERATION Front Panel Organization 2 1 Controls Connectors and Indicators 2 1 Learning the Controls 2 6 Display Controls 2 8 Vertical Controls 2 8 Input Coupling 2 8 Channel Selection 2 9 Add and Invert 2 9 Chop or A lt 2 9 Horizontal Controls 2 10 Sweep Speed Selection 2 10 Magnifying Waveform Details 2 10 2205 Operator s ...

Page 7: ...ents 3 1 Peak to peak V o ltag e 3 1 Instantaneous Voltage 3 3 Algebraic Addition 3 5 Common mode Rejection 3 6 Amplitude Comparison Ratio 3 7 Time Measurements 3 8 Time Duration 3 8 Period and Frequency 3 10 Rise Time 3 10 Time Difference Between Pulses on Time Related Signals 3 12 Phase Difference 3 14 Television Displays 3 17 TV Field Signals 3 17 TV Line Signals 3 18 Z Modulation 3 18 SECTION ...

Page 8: ... CHARACTERISTICS SECTION 6 OPTIONS AND ACCESSORIES Standard Accessories 6 1 Options 6 1 Optional Accessories 6 4 APPENDIX A Magnified Sweep Speeds APPENDIX B Repackaging for Shipment APPENDIX C Glossary 2205 Operator s iii ...

Page 9: ...quipment or the property W A R N IN G statements identify conditions or practices that could result in personal injury or loss of life As Marked on Equipment C A U TIO N indicates a personal injury hazard that is not im mediately accessible as one reads the markings or a hazard to property including the equipment itself DANGER indicates a personal injury hazard that is immediately accessible as on...

Page 10: ...ounded through the grounding conductor of the power cord To avoid electrical shock plug the power cord into a properly wired receptacle before making any connections to the product input or output terminals A protective ground con nection by way of the grounding conductor in the power cord is essential for safe operation Danger Arising From Loss of Ground Upon loss of the protective ground connect...

Page 11: ...urrent rating as specified on the back of your product and in Table 6 1 Do Not Operate in an Explosive Atmosphere To avoid explosion do not operate this product in an explosive atmosphere Do Not Remove Covers or Panels To avoid personal injury do not remove the product covers or panels Do not operate the product without the covers and panels properly installed VI 2205 Operator s ...

Page 12: ...triggering at any sweep speed and single sweep triggering The trigger sig nal is dc coupled An external triggering signal or an external Z axis modulation signal can be applied via a front panel connector and the source selector switches The horizontal system provides calibrated sweep speeds from 0 5 s to 100 ns per division For greater measurement accu racy a X I0 magnifier circuit extends the ma...

Page 13: ...bout your 2205 Oscillo scope or about other Tektronix products contact the nearest Tektronix Sales Office or Distributor consult the Tektronix prod uct catalog or in the U S call the Tektronix National Marketing Center toll free at 1 800 426 2200 The 2205 Oscilloscope viii 2205 Operator s ...

Page 14: ...SECTION 1 PREPARATION FOR USE 2205 Operator s ...

Page 15: ...1 ...

Page 16: ...ency from 48 Hz to 440 Hz Before connecting the power cord to a power source verify that the LINE VOLTAGE SELECTOR located on the rear panel is set cor rectly and that the proper line fuse is installed Refer to Table 1 1 Figure 1 1 and the instrument rear panel To convert the 2205 for operation on the other line voltage range first check that the power cord is not connected to any power source The...

Page 17: ...rica 240 V 230V ANSI C73 20 NEMA 6 15 P IEC 83 UL 198 6 A5 Switzerland 220 V 230V SEV IEC 127 aA 5 A Type C fuse is installed inside the plug of the Option A2 power cord bReference Standards Abbreviations ANSI American National Standards Institute AS Standards Association of Australia BS British Standards Institution CEE International Commission on Rules for the Approval of Electric Equipment IEC ...

Page 18: ...CTION REPLACE C A U T IO N TO AVOID ELECTRIC SHOCK THE POWER CORD PROTECTION GROUNDING CONDUCTOR MUST BE CONNECTED TO GROUND DO NOT REMOVE COVERS REFER SERVICING TO QUALIFIED PERSONNEL ONLY WITH SPECIFIEO TYPE AND RATED FUSE POWER MAX WATTS 50 MAX VA 60 FREQUENCY 48 440H z LINE VOLTAGE SELECTOR 230V n TEKTRONIX INC BEAVERTON OREGON U S A MADE IN HONG KONG Figure 1 1 Voltage selector switch fuse an...

Page 19: ...ce the fuse holder and cap PO W ER CORD This instrument has a detachable three wire power cord with a three contact plug for connection to both the power source and protective ground The ground contact on the plug connects through the power cord to the external metal parts of the instru ment For electrical shock protection insert this plug only into a power source outlet that has a properly ground...

Page 20: ...ECTOR is set for the source voltage to be used 3 Verified the fuse 4 Attached the power cord 5 Ensured adequate ventilation around the instrument 6 Plugged the power cord into the appropriate power source outlet Now turn on your oscilloscope by pressing in the POWER button Observe that the Power On indicator located below the button illuminates 2205 Operator s 1 5 ...

Page 21: ......

Page 22: ...SECTION 2 OPERATION 2 2205 Operator s ...

Page 23: ... vV V vi_rf M r ...

Page 24: ...NOTE Numbers on the instrument are keyed to Table 2 1 ...

Page 25: ... two BNC input connectors through which you apply the signals that you want to view The HORIZONTAL controls are to the right of the VERTICAL sec tion Horizontal controls set and move the time or horizontal axis for the displayed traces On the extreme right of the front panel enclosed within shaded green lines is the TRIGGER section Trigger controls define the signals and the conditions needed to i...

Page 26: ... power Is turned on Determine power condition 7 8 VERTICAL POSITION Moves trace up or down on screen Position trace vertically and compensate for dc component of signal 9 CH 1 BOTH CH 2 Selects signal inputs for display View either channel independently or both channels simultaneously 10 NORM INVERT Inverts the Channel 2 signal display Provide for differentia CH 1 CH 2 or summed CH 1 CH 2 signals ...

Page 27: ... deflection system 15 CH 1 OR X CH 2 OR Y Provides for Input signal connections CH 1 gives hori zontal deflection when SEC DIV is In X Y CH 2 pro vides vertical de flection Apply signals to the vertical deflection system 16 HORIZONTAL POSITION POSITION moves traces horizontally Control trace positioning In horizontal direction 17 MAG X1 X10 Selects degree of horizontal magni fication Examine small...

Page 28: ...om positive going or negative going signals 23 LEVEL Select trigger signal amplitude point Select actual point of trigger 24 TRIG D READY Indicator lights when sweep Is triggered In P P AUTO NORM or TV FIELD In Single Sweep mode Indicates trigger is armed Indicate trigger state 25 MODE P P AUTO TV LINE triggers from waveforms and television lines having repetition rates of at least 20 Hz NORM trig...

Page 29: ...igger ie algebraic sum of Channel 1 and Channel 2 sig nals BOTH ALT trig ger comes from Channel 1 and Channel 2 on alternate sweeps Select source of signal that Is coupled to the trigger circuit 28 EXT INPUT Connection for applying external signal for use as a trigger Trigger from a source other than vertical signal Also used for single shot application Connection for applying external signal for ...

Page 30: ...MODE SEC DIV SEC DIV Variable Midrange CH 1 1 V IX CAL detent fully clockwise AC Midrange XI 0 2 ms CAL detent fully clockwise Trigger SLOPE LEVEL MODE SOURCE 2 Connect a signal adapter to the Channel 1 input BNC con nector labeled CH 1 or X Attach the ground lead to the collar of the EXT INPUT connector and apply the signal adapter tip to the PROBE ADJUST terminal If necessary adjust the TRIGGER ...

Page 31: ...ble CAL SEC DIV Variable CAL HORIZONTAL MODE HORIZONTAL MAG TRIGGER SLOPE 6 At this point connect the second signal adapter to the CH2 or Y input connector Set the VERTICAL MODE selector to CH 2 and TRIGGER SOURCE to CH 2 then follow steps 2 through 5 again using the Channel 2 controls 7 Now set the VERTICAL MODE selectors to BOTH NORM ALT and return both VOLTS DIV controls to 2 V IX Rotate all va...

Page 32: ... detent Best accuracy is achieved by setting the VOLTS DIV control for the largest display possible When a cable or a signal adapter is used to connect a signal the number in the IX front panel area indicates sensitivity When using a 10X probe the number in the 10X PROBE front panel area indicates sensitivity For example the setting of 1 V div with a cable or signal adapter would be 10 V div with ...

Page 33: ... ALT When BOTH channels are selected the display is time shared The CHOP mode displays each channel for a short time and mul tiplexes during the sweep to give the appearance of displaying both channels at once This mode CHOP works better than ALT for sweep speeds slower than 1 ms per division and for low repetition rate signals that make the display flicker up to 2 p s division The ALT mode displa...

Page 34: ... When selected X I0 MAG mode lets you examine details such as the entire leading edge of a pulse s second repetition of a trace up to 10 screen lengths from the trigger point Appendix A lists the sweep speeds for 10X magnification at every SEC DIV control setting The one division segment of the unmagnified trace centered on the middle vertical graticule line is expanded and displayed as the magnif...

Page 35: ...LINE triggering mode NORM This mode produces a sweep only when the triggering signal meets the criteria set by the LEVEL and SLOPE controls With NORM mode selected range of the LEVEL control is suffi cient to set any voltage threshold that can be displayed by the instrument In the absence of a triggering signal no sweep occurs Use the NORM mode for viewing infrequent events and erratic signals SGL...

Page 36: ...ous dis plays With TRIGGER SOURCE set to VERT MODE and VERTICAL MODE set to ADD or CHOP the triggering signal is the algebraic sum of the Channel 1 and Channel 2 input signals Use a composite trigger source only to view asynchronous signals simultaneously To generate a composite trigger select VERT MODE TRIGGER SOURCE and BOTH ALT VERTICAL MODE Slope Use the SLOPE control to select either the risi...

Page 37: ...t signal transitions will be highly distorted and extra neous noise will be induced without the probe ground connec tion and or with extra ground connections from the 2205 to the circuit being tested Probe Compensation Optional 10X Probe Misadjustment of probe compensation is a common source of measurement error Due to variations in oscilloscope input characteristics probe compensation should be c...

Page 38: ...veform fidelity and accuracy use only high quality low loss coaxial cables When you use 50 XI or 75 XI coaxial cable attach a matching external terminator Some high frequency response will be lost without external termination 2 14 2205 Operator s ...

Page 39: ...SECTION 3 APPLICATIONS 2205 Operator s ...

Page 40: ......

Page 41: ...l to either the CHI or the CH2 input connec tor and set the VERTICAL MODE selector to display the chan nel used 2 Set the appropriate VOLTS DIV control to display about 5 divisions of the waveform and ensure that the VOLTS DIV variable control is in the CAL detent 3 Adjust the TRIGGER LEVEL control to obtain a stable display 4 Rotate the SEC DIV control to a setting that displays at least one cycl...

Page 42: ...se of hum or noise on the signal a more accurate result can be obtained by measuring from the top of a peak to the top of a valley This will eliminate trace width from the measurement 8 Calculate the peak to peak voltage using the following for mula vertical VOLTS DIV Vp p deflection x setting divisions 10X Probe lf a IX probe is being used for the measurement use the IX VOLTS DIV setting 3 2 2205...

Page 43: ...ut coupling to GND 3 Vertically position the trace to the center horizontal graticule line This establishes the ground reference location NOTE If the measurements are to be made relative to a voltage level other than ground set the input cou pling switch to DC and apply the reference voltage to the input connector Then position the trace to the horizontal reference line 4 Set the input coupling co...

Page 44: ... the point on the waveform at which the level is to be determined see Figure 3 2 level 1 A 0 ZERO VOLT REFERENCE i 0 LEVEL 1 B 6717 05 Figure 3 2 Instantaneous voltage measurement 9 Calculate the instantaneous voltage using the following for mula Instan vertical polarity VOLTS DIV taneous deflection x or x setting Voltage divisions 10X Probe lf the signal adapter is being used for the measurement ...

Page 45: ... waveform displayed is the difference between the signals ap plied to the Channel 1 and Channel 2 inputs CHI CH2 When both VOLTS DIV controls are set to the same deflection factor the deflection factor of the ADD trace is equal to the deflection factor indicated by either VOLTS DIV control The following general precautions should be observed when us ing ADD VERTICAL MODE 1 Do not exceed the input ...

Page 46: ...s the undesired portion of the Channel 1 display see Figure 3 3 top 5 Now set the middle and right VERTICAL MODE selectors to CH2 INVERT and ADD Slightly readjust the CH2 VOLTS DIV variable control for maximum cancellation of the undesired signal component Figure 3 3 bottom Amplitude Comparison Ratio In some applications it may be necessary to establish a set of deflection factors between step set...

Page 47: ...jection 2 Set the amplitude of the reference signal to 5 vertical divi sions by adjusting the VOLTS DIV and VOLTS DIV Variable CAL controls 3 Disconnect the reference signal and apply the unknown sig nal to the same channel input Adjust the vertical position of the waveform so that its bottom edge just touches the 0 line on the crt 4 Horizontally position the waveform so that its topmost fea tures...

Page 48: ...on display TIME MEASUREMENTS Time Duration To measure time between two points on a waveform use the following procedure 1 Apply the signal to either the CHI or the CH2 input connec tor and set the VERTICAL MODE selector to display the chan nel used 2 Adjust the TRIGGER LEVEL control to obtain a stable display 3 Set the SEC DIV control to display between one and two complete repetitions of the wave...

Page 49: ...he horizontal distance between the time measure ment points 6 Calculate time duration using the following formula horizontal SEC DIV distance x control Time _ divisions setting Duration magnification factor EXAMPLE In Figure 3 5 the distance between the time meas urement points is 8 3 divisions and the SEC DIV setting is 2 ms per division HORIZONTAL MAG is set to X I 2205 Operator 8 3 9 ...

Page 50: ...z Rise Time Rise time measurements use the same methods as time dura tion except that the measurements are made between the 10 and 90 points on the low to high transition of the selected waveform Fall time is measured between the 90 and 10 points of the high to low transition of the waveform 1 Apply a signal to either the CHI or the CH2 input connector and set the VERTICAL MODE selector to display...

Page 51: ...nd 90 amplitude points 5 Measure the horizontal distance between the 10 and 90 points Figure 3 6 Points A and B and calculate time dura tion using the following formula horizontal SEC DIV distance x control Rise _ divisions setting Time magnification factor EXAMPLE In Figure 3 6 the horizontal distance between the 10 and 90 amplitude points is 5 divisions and the SEC DIV switch is set to 1 ps per ...

Page 52: ... reference signal to the CHI input connector and ap ply the comparison signal to the CH2 input 4 Set both VOLTS DIV controls for a display of about five divi sions 5 Set VERTICAL MODE to BOTH then select either ALT or CHOP depending on the frequency of the input signals 6 If the two signals are opposite in polarity set the middle VERTICAL MODE selector to CH2 INVERT to invert the Chan nel 2 displa...

Page 53: ...lculate the time difference using the following formula horizontal SEC DIV difference x control Time _ divisions setting Difference magnification factor EXAMPLE In Figure 3 7 the SEC DIV control is set to 50 j j s per division and HORIZONTAL MAG is set to X I0 The horizontal difference between waveform measurement points is 4 5 divi sions Time Difference 50 us div x 4 5 div 10 22 5 jis 2205 Operat...

Page 54: ...ALT or CHOP depending on the frequency of the input signals The reference signal should precede the comparison signal in time 5 If the two signals are opposite in polarity set the middle VERTICAL MODE switch to CH2 INVERT to invert the Channel 2 display 6 Set both VOLTS DIV and VOLTS DIV Variable CAL controls to display equal amplitude waveforms 7 Adjust the TRIGGER LEVEL control for a stable disp...

Page 55: ... graticule Phase _ difference x calibration Difference divisions deg div EXAMPLE In Figure 3 8 the horizontal difference is 0 6 divi sion with a graticule calibration of 45 per division Substituting the given values into the phase difference formula Phase Difference 0 6 div x 45 div 27 CHANNEL 1 CHANNEL2 MEASURE TIME FROM A TO B HORIZONTAL DIFFERENCE Figure 3 8 Phase difference 2205 Operator s 3 1...

Page 56: ...tion will be 4 5 per division 45 division divided by 10 Figure 3 9 shows the same signals illustrated in Figure 3 8 but horizontally magnified by a factor of 10 EXAMPLE In Figure 3 9 the 10X magnified display results in a horizontal difference of six divisions between the two signals Substituting the given values into the phase difference formula Phase Difference 6 div x 4 5 div 27 CHANNEL 1 REFER...

Page 57: ...e to obtain stable triggering 4 Set the appropriate VOLTS DIV control to display one divi sion or more of composite video signal 5 To change the TV field being displayed momentarily inter rupt the trigger signal by setting the input coupling to GND then back to DC or AC until the desired field is displayed NOTE To examine a TV Field signal in more detail set HORIZONTAL MAG to X I0 6 To display eit...

Page 58: ... the LEVEL control slightly clockwise to obtain stable triggering 5 Set the appropriate VOLTS DIV control to display one divi sion or more of composite sync signal NOTE To examine a TV Line signal in more detail set HORIZONTAL MAG to X I0 6 To display a selected TV Line pulse first trigger the sweep on a TV Field sync pulse Use the HORIZONTAL POSITION control to select the desired line pulse then ...

Page 59: ... used 3 Apply the Z modulation signal to the connector labeled EXT INPUT or Z When the Z modulation and the vertical input signals are syn chronized Z modulation is seen as gaps in the trace at the modulation frequency The size of the gap depends upon the mark to space ratio of the Z modulation signal The positive going portion of the Z modulation signal decreases display brightness 2205 Operator ...

Page 60: ...F M ...

Page 61: ...SECTION 4 CHECKS AND ADJUSTMENTS 2205 Operator s ...

Page 62: ...B 3 ...

Page 63: ...set instrument controls see Learning the Controls in Section 2 and obtain a baseline trace 2 Use the Channel 1 POSITION control to move the baseline trace to the center horizontal graicule line 3 The trace should be parallel to the center horizontal graticule line If it is not use a small flat bit screwdriver to adjust the TRACE ROTATION control on the front panel so that the trace aligns with the...

Page 64: ...ontrol to vertically center the display 7 Check the waveform presentation for overshoot and rolloff see Figure 4 1 If necessary perform step 8 to adjust the probe low frequency compensation Otherwise proceed to step 9 8 Rotate the sleeve on the probe head to expose the LF COMP adjustment capacitor see Figure 4 2 Use a low reac tance alignment tool to adjust LF COMP and obtain a square or nearly sq...

Page 65: ... Channel 2 probe tip to the PROBE ADJUST output terminal 10 Obtain a 5 division signal display and vertically center the trace 11 Repeat step 7 for the Channel 2 probe LFCOMP ROTATING PROBE SLEEVE i C 1 TIP 6 7 1 7 1 4 Figure 4 2 Locating the low frequency compensation adjustment 2205 Operator s 4 3 ...

Page 66: ......

Page 67: ...SECTION 5 PERFORMANCE CHARACTERISTICS 2205 Operator s ...

Page 68: ...5 ...

Page 69: ...Class 5 equipment except where otherwise noted Mechanical characteristics of the instrument are listed in Table 5 3 TABLE 5 1 Electrical Characteristics Characteristics Performance Requirements VERTICAL DEFLECTION SYSTEM Deflection Factor Range 5 mV per division to 5 V per division in a 1 2 5 sequence of 9 steps Accuracy 3 Variable Control Range Continuously variable and un calibrated between step...

Page 70: ...30 input Characteristics Resistance 1 M fi 2 Capacitance 25 pF 2 pF Maximum Safe Input Voltage DC or AC Coupled 400 V dc peak ac or 800 V ac p p to 10 kHz or less Common Mode Rejection Ratio CMRR At least 10 to 1 at 20 MHz Trace Shift With VOLTS DIV Switch Rotation 0 75 division or less Variable control in CAL detent With VOLTS DIV Variable Control Rotation 1 0 division or less With Channel 2 Inve...

Page 71: ...l 40 mV 150 mV Lowest Usable Frequency in P P AUTO Mode 2 0 Hz TV FIELD Mode 1 0 division of composite sync External Input Resistance i m a 10 Caoacitance 25 oF 2 5 dF Maximum Voltage 400 V dc peak ac or 800 V ac p p at 10 kHz or less Trigger Level Range NORM Mode 15 divisions referred to the appropriate vertical input EXT Source At least 1 6 V 3 2 V p p EXT 10 Source At least 16 V 32 V p p 2205 O...

Page 72: ... C to 35 C 3 4 0 C to 40 C 4 5 Variable Control Range Continuously variable and un calibrated between calibrated step settings Decreases cali brated sweep speeds at least by a factor of 2 5 Sweep Linearity Magnified XI X I0 5 7 Position Control Range Start of sweep to 10th division in X I and to 100th division in X I0 will position past the center vertical graticule line Registration of Unmagni fi...

Page 73: ...oltage ac p p to 10 kHz or less X Y OPERATION XI MODE Deflection Factors Same as Vertical Deflection System with Variable controls in CAL detents Accuracy X Axis 5 Y Axis Same as Vertical Deflection System Bandwidth 3 dB X Axis Dc to at least 1 MHz Y Axis Same as Vertical Deflection System Phase Difference Between X and Y Axis Amplifiers 3 from dc to 50 kHz PROBE ADJUSTMENT SIGNAL OUTPUT Voltage i...

Page 74: ...g 95 V ac to 128 V ac 230 V Setting 185 V ac to 250 V ac Line Frequency 48 Hz to 440 Hz Maximum Power Consumption 40 W 60 VA Line Fuse 115 V Setting UL198 6 3AG V x 1V4 inch 0 75 A Slow 230 V Setting 0 5 A Slow CATHODE RAY TUBE Display Area 80 by 100 mm Standard Phosphor GH P31 Nominal Accelerating Voltage 1800 V 10 5 6 2205 Operator s ...

Page 75: ...dity Operating 30 C to 40 C 85 0 5 Nonoperating 30 C to 60 C 85 0 5 Vibration Operating 15 minutes along each of three major axes at a total displace ment of 0 015 inch p p 2 4 g at 55 Hz with frequency varied from 10 Hz to 55 Hz to 10 Hz in one minute sweeps Hold for 10 minutes at 55 Hz in each of three major axes All major resonances must be above 55 Hz Shock Operating and Nonoperating 30 g half...

Page 76: ...ing Weight 9 1 kg 20 0 lbs or less Height 138 mm 5 4 in Width With Handle 379 mm 14 9 in Without Handle 327 mm 12 9 in Depth Without Front Cover 441 mm 17 4 in With Optional Front Cover 455 mm 17 9 in With Handle Extended 516m m 2 0 3 in Figure 5 1 Maximum input voltage versus frequency derating curve for CH 1 OR X CH 2 OR Y and EXT INPUT connectors 5 8 2205 Operator s ...

Page 77: ...SECTION 6 OPTIONS AND ACCESSORIES ...

Page 78: ...6 ...

Page 79: ...ributor STANDARD ACCESSORIES Each instrument is shipped with the following standard accesso ries Quantity Description Part Number 2 1 1 1 1 1 Signal Adapters Operator s Manual Power Cord and Fuse Power Cord Clamp Screw Washer 103 0275 00 070 6717 00 Per option ordered see Table 6 1 343 0003 00 213 0882 00 210 0803 00 OPTIONS Option 02 This option is intended for users who need added front panel pr...

Page 80: ...onfiguration that permits easy installation into virtually any 19 inch wide electronic equipment rack All hardware is supplied for mounting the instrument into the main frame Complete rack mounting instructions are provided in a separate document These instructions also contain the procedures for converting a standard instrument into the Option 1R configura tion by using the separately orderable r...

Page 81: ...able power cord and fuse configuration ordered by the customer Table 6 1 identifies the Tektronix part numbers for international power cords and as sociated fuses Additional information about power cord options is contained in Section 1 Preparation for Use 2205 Operator s 6 3 ...

Page 82: ... V 3AG i 4 x 1V4 Slow 159 0032 00 Option A2 United Kingdom Power Cord 2 5 m 161 0104 07 Fuse 0 5 A 250 V 3AG i 4 x 1V4 Slow 159 0032 00 Option A3 Australia Power Cord 2 5 m 161 0104 05 Fuse 0 5 A 250 V 3AG i 4 x W Slow 159 0032 00 Option A4 North America Power Cord 2 5 m 161 0104 08 Fuse 0 5 A 250 V 3AG i 4 x 1V4 Slow 159 0032 00 Option A5 Switzerland Power Cord 2 5 m 161 0167 00 Fuse 0 5 A 250 V ...

Page 83: ...t Panel Protective Cover and Accessory Pouch 020 1514 00 Hand Carrying Case 016 0792 01 CRT Light Filter Clear 337 2775 02 Rack Mount Conversion Kit 016 0819 02 Viewing Hoods Collapsible Polarized Binocular 016 0592 00 016 0180 00 016 0566 00 Probe 10X 2 m with accessories P6103 Alternative Power Cords European United Kingdom 020 0859 00 020 0860 00 Australian North American Switzerland 020 0861 0...

Page 84: ...3 AM503 Current Probe Amplifier 134 Active Probe 10X FET P6202A Active probe Power Supply 1101A Ground Isolation Monitor A6901 Isolator for multiple inde pendently referenced differential measurements A6902B DC Inverter 1107 DC Inverter Mounting Kit 016 0785 00 Portable Power Supply 1105 Battery Pack 1106 Oscilloscope Cameras Low cost C 5C Option 04 Motorized C 7 Option 03 and Option 30 Portable I...

Page 85: ...ed Time Division X I0 0 5 s 50 ms 0 2 s 20 ms 0 1 s 10 ms 50 ms 5 ms 20 ms 2 ms 10 ms 1 ms 5 ms 5 ms 2 ms 2 ms 1 ms 1 ms 5 ms 50 is 2 ms 20 is 1 ms 10 is 50 is 5 is 20 is 2 is 10 is 1 JlS 5 is 5 is 2 is 2 ps 1 IS 1 ps 5 is 50 ns 2 is 20 ns 1 1S 10 ns 2205 Operator s A 1 ...

Page 86: ......

Page 87: ... be shipped to a Tektronix Service Center for service or repair attach a tag to the instrument showing the follow ing Owner with address name of the person at your firm who can be contacted complete instrument type and serial number and a description of the service required 3 Wrap the instrument with polyethylene sheeting or equivalent to protect the outside finish and to prevent entry of packing ...

Page 88: ......

Page 89: ...nel 1 and Channel 2 algebraically ALTERNATE ALT Shows CH 1 and CH 2 alternately first one sweep of Channel 1 then one sweep of Channel 2 Alternating Coupling AC Static signal components are blocked and only the alternating components of the input signal reach the channel BOTH Displays CH 1 and CH 2 in ALT CHOP or ADD mode CAL Changes the variable scale factor up to 2 5 times the VOLTS DIV setting ...

Page 90: ...onnection to signal source Magnified times 1 MAG X I Magnifies the SEC DIV by 1 Magnified times 10 MAG X I0 Magnifies the SEC DIV by 10 POSITION Moves the trace horizontally on the screen PROBE ADJUST Provides a square wave for use as a reference when adjusting compensation on 10X probes Seconds Division SEC DIV Lets you select the rate at which the beam sweeps across the screen TRIGGER CONTROLS C...

Page 91: ... point will occur on the raising or falling edge of the signal Trigger Ready TRIG1 D Lights when the sweep is triggered Television Field TV FIELD Trigger on tv fields Television Line TV LINE Trigger on tv lines Vertical Mode VERT MODE Trigger source is determined by the Vertical Mode OTHERS Alternation A change in polarity like a positive changing directions to a negative and back again Cathode Ra...

Reviews: