www.tecnaonline.com - [email protected]
E N G L I S H
Mark all the checked fittings, with a permanent marker for instance.
4. Remove the protective caps of the hydraulic breaker and support device. Keep them safely since
they have to be used again when closing the connections.
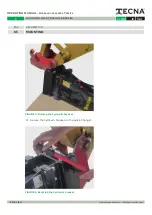
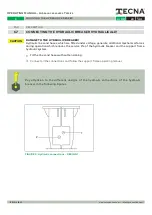
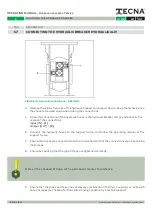
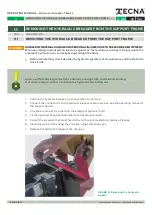
5. Screw the connections of the hydraulic hoses in the hydraulic breaker and pay attention to the
names of the connections:
Input (IN) -
(1)
Output (OUT) -
(2)
6. Connect the hydraulic hoses to the support frame and follow the operating manual of the
support frame.
7. Ensure that hoses are connected to all the connections or that the connections are closed using
lock screws.
8. Ensure by checking that the pipe fittings are tightened correctly.
9. Ensure that the pipes and hose lines and every combination of fittings, couplings or joints with
hoses or pipes are checked for their safe working condition by a technical expert.
FIGURE 10: Hydraulic connections – DESIGN 2
PAR
DESCRIPTION
6.7
CONNECTING THE HYDRAULIC BREAKER HYDRAULICALLY
24
/44
REV
0.0
MOUNTING THE HYDRAULIC BREAKER
6
OPERATING MANUAL
-
H
ydraulic
breakers
T
series


