background image

47

Spazio Forma

Contents

The goal arc and dial

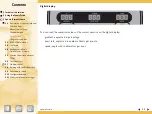
The buttons, enabled after a goal is selected, are for increasing or decreasing the selected
goal value during the exercise. Depending on the type of goal, the value increases or decreases
in steps of 1 minute, 0.1 km or 10 calories each time the key is pressed, or faster if the key is
held down.

The arc of LEDs lights up from left to right in time with the workout,
until the set goal is reached. The LED corresponding to the current
time/distance/calories portion blinks.

The type of goal selected is lit up in the arc during the exercise. In
the dial, the display of the numerical value for the selected goal,
which proceeds incrementally, alternates with that of all the
messages.

1 Technical information

2 Using the Spazio Forma

3 Spazio Forma software

3.1

Description of the control panel

Function keys

Manual control keys

The number pad

Digital display

The goal arc and dial

3.2

QUICK START workout

3.3

Cool down

3.4

Workouts with Goals:
Time, Calories, Distance

3.5

Constant heart rate workout
(CPR)

3.6

The fitness test

3.7

Profile workout

3.8

Training with the Wellness Key

3.9

Performance index

3.10

Configuration menu

3.11

Other control panel messages

Summary of Contents for Spazio Forma

Page 1: ...ct C Electrical specifications D Equipment classification E CE Mark F Serial number and date of manufacture G Certification mark for the USA and Canada H Product code 1 Technical information 1 1 Equip...

Page 2: ...chnical information 1 1 Equipment identification 1 2 Description of the equipment 1 2 1 Technical data 1 2 2 Main components 1 2 3 Accessories 1 2 4 Safety devices and notices 1 3 Installation and ass...

Page 3: ...onformed to 55014 1 55014 2 55022 Electrical isolation class according to EN60601 1 Class I Marks and certificates CE ULUS Calculated with user of weight 85 kg 187 lb Normal non waterproofed equipment...

Page 4: ...tread surface 4 Footrests for getting on and off Spazio Forma 5 Central riser supports the control panel and side grips 6 Tray for standing the water bottle or other useful items on during the workout...

Page 5: ...V T 11 User manual 12 Warranty certificate 13 Power supply cable 14 Lubricating oil 15 Water bottle 16 Side grips fixing kit 1 Technical information 1 1 Equipment identification 1 2 Description of the...

Page 6: ...start the equipment again Danger The snap off safety switch must be removed from the Spazio Forma control panel at the end of the workout and kept in a safe place to prevent unsupervised use of the eq...

Page 7: ...ise starts or finishes or if the heart rate is high D Main switch turns the equipment s power on and off 1 Technical information 1 1 Equipment identification 1 2 Description of the equipment 1 2 1 Tec...

Page 8: ...to make the area safe and relaxing place to exercise in there is a safety area of free space as shown in the illustration that the floor is flat stable and vibration free and strong enough to bear th...

Page 9: ...the crate there is the equipment folded up and resting on the pallet the side grips The lifting and carrying can be done with normal lifting equipment To protect people and property carefully assess...

Page 10: ...ckaging materials for re use in case of a move Warning Observe the legally stated urban waste disposal procedures when disposing of the packaging material cont 1 Technical information 1 1 Equipment id...

Page 11: ...els touch the ground 1 Technical information 1 1 Equipment identification 1 2 Description of the equipment 1 3 Installation and assembly 1 3 1 Place of installation 1 3 2 Unpacking 1 3 3 Assembly 1 3...

Page 12: ...nding holes in the riser two near the guard at the bottom and two under the control panel cont 1 Technical information 1 1 Equipment identification 1 2 Description of the equipment 1 3 Installation an...

Page 13: ...rews C behind the control panel cont 1 Technical information 1 1 Equipment identification 1 2 Description of the equipment 1 3 Installation and assembly 1 3 1 Place of installation 1 3 2 Unpacking 1 3...

Page 14: ...equipment is fully assembled on the floor check that it is level if it isn t proceed with levelling 1 Technical information 1 1 Equipment identification 1 2 Description of the equipment 1 3 Installat...

Page 15: ...holding the cam b still in position cont 1 Technical information 1 1 Equipment identification 1 2 Description of the equipment 1 3 Installation and assembly 1 3 1 Place of installation 1 3 2 Unpacking...

Page 16: ...eight screws g four on each side and remove the guard d cont 1 Technical information 1 1 Equipment identification 1 2 Description of the equipment 1 3 Installation and assembly 1 3 1 Place of install...

Page 17: ...nd the two screws e 1 Technical information 1 1 Equipment identification 1 2 Description of the equipment 1 3 Installation and assembly 1 3 1 Place of installation 1 3 2 Unpacking 1 3 3 Assembly 1 3 4...

Page 18: ...moving the equipment always check that it is level in order to guarantee the correct working 1 Technical information 1 1 Equipment identification 1 2 Description of the equipment 1 3 Installation and...

Page 19: ...ing and unplugging can be done easily and safely When plugging in the switch on the equipment must be in the 0 position i e the equipment must be switched off Plug the power cable first into the equip...

Page 20: ...ductor can result in a risk of electrical shock Check with a qualified electrician or serviceman if you are in doubt as to whether the product is properly grounded Do not modify the plug provided with...

Page 21: ...able from the wall socket clean the control panel with a damp but not wet cloth Every week clean the equipment completely with the equipment turned off clean the external parts with a damp sponge rais...

Page 22: ...e the blown fuse with a new one as supplied 10 A 250 V T Fit the fuse holder back into its housing making sure it clicks in properly Information If the fuses blow repeatedly lubricate the treadmill If...

Page 23: ...uipment running Set the adjustment screw i located at the back of the equipment opposite the control panel support riser so that the belt is centrally aligned with the back roller Warning The treadmil...

Page 24: ...the belt and table as shown in the illustration Oil the tread belt in several different places without applying an excessive amount of oil Start the treadmill at a speed of 5 km h and walk on it for a...

Page 25: ...d Power supply cable connector not plugged into equipment Fuses blown Plug the power supply cable into the wall socket Check the power supply in the mains socket in question by plugging in another app...

Page 26: ...quipment far enough away to stop signal interference minimum distance between two units cm 80 Find the interference source e g electrical domestic appliance and move it away or move Spazio Forma Conta...

Page 27: ...ct the Technogym Technical Support Service you must give the following information equipment model date of purchase serial number precise description of the problem encountered Warning Work on the equ...

Page 28: ...st at a room temperature between 10 C and 25 C and relative humidity between 20 and 90 For better storage use the original packing materials 1 Technical information 1 1 Equipment identification 1 2 De...

Page 29: ...c which must be disposed of in compliance with urban waste and refuse regulations contacting a company specialised in urban and environmental sanitation Disposing of the chest band The chest band whic...

Page 30: ...t band is worn the heart rate is monitored constantly and shown on the display so that the speed most appropriate to the user s physical condition weight and age can be worked out and in accordance wi...

Page 31: ...particular area If you feel ill during the workout dizziness chest pains etc stop exercising immediately and consult a doctor If the beep sounds for 5 seconds during the exercise and the message HIGH...

Page 32: ...onstitute a hazard Do not use the equipment near inflammable liquids or gas The equipment must not be placed close to heat sources or close to sources of electromagnetic waves e g televisions electric...

Page 33: ...e requirements stated in the User manual the electrical system must conform to the standards and legal requirements in the country of use the installation maintenance and setting must be done by quali...

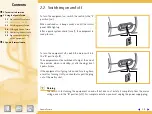
Page 34: ...after having closet Spazio Forma If the equipment isn t going to be used for a long time as well as turning it off you should also pull the plug out of the wall socket Warning The switch is for turnin...

Page 35: ...quick self control reset the equipment is ready for use When the equipment is folded it is blocked in position by a safety stop To unfold it press on the release pedal a and pull the treadmill downwa...

Page 36: ...lded up At this point you can open the belt see section 2 3 or switch off Spazio Forma see section 2 2 The equipment will lean downwards slightly at this point grip the rear frame and fold up the belt...

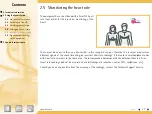
Page 37: ...quipment units with heart rate receivers in the same area the recommended minimum distance between them is 80 cm Heart rate readings will not be accurate near electromagnetic radiation sources TVs cel...

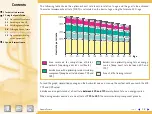
Page 38: ...rt rate between 60 and 70 Zone of little training interest Heart rate per minute Age To read the graph simply find your age on the horizontal axis and scan up the vertical until you reach the 60 70 an...

Page 39: ...maximum rate unless you are an athlete engaged in competitive sport Warning The sole function of the heart rate monitor is to display the heart rate during exercise and cannot be used for medical card...

Page 40: ...e two side grips make it safer when you first use Spazio Forma later on however it s better to walk or run without any support to improve your balance and posture At a speed of about 6 7 km h the fast...

Page 41: ...pace must be regular with legs and feet parallel to the treadmill centre line Danger Walking or running backwards is prohibited Using the equipment two at a time is prohibited To rest without stopping...

Page 42: ...y after unfolding the treadmill see sections 2 3 and 2 4 F A B E C D 1 Technical information 2 Using the Spazio Forma 3 Spazio Forma software 3 1 Description of the control panel Function keys Manual...

Page 43: ...fitness test starts one of the 6 different route types proposed by Technogym or for programming up to 3 personal route types The profile duration depends on one of the GOALS i e time distance or calo...

Page 44: ...se for a short pause During the pause all the control panel settings are blocked and the only keys enabled are the QUICK START restart and STOP end keys starts an exercise or restarts it after a pause...

Page 45: ...figures the number pad also has CLEAR and ENTER keys 1 Technical information 2 Using the Spazio Forma 3 Spazio Forma software 3 1 Description of the control panel Function keys Manual control keys Th...

Page 46: ...nformation 2 Using the Spazio Forma 3 Spazio Forma software 3 1 Description of the control panel Function keys Manual control keys The number pad Digital display The goal arc and dial 3 2 QUICK START...

Page 47: ...es portion blinks The type of goal selected is lit up in the arc during the exercise In the dial the display of the numerical value for the selected goal which proceeds incrementally alternates with t...

Page 48: ...rrent minute blinks in the arc The speed and gradient edit keys and the keys and are enabled At the end of the exercise the speed and gradient decrease for the cool down 1 Technical information 2 Usin...

Page 49: ...total distance covered or the total calories burned this value is alternated with the display of the workout results average H R 120 bpm if the heart rate monitor has been used for at least 3 minutes...

Page 50: ...t Press the QUICK START key to start the equipment emits a beep and the treadmill starts at gradient 0 and speed 0 8 km h The age and weight values are set initially and then the body weight will be r...

Page 51: ...ed how many calories have been burned and what distance has been covered TIME 3 50 CALORIES 35 DISTANCE 3 05 KM The following keys are enabled the speed and gradient edit keys the STOP and PAUSE keys...

Page 52: ...Press the key for the selected GOAL time min 30 calories 320 distance km 20 5 Type in the goal value with the number keys and then press ENTER to confirm and proceed age 30 Type in the age with the nu...

Page 53: ...e goal arc lights up proportionally from left to right until the entire set goal value has expired the goal s numerical value is shown in the goal dial as it increases and alternates with the display...

Page 54: ...keeping the same goal i e time calories or distance H R NOT DETECTED At the end of the exercise the speed and gradient decrease for the cool down 1 Technical information 2 Using the Spazio Forma 3 Spa...

Page 55: ...number keys and then press ENTER to confirm and proceed gender M 1 F 2 1 Press number key 1 to select male gender or number key 2 to select female gender Then press ENTER to confirm and proceed press...

Page 56: ...the set heart rate the goal arc lights up from left to right until all the step time expires Only the STOP key is enabled for canceling the test The test cannot be interrupted for a pause When the ST...

Page 57: ...15 0 level 10 1 Technical information 2 Using the Spazio Forma 3 Spazio Forma software 3 1 Description of the control panel 3 2 QUICK START workout 3 3 Cooldown 3 4 Workouts with Goals Time Calories D...

Page 58: ...not needed for profile workouts When the dedicated key is pressed you are prompted to select a profile select profile 1 6 Press one of the number keys for profiles from 1 to 6 then press ENTER to conf...

Page 59: ...do the exercise at a higher effort level than that indicated by the fitness test Always check that the heart rate is not greater than 90 of the maximum rate see section 2 5 for the calculation and se...

Page 60: ...s changed the whole profile is displayed in the goal dial and the new step flashes for a few seconds The following keys are enabled the STOP and PAUSE keys the speed and gradient edit keys the goal va...

Page 61: ...the effort level based on the test result with the number keys then press ENTER to confirm and proceed Danger You are advised not to do the exercise at a higher effort level than that indicated by th...

Page 62: ...goal dial and the new step flashes for a few seconds The following keys are enabled the STOP and PAUSE keys the speed and gradient edit keys which edit the heart rate in the constant heart rate profi...

Page 63: ...stant speed and gradient values or number key 2 to program a constant heart rate profile select goal TIME or DISTANCE Press the key for the selected GOAL For the CPR profile you must select the execut...

Page 64: ...ge with the number keys and then press ENTER to confirm and proceed For CPR profiles you must set selected GOAL value and the percentage of the theoretical maximum H R to be kept constant step 1 time...

Page 65: ...step 2 distance km 3 5 or press ENTER to end the programming and save the profile profile 01 saved The personal profile is now available together with the other six profiles when the key is pressed 1...

Page 66: ...yed always train with chest band always train without chest band Press ENTER to confirm and proceed or CLEAR to delete The assessment test The first exercise is an assessment test which has the same c...

Page 67: ...e 6 somewhat strong 7 strong 8 very strong 9 extremely strong The and goal keys can also be used to increase or decrease the value in the arc until achieving the desired value Then press ENTER to conf...

Page 68: ...d and gradient decrease for the cool down The modifications to the load and value of the goal carried out during an exercise will also apply to the following session according to a specific progressio...

Page 69: ...e profile of the last session The Wellness Key can be reset in the configuration menu when reset the Wellness Key returns to the same condition as when purchased 1 Technical information 2 Using the Sp...

Page 70: ...ate The criteria used to calculate the performance index makes it possible to compare tests taken by people of different ages In any event you are advised to compare the results of different tests tak...

Page 71: ...he options and proceed press ENTER when the chosen option is displayed in the goal dial Press the CLEAR key to go back to standby Whenever CLEAR is pressed in whatever message all the changes made up...

Page 72: ...ue shown on the goal dial Enter the new setting with the number keys and then press ENTER to confirm and go back to the main configuration menu Press and hold CLEAR to go back to the main configuratio...

Page 73: ...d 1 Technical information 2 Using the Spazio Forma 3 Spazio Forma software 3 1 Description of the control panel 3 2 QUICK START workout 3 3 Cooldown 3 4 Workouts with Goals Time Calories Distance 3 5...

Page 74: ...tting in the configuration menu is reached see previous section the exercise stops and the cool down starts May appear in GOAL CPR calorie distance and QUICK START exercises wear the chest band In exe...

Page 75: ...RESET If the emergency stop has been triggered the equipment stops immediately and remains blocked until the RESET key is pressed after a few seconds from the key being pressed the equipment goes int...

Reviews: