background image

>

Press the 

OK

key now to confirm, and an automatic

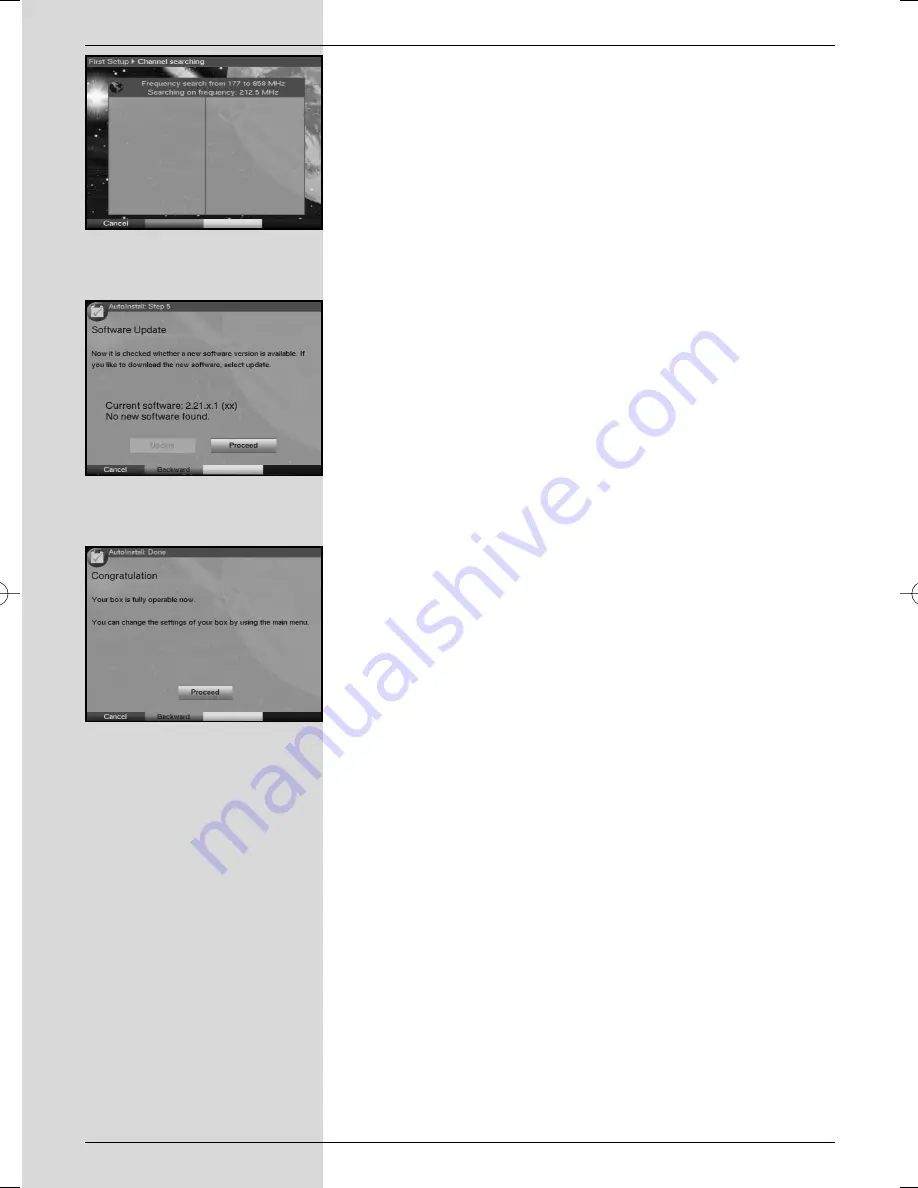
programme scan will be carried out. The entire recep-
tion range of the receiver will be scanned for digital
programmes This procedure may take several minu-
tes. Please note any messages displayed on the
screen 

(Fig. 5-6)

.

Updating the software

When the programme scan has been completed, the digital
receiver will check whether a new version of the software is
available for your unit. If a new version is available, you can
perform an automatic software update.
>

Use the 

arrow keys left/right

to select the field

Update

, and confirm by pressing 

OK

(Fig. 5-7)

The

new software for the receiver will now be downloaded.
This procedure may take several minutes. 

Exiting from the installation assistant

>

Read the message displayed 

(Fig. 5-8)

and confirm by

pressing 

OK

, to return to normal operation.

14

(Fig. 5-8) 

(Fig. 5-7) 

(Fig. 5-6) 

Bedanl DigiPal2_DigitMod T1engl  15.06.2005  16:33 Uhr    Seite  14

Summary of Contents for DigiPal 2

Page 1: ...for the reception of DVB T TV and radio channels Operating Manual DigiPal 2 DigitMod T1...

Page 2: ...me difference to GMT hours 15 6 2 2 Country 16 6 2 3 Remote control code 16 6 2 4 Antenna feed 5V 16 6 2 5 Stand by clock 16 6 3 Audio Video settings 17 6 3 1 Picture format TV set 17 6 3 2 Language A...

Page 3: ...4 7 2 Marking a programme 27 7 14 7 3 SFI Timer programming 28 7 14 7 4 SFI Programme overview 28 7 14 7 5 SFI overview by programme type category 29 7 14 8 Exiting SFI 30 7 15 Timer recording 30 8 Ch...

Page 4: ...a 47 11 Trouble shooting guide 50 Notes 51 Index 53 For daily use 54 6 Your unit carries the CE logo and complies with all relevant EU standards Not responsible for printing errors subject to change w...

Page 5: ...uage select Info Stop Menu on off Sound on off mute EXTERNAL Multi function keys TV Radio mode Volume SFI EPG Programme Volume Programme Video text OK Arrow key right Arrow key left Arrow key up Arrow...

Page 6: ...ed 5V 30mA switchable via OSD RS 232 interface Audio outputs analogue Audio output digital electric Programme selection up down On Standby LED display LED display Input terrestrial antenna antenna fee...

Page 7: ...ensible as necessary The range of features of your unit is constantly being expan ded in the form of software updates This may lead to addi tional operating steps becoming necessary which are not yet...

Page 8: ...ction or volume adjustment Chapter 8 contains information on how to add new programmes and how to change the programme order Technical terms used in the operating manual are explained in Chapter 9 Tec...

Page 9: ...nit on a smooth horizontal surface and do not place any objects on top of the unit The top cover contains air slits which permit heat to escape from the interior of the unit Do not place any burning i...

Page 10: ...DVB receiver and the televi sion set c Connection between the antenna output of the DVB T receiver and the antenna input of the television set d Scart connection of a video recorder with the VCR Scar...

Page 11: ...is will switch automatically to AV mode when the digital receiver is switched on and will thus switch to DVB T operation 4 2 2 Using HF cable If you wish to continue receiving any analogue programmes...

Page 12: ...ital receiver or other components being damaged or destroyed f When you have completed making all the connections use the mains cable DigiPal 2 or power adapter DigitMod T1 supplied to connect the rec...

Page 13: ...the arrow keys up down to select the prefer red audio channel language Fig 5 3 When the installation assistant has been completed your language selection here will be used to sort the programmes in yo...

Page 14: ...leted the digital receiver will check whether a new version of the software is available for your unit If a new version is available you can perform an automatic software update Use the arrow keys lef...

Page 15: ...ormance of your DVB receiver you must still set this to your personal preferences Press the Menu key to call up the Main Menu Use the arrow keys up down to mark the item Settings Confirm by pressing O...

Page 16: ...1 or SAT2 In this line operate any key of the appropriate remote control unit Sat1 or Sat2 to select the remote control code Press Back to return to the menu Settings or press Menu to return to normal...

Page 17: ...et 4 3 or 16 9 This function provides for automatic adjustment of the picture format bro adcast to your television set 6 3 2 Language Audio signal Use the arrow keys right left to select your preferre...

Page 18: ...nabled off Dolby Digital sound can also be switched on manually Please refer to Point 7 4 1 of this operating manual 6 4 Antenna adjustment To position the antenna in the optimum direction the receive...

Page 19: ...gramme slot 14 2 then 3 then 4 for programme slot 234 When entering multi digit programme numbers you have approx 3 seconds after pressing the key to complete your entry If you wish to enter a number...

Page 20: ...ys to enter your PIN code You can now view the programme selected or Switch to a programme that is not blocked If you have selected the option Always under Point 6 2 1 the message requiring entry of t...

Page 21: ...currently broadcast will be displayed on screen Fig 7 7 Use the arrow keys up down to select the desired language Confirm by pressing OK You can now listen to the programme in the desired langua ge Y...

Page 22: ...amme information This function allows you to view programme information rela ted to the current programme Press the Info key to display the information related to the current programme Fig 7 8 In the...

Page 23: ...r from 15 minutes to 2 hours At the end of the selected time the receiver will switch off automatically and go to stand by mode 7 12 Video text 7 12 1 Using the video text decoder of your televi sion...

Page 24: ...his key again to exit from mixed mode Stop mode Press the Stop key the message Stop will be display ed in the top left corner of the video text window This will prevent the automatic continuous paging...

Page 25: ...the receiver must be in standby mode The download procedure is indicated by the message SFld in the display If your receiver is switched on at this time the function will not be carried out You can al...

Page 26: ...listing current programmes will be displayed first The yellow bar to the right of the pro gramme name indicates the time elapsed of the current pro gramme The programme currently being viewed is high...

Page 27: ...on the numeric keys or Press Back to return to the table Next 7 14 7 SFI Functions To perform the following SFI functions call up the SFI as described in Point 7 14 3 7 14 7 1 SFI Information Use the...

Page 28: ...If necessary you can make alterations or corrections at this stage see 7 15 Press Back to return to the previous table The appropriate line will be highlighted Your receiver will be switched on at the...

Page 29: ...ro gramme Press the OK key to display the SFI overview of the marked programme 7 14 7 5 SFI overview by programme type category If you are particularly interested in certain types of program me you ca...

Page 30: ...me by means of an external recording unit e g a video recorder Please note that you must also programme your video recor der in order to record the programme If the unit was switched on by means of th...

Page 31: ...ove the marker backward or forward in the list one page at a time Press OK to accept this into the timer programming Date Use the arrow keys to mark the column Date Use the numeric keys to enter the d...

Page 32: ...tting use the arrow keys up down to mark the timer event you wish to change Press the yellow function key Change to move to the settings of the marked timer You can now effect the changes as described...

Page 33: ...you can change the pre pro gramming of your digital receiver as well as the Favourites programme list according to your preferences This function is also required to sort newly found programmes into t...

Page 34: ...keys up down to mark the selection criterion according to which the Total list is to be sorted Select e g All Programmes to indicate all available programmes in the Total list or All new to indicate...

Page 35: ...the Favourites list Press the blue function key Functions A selection window indicating the Navigator functions will be displayed Fig 8 5 Use the arrow keys up down to mark the line Remove Confirm by...

Page 36: ...r the numeric keys to move the marked program me to the desired position in the list Press the yellow function key Sort to save the pro gramme at the new position To sort several programmes simultaneo...

Page 37: ...y The Favourites list of the mode selected Radio or TV will be displayed The pro gramme currently selected will be highlighted Fig 8 8 Press the green function key to switch between radio and TV lists...

Page 38: ...enres If you are interested in particular types of programmes you can display the programme information sorted according to specific genres such as movies news etc Last used When this setting is selec...

Page 39: ...8 3 Parental control blocking programmes Your unit is equipped with a parental control function This means that important functions e g calling up the main menu can be protected from unauthorised mani...

Page 40: ...or off 8 3 3 Selecting a programme Press OK The Favourites list of the selected range TV or Radio will be displayed The programme cur rently selected will be highlighted Fig 8 12 Press the green funct...

Page 41: ...rogramme specific PID numbers After the scan has been completed a message will be displayed on screen indicating how many programmes your digital receiver has found how many of these are new and how m...

Page 42: ...t to enter the start channel or use the numeric keys to enter the start frequency Use the arrow keys up down to mark the field Stop Channel resp Stop Frequency and pro ceed as described above to enter...

Page 43: ...creen while it is still in progress When the scan is comple ted the total number of programmes found as well as the number of new programmes found will be indicated In addi tion a prompt will be displ...

Page 44: ...nu item Settings Confirm by pressing OK The sub menu Settings will be displayed Fig 8 19 Now use the arrow keys up down to mark the menu line Service Settings Confirm by pressing OK The sub menu Servi...

Page 45: ...version to be downloaded automatically the digital receiver must be in standby mode The downloading procedure is indicated by TErL followed by TEr0 to TEr9 in the display Ensure that this procedure is...

Page 46: ...ric description with the exception of European television channels broadcast in the frequency band 40 230 MHz these are denoted by letters Data compression MPEG1 MPEG2 The transmission of the current...

Page 47: ...are Update Digital television is a new medium that provides improved sound and picture quality as well as the facility to provide interactive services These new services are constantly being developed...

Page 48: ...lk 65 dB Input analogue Input level l r 0 5 V r m s nominal Input impedance 40 kOhm Volume at switch on Automatic output of volume level previously selected Dolby Digital AC3 Video parameters Output O...

Page 49: ...vents maximum 124 DigiPal 2 30 DigitMod T1 events one year in advance Remote control system RC 5 Sub system address 10 SAT 2 Modulation frequency 36 kHz Infra red wavelength 950 nm Optional remote con...

Page 50: ...ly positioned Adjust antenna position No picture no sound display on Defective or no cable connection Check all cable connections Antenna incorrectly positioned Adjust antenna position No reception wh...

Page 51: ...Notes 51...

Page 52: ...Notes 52...

Page 53: ...anual search mode 43 MPEG1 46 MPEG2 46 Navigator 19 Operating language 15 Operation 18 Parental control 39 Picture format 17 Programme information 23 Programme list management 33 Programme search mode...

Page 54: ...When entering programme numbers consisting of several digits you have approximately 3 seconds after pressing a key to complete the entry If you wish to enter a number consisting of only one or two dig...

Reviews: