background image

7 Changing basic programming

7.1 Configuring the programme list

This chapter describes how you can change and adapt the
preprogramming of your receiver as well as the Favourites
programme list to suit to your own preferences. This function
is also required to sort newly found programmes into the list
after a programme search. 
Please note the following: 
Youir receiver is provided with two programme lists, the
Favourites list and the Total list. The Favourites programme
list contains all the programmes that you have taken into this
list, using the procedure described below. The Total list
contains all programmes. 
This chapter also describes how you can delete a program-
me, and how you can block access to a programme by
means of the parental control function. When calling up the
programme list by pressing the 

OK

key, the Favourites pro-

gramme list will be displayed. When you are in TV mode you
can view the TV list, and when you are in Radio mode you
can view the list of radio programmes.

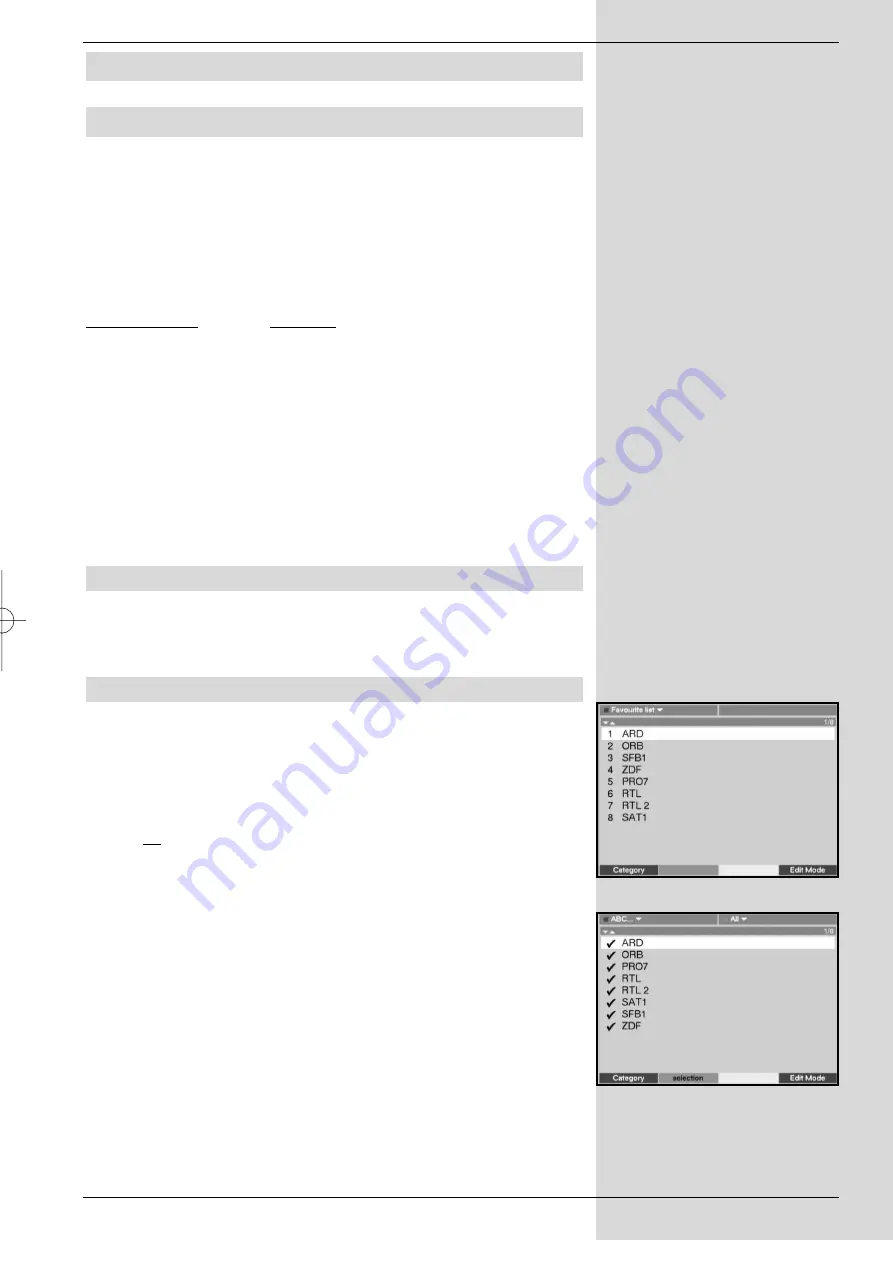
7.1.1 Calling up a Programme list 

>

Press the 

OK 

key.

The Favourites programme list will be displayed. 

(Fig.

7-1)

7.1.2 Adding programmes to the programme  list

To add programmes to the programme list selected, proceed
as follows:
>

Press the 

red 

function key to display a selection

window that allows you to switch between the
Favourites list and the Total list. This Total list contains
all available programmes. You have the option of
displaying the Total list sorted according to

Providers 

or sorted alphabetically (

ABC...

).

>

Use the 

arrow keys up/down

to select the desired

programme listing. (e.g. 

ABC

)

>

Confirm by pressing 

OK

.

An alphabetically sorted list will now be displayed.

(Fig. 7-2)

25

(Fig. 7-1)

(Fig. 7-2)

bed_anl_DigiPal 1.qxd  23.01.03  14:42  Seite 25

All manuals and user guides at all-guides.com

Summary of Contents for DigiPal 1

Page 1: ...Operating Manual DigiPal 1 Receiver for DVB T programmes Art No 0000 4903 E E E EP P P PG G G G All manuals and user guides at all guides com a l l g u i d e s c o m...

Page 2: ...age format 16 5 3 2 Language 16 5 3 3 SCART mode 16 5 3 4 Video system 16 5 3 5 UHF output channel 16 6 Operation 16 6 1 Switching on and off 17 6 2 Programme selection 17 6 3 Volume adjustment 18 6 4...

Page 3: ...scan 29 7 4 2 Expanded search function 30 7 4 3 Manual search 30 7 4 4 After a scan 31 7 5 Calling up default setting delete all 32 7 5 1 Activating default setting 32 7 5 2 Delete all programmes 32 7...

Page 4: ...Sound on off Language selection Programme down Multi function keys Volume Programme up TV Radio operation EPG OK Volume Arrow key right Arrow key left Arrow key up Arrow key down Remote control Info k...

Page 5: ...erface Antenna output Input terrestrial aerial antenna feed 5V 100mA switchable via OSD LED display Programme selection up down SCART socket TV On Standby Front view Rear view All manuals and user gui...

Page 6: ...programmes or how to change the order of programmes in the list Technical terms used in the operating manual are explained in Chapter 8 Technical data may be found in Chapter 9 A trouble shooting gui...

Page 7: ...ighted candles on top of the unit Do not expose the unit to water in drop or spray form and do not place any liquid filled objects such as vases on top of the unit The unit should be operated only in...

Page 8: ...ate field Help function Wherever it is available in a menu pressing the blue function key will display a help text pressing again will end the display Key descriptions and terms used in the OSD menu a...

Page 9: ...to select the time zone corresponding to your location Confirm b y pressing OK to confirm your selection and to proceed to the channel search function Fig 3 6 Please note the message displayed Fig 3...

Page 10: ...from the DVB T receiver to the television set Connection to the TV set by means of an antenna cable a Connection from the antenna to the terrestrial anten na input of the DVB T receiver b Mains power...

Page 11: ...4 3 Connection to a television set Once you have connected your receiver to the television set as described above it may be necessary before you can make further settings or adjustments to adapt the...

Page 12: ...the UHF output channel Proceed as follows Press the Menu key to display the Main Menu Fig 4 1 Now select the line Settings using the arrow keys up down to mark the appropriate line Confirm by pressing...

Page 13: ...hen store this in your TV set memory At this stage it may be necessary to fine tune the channel on your TV set 4 5 Adjusting the antenna Your receiver is equipped with a signal strength indicator to f...

Page 14: ...the Back key to return to the Main Menu 5 2 Basic settings In order to operate your DVB receiver as conveniently as possible you should make some adjustments to accommodate your personal preferences...

Page 15: ...in the line Country Press the Back key to return to the Settings menu or press the Menu key to return to normal operation The settings will be automatically stored in memory 5 2 4 Antenna feed 5V If y...

Page 16: ...us Use the arrow keys left right in this line to select either FBAS or RGB whichever is appropriate for your TV set For standard sets the default setting is RGB 5 3 4 Video system Use the arrow keys l...

Page 17: ...ypad For example 1 for programme slot 1 1 then 4 for programme slot 14 2 then 3 then 4 for programme slot 234 When entering programme numbers with more than one digit you have approx 3 seconds after e...

Page 18: ...control function the note Unit PIN will be displayed on screen Fig 6 4 Enter your PIN code by means of the numeric keypad The selected programme can now be viewed In order to facilitate viewing the PI...

Page 19: ...to select the desired language Confirm by pressing OK You can now listen to the programme in the language selected Your receiver is also able to receive mono broadcasts in the information box Fig 6 7...

Page 20: ...formation relating to the current programme Now press the yellow function key again to view information relating to the next programme Press the yellow key again to switch off the display 6 9 Channel...

Page 21: ...k Press the Back key to return to normal operation 6 11 Electronic Programme Guide The EPG function Electronic Programme Guide enables you to display the programme schedules and contents on your telev...

Page 22: ...l Timer operation can be interrupted by pressing the On Standby key 6 12 1 Programming by means of EPG Switch to the channel that carries the programme you wish to record Press the EPG key The EPG tab...

Page 23: ...e TV or Radio Station Channel In this line you should select the TV station providing the programme which you would like to record Use the arrow keys to select the line Station Confirm by pressing OK...

Page 24: ...ecording Timer operation is indicated visually by the blinking of the LED display for control purposes Noting function Your receiver will switch itself on at the time you have set as starting time and...

Page 25: ...en calling up the programme list by pressing the OK key the Favourites pro gramme list will be displayed When you are in TV mode you can view the TV list and when you are in Radio mode you can view th...

Page 26: ...Selection mode The highlighted programme will now ne indicated by a cross in the left margin and the menu display will be shown in transparent form with the picture in the background You can now use...

Page 27: ...neously proceed as follows Press the OK key to go to the Select mode The selected programme will now be indicated by a cross in the left margin You can now proceed to select additional programmes usin...

Page 28: ...Changing the PIN The PIN code is set at the factory to 0000 In order to activate the parental control function you must enter your own personal PIN code in place of the factory setting Note Do not for...

Page 29: ...ecific frequency for programmes When the search has been completed your screen will dis play a message showing how many programmes have been found by your receiver and how many of these are new New pr...

Page 30: ...d as described above to enter the stop channel resp the stop frequency You can now go to the line Search Mode to decide whether you want to search only for free to air pro grammes or whether you want...

Page 31: ...e is broad cast as described above Press the green function key PID Suche to enter the PCR Audio and Video PID Fig 7 9 Then use the arrow keys up down to highlight in turn the lines PCR PID Audio PID...

Page 32: ...sub menu Factory Settings will be displayed Fig 7 11 7 5 1 Activating Factory Default Setting This function allows you to return to the original default set tings at the same time deleting all your pe...

Page 33: ...hnology used for pictures graphic images sound and text i e for data in any form and always in every possible quality suitable to the type of data DVB T Receiver The signals received by the antenna ca...

Page 34: ...y programme providers In order to utilise these services it may become necessary to update the receiver s software 9 Technical Data DVB T Tuner Input frequency range 174 230 MHz 470 860 MHz Frequency...

Page 35: ...75 Ohms Output level GREEN 0 7 Vs s into 75 Ohms Output level BLUE 0 7 Vs s into 75 Ohms Teletext Teletext Filtering corresponding to ETS 300 472 Standard Reception Teletext data FBAS corresponding t...

Page 36: ...mer we would like to point out once again that if the following fault occurs you should first try to solve the problem yourself in the manner described before contacting your service repair specialist...

Page 37: ...ot shown in programme list Wrong programme list selected Select different programme list see Point 6 2 3 1 Sound OK screen blue Set to radio mode Change setting to TV mode Unit cannot be operated Defe...

Page 38: ...ave approx 3 seconds time after pressing a key to enter the next digit and complete the entry If you wish to enter only a single or double digit number you can speed up the switching procedure by hold...

Reviews: