background image

EQUALISER

EQ

BBS/X-BASS

BBS

BBS

CARE & CLEANING

WARRANTY

SPECIFICATIONS

Your system includes additional sound modes that you
can select to match your musical taste.

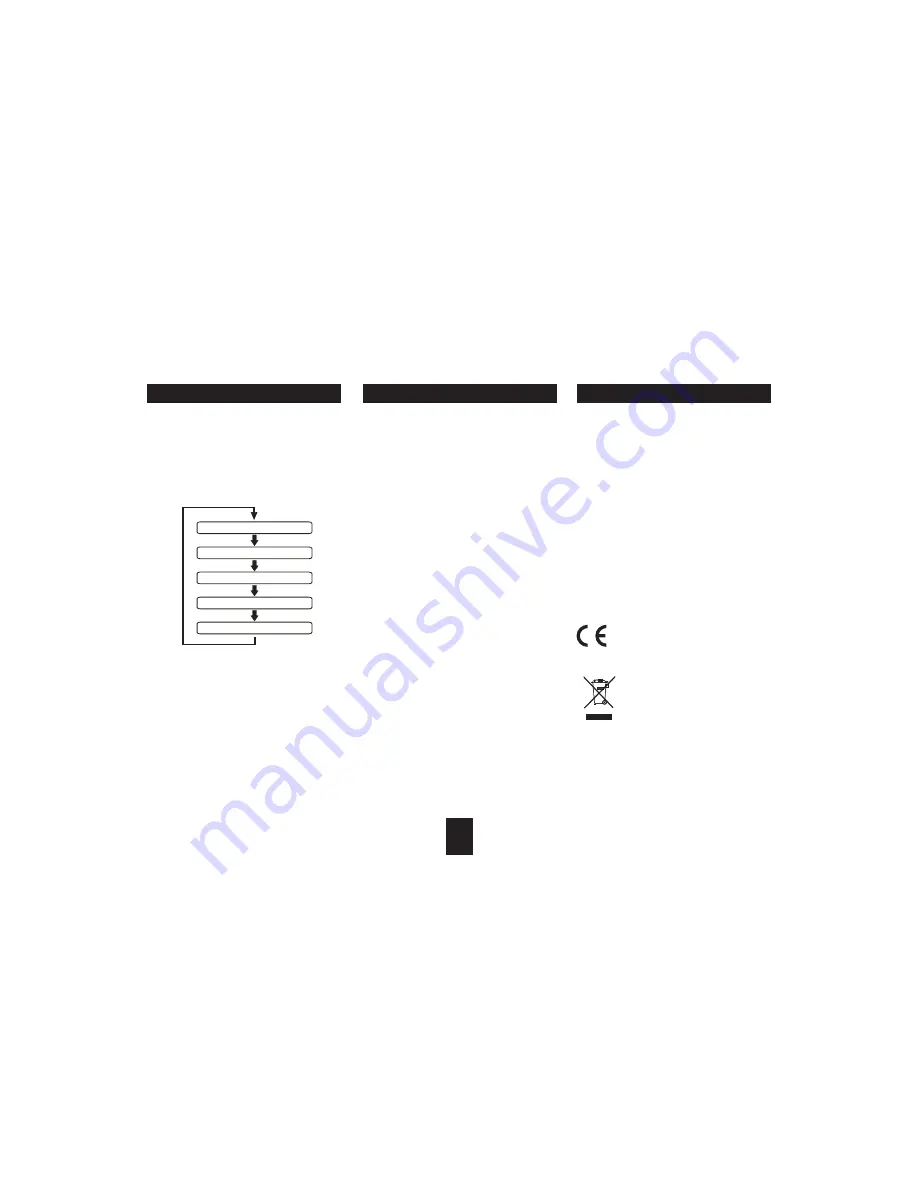
To set the equaliser, press the

button on the

remote control repeatedly. You will cycle through
the settings shown below.

The FLAT setting has no equalisation applied.

BBS/X-BASS is a bass-extension feature that increases
the bass response of the system.

To switch BBS/X-BASS on, press the

button.

To switch BBS/X-BASS off, press the

button

again.

When BBS/X-BASS is switched on the 'X-BASS' legend
will show on the display.

There is a headphone output socket under the cover at
the top of the front panel. If headphones are connected
to this socket for private listening, the speakers will cut
out automatically.

Occasionally wipe the cabinet with a lint free duster.
Never clean the unit with liquids or solvents. Clean the
screen from time to time with a approved anti-static
cleaner or a calotherm cloth available from opticians.
Loudspeaker grilles can be brushed carefully with a soft
brush.

Do NOT clean the inside of the CD tray with a cloth.
Lightly blow out any dust.

Compact Discs: If a disc becomes soiled, wipe the surface
gently with a soft cloth.The disc should be cleaned from
the centre to the edge.

After play, remove the CD from the disc tray and store it
in its packing.

Your Technika appliance is covered by a warranty for 12
months from the date of purchase. If a fault develops
during this period, please contact the TESCO electrical
help line on 0845 456 6767. Please have your original
purchase receipt with you when you call. This warranty
in no way affects your consumer rights

Power Supply . . . . . . . . . 220-240V~, 50 Hz
Power consumption . . . . 35W
Output Power . . . . . . . . . 10Watts per channel
Frequency Response: . . . 20Hz-20kHz
Frequency Range . . . . . . DAB: 174-240 MHz

FM: 87.5-108 MHz

Produced after 13th August 2005.

Waste electrical products should not be
disposed of with household waste. Please
recycle where facilities exist. Check with
your Local Authority or retailer for
recycling advice.

$

$
$

SYSTEM RESET

SERVICE AND WARRANTY

SPECIAL AUDIO FUNCTIONS

HEADPHONES

16

FLAT

CLASSIC

ROCK

JAZZ

POP

Summary of Contents for MC-807

Page 1: ...MC 807 DAB FM CD Micro System with iPod dock User Handbook ...

Page 2: ......

Page 3: ...er frequency energy and if not installed and used in accordance with the instructions may causeharmfulinterferencetotunercommunications However thisisno guarantee that interference will not occur in a particular installation If this equipment does cause harmful interference to tuner or television reception whichcanbedeterminedbyturningtheequipmentoffandon the user is encouraged to try to correct t...

Page 4: ...l If any items are missing or damaged contact your nearestTESCOstoreforareplacement Haveyourreceipt ready when you call Retain the packaging If you dispose of it do so having regard to any recycling regulationsinyourarea Place the main unit on a sturdy table or shelf where it cannot get knocked over and where there is a clear line ofsighttotheremotehandset Theloudspeakersmaybe placed either side o...

Page 5: ... 6 DISPLAY CLOCK BUTTON 7 VOLUME UP 8 STANDBY BUTTON 9 VOLUME DOWN 10 ALARM BUTTON 11 SNOOZE 12 SELECT PLAY PAUSE BUTTON 13 OPEN CLOSE BUTTON 14 SCROLL TUNE SKIP UP BUTTON 15 STOP SCAN 16 SCROLL TUNE SKIP DOWN BUTTON 17 HEADPHONE JACK 18 BUTTON BUTTON iPod DOCKING BAYWITH CONNECTOR CONTROLS AND FEATURES 3 FRONT VIEW TOP VIEW ...

Page 6: ...ttery When replacing the battery in the remote control refer tothediagrambelow 1 Pressthecatchacross 2 Whileholdingthecatch openthebatterydoor 3 Fit the battery observing polarity as shown When replacing the battery use only the same CR2025 typespecified Dispose of used batteries with regard to the recycling regulationsinyourarea DoNOTshortcircuitbatteriesor throwthemintowater thegeneralrubbishori...

Page 7: ...IGHTCURSORBUTTONS 17 ENTERBUTTON 18 PLAY PAUSEBUTTON 19 SCROLLDOWNBUTTON 20 MENUBUTTON 21 PRESET BUTTONS 22 SCAN BUTTON 23 SCROLLUPBUTTON 24 SNOOZEBUTTON 25 OPEN CLOSEBUTTON 26 CDSELECTBUTTON 27 DISPLAYMODEBUTTON 28 EQBUTTON 29 BBSBUTTON 30 VOLUP DOWNBUTTONS 31 FASTSEARCHUPBUTTON 32 STOPBUTTON 33 ALBUM SELECTBUTTONS 34 PLAYLIST SELECTBUTTONS REMOTE CONTROL FUNCTIONS 5 1 2 3 4 5 6 7 8 9 10 11 12 13...

Page 8: ...toadjust Press the buttons to set the selecteddigittothecorrectvalue Repeatthelasttwostepstosetallthedigitstothe correcttime Pressthe buttontostarttheclockwhenyou havefinishedsettingthetime Press the button on the handset or the front panel to bring the unit in and out of Standby mode There are 5 sources you can listen to through your system ChoosefromDABradio FMradio CD iPodorAux an external sour...

Page 9: ... showninthelistwitha symbolbeforethename You can select an inactive station but if tuning cannot be completedanalternativestationwillbeselected Some stations have additional secondary services If secondary services are available a symbol will be shownnexttothestationname Secondaryserviceswill appearinthestationlistafterthemainstation You can store up to 10 DAB stations in presets for quick recall ...

Page 10: ... a scrolling message giving real timeinformation songtitles newsheadlines etc This describes when available thestyleoftheprogrammebeingbroadcast isthenameofthe DABMultiplexthatiscurrentlytuned Shows the current Time Time is updated by broadcastedinformation Shows the Multiplex channel identifier and frequency for the station currentlyplaying DABallowsbroadcasterstovarytheBITRATE or the amount by w...

Page 11: ...ually Selectthe ManualTune optionfromthemenu Press the buttons to move through the DAB channels Press the button to show a signal strength bargraphforthisstationmultiplex You can change the position of the aerial to get the best signallevelforthischannel Press the button again to return to normal operation The display will show each channel number with its associated frequency If there is a multip...

Page 12: ...epending on the mode in which the programmeisbeingbroadcast You can change the information displayed while listeningtoFM Tochangethedisplaymode Press the button repeatedly to cycle through theoptionslistedbelow You can store up to 10 FM stations in presets for quick recall Tostoreapresetstation Selectthe stationtostore Pressthe button Choose the preset location you wish to store with the buttons T...

Page 13: ...itablecompositevideo CVBS inputofyourTV monitortowatchthevideo If you own an early model iPod that doesn t have a docking connector or a different brand of MP3 player youcanstillconnectthesoundoutputtoyoursystemvia theAUXjackonthebackpanel Using a 3 5mm stereo plug to twin phono cable notsupplied connectoneendofthecabletothe headphonejack oftheiPodorMP3player andthe otherendtotheAUXjacksonthebackp...

Page 14: ...el To start playback press the button Topauseplayback pressthe buttonagain Toskipbackorforwardtoothertracks pressthe or buttonsrepeatedly Tofastsearchthroughtracks pressand the or buttons YoucanchangethealbumplayingonyouriPodfromthe remotecontrol Press the or buttons repeatedly to selectthealbumyouwanttohear YoucanalsoselectPlayliststhatyouhavestoredinyour iPod Press the or buttons repeatedly to s...

Page 15: ...CDReading Pressthe buttontoopentheCDtray Place the disc onto the tray with the printed label sidefacingup Pressthe buttonagaintoclosetheCDtray To pause the disc Press the button To resume playback Press the buttonagain To stop playback Press Togoforwardorbackatrackortracks Press the buttons repeatedly to move backorforwardatrack TosearchtheCDforwardorbackathighspeed From the remote control press a...

Page 16: ...tem and connector s at the other end suitable for the personal audioplayer computer Connect the cable between the headphone or LINE AUX output of the personal audio player and theAUXinputsonthebackpanelofyoursystem With the cable connected select the AUX input by pressingthe buttonuntil Aux isshownonthe display Setyourpersonalaudioplayer computertoPLAY Setthelisteningvolumetothelevelyouwantwith th...

Page 17: ...ogramthesystemtoswitch itselfoffafterasetperiodoftimein10minutestepsbetween 10minutesand120minutes Press and the button until the sleep display appears Now press the button repeatedly to set the requiredsleeptime TochecktheSleeptimeremainingwhenset Pressthe button To cancel the Sleep function once set you can either set to Standbyor Pressand the button untilthesleepdisplay appears Nowpressthe butt...

Page 18: ...otherm cloth available from opticians Loudspeakergrillescanbebrushedcarefullywithasoft brush Do NOT clean the inside of the CD tray with a cloth Lightlyblowoutanydust CompactDiscs Ifadiscbecomessoiled wipethesurface gentlywithasoftcloth Thediscshouldbecleanedfrom thecentretotheedge After play remove the CD from the disc tray and store it initspacking YourTechnika appliance is covered by a warranty...

Page 19: ......

Page 20: ...Tesco Stores Ltd Delamare Road Cheshunt Herts EN8 9SL MC 807 V0 2 ...

Reviews: