background image

- 4 -

1- Before turning the power ON

b)

About power source

Do not use any other outlet than followig.

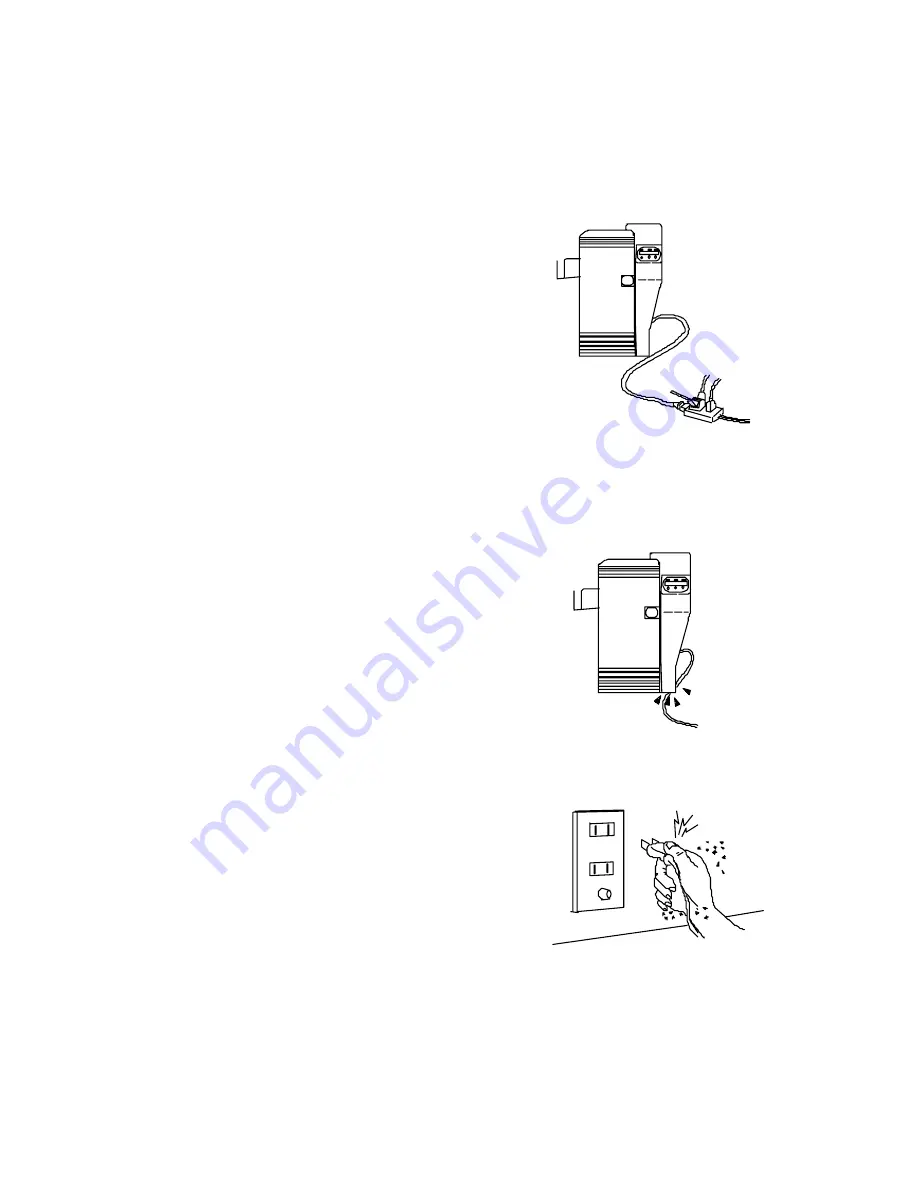
Do not connect more than one equipments

onto one outlet.

Otherwise, it may cause

a fire and/or electric shock.The specified

rating of this equipment is following.

100 ‘240 VAC

2A

Dust on the plug and electrical outlet mustbe removed.If used without

removing, a small amount of electricity runs continuously through the dust

by the effect of moisture etc. and may eventually cause a fire.

Be careful so that the power supply cord

is not damaged.

If the cord is twisted,

pulled strongly or placed underneath a

heavy object, it may be damaged and become

a cause of fire.

Do not handle the plug with wet hand

because it may cause electric shock.

When you use an extention cord, do not use the cord which is rated at less

than 125V 10A.

Excessive heat or smoke will be caused.

Summary of Contents for Nisca PR5300

Page 1: ...DIRECT CARD PRINTER PR5300 Operation Manual Ver 1 3 Aug 00...

Page 2: ...gsafter the owerON P Operation Panel Section 4 a Outline of the Operation Panel b Operation of Normal Mode c OperationofUserMode d Function of User Mode e StructureofUserMode Operation Section 5 a Set...

Page 3: ...r of death or serious injury This indicates that there is possibility of death or serious injury This indicates that there is a possible cause of injury and or damages on properties This manual MUST b...

Page 4: ...room It may cause fire and or electric shock Do not install the equipments near the heat emitting apparatus such as stove and heater or near the flammables such as curtain It may cause fire Do not pla...

Page 5: ...is closed by obstcle heat can not be dissipated and it may cause a fire Place with the clearance as shown in the illustration Do not place in the room with much vibration It may cause troubles on the...

Page 6: ...f used without removing a small amount of electricity runs continuously through the dust by the effect of moisture etc and may eventually cause a fire Be careful so that the power supply cord is not d...

Page 7: ...connected to an copper rod which is buried in the ground at the depth of 65cm 26inch or deeper qGrounding line may not be connected to the following points r Gas pipe There is a danger of fire and or...

Page 8: ...electric shock If by any chance metal pieces or water get inside the equipment turn off the main switch and plug off the power supply cord from the outlet Then contact the dealer from whom you have p...

Page 9: ...r from whom the equipment was purchased In case of thunder for the purpose of safety turn OFF the main switch and plug off the power cord This will prevent burning of the equipment fire or electric sh...

Page 10: ...It may cause card jamming or malfunction of the equipment Do not touch any part inside the equipment other than directed by this manual Read this manual carefully before performing recovering operati...

Page 11: ...oken and cause fire or electric shock 1 Other e If the equipment is installed and operated at near TV set or radio it may cause an interferrence such as noise or flicker In such case use the outlet co...

Page 12: ...he carton together with the printer If anything is missing contact the dealer from whom you have purchased Bandled with only for the equipment with 2 x Ferrite Cores interface for European market Empt...

Page 13: ...ble with one roll of ink rribbon Ink ribbon has been changed in the middle There has been errors in the middle Head lifting has been done in the middle Abnormal operation which is not allowed in this...

Page 14: ...pins with fingers Static may damage the circuits inside this part At the printing edge of the Print Head is very high compound of heating element So never touch this part with a hard object fingersor...

Page 15: ...he Input Roller is every 40 000 frames if the recommended cards are used and cleaning is done every 2 000 frames To exchange the Roller refer the item Replacing Input Roller at 7 a For cleaning the Ro...

Page 16: ...14 d Nameoftheparts 2 Front side of the printer Front Access Cover ATop Cover BRear Cover COperation Panel DCard Feeding Unit EPower Switch FReject Card Exit GFront Cover HCard Stacker...

Page 17: ...15 Rear side of the printer A SCSI type interface equipment Circuit Protecter ASCSI Connector BOptional Unit Connector CPower Cord Receptacle DTerminate Switch...

Page 18: ...16 Rear side of the printer B PARALLEL type interface equipment A C Circuit Protecter PARALLEL Connector A BOptional Unit Connector CPower Cord Receptacle...

Page 19: ...17 Front Access Panel Input Roller Module ARibbon Cartridge Holding Lever BManual Rotation Knob CRibbon Cartridge...

Page 20: ...destruct the magnetic encoding data if the Magnetic Encoder is being used In the worst case it may cause equipment trouble b Space for installation 3 The space for the operation as shown in the illust...

Page 21: ...el 1 Entering into the User Menu Press and hold the Menu key as shown in the fig till the displayed letters change from Input Command to User Mode When the key is released the following selection is s...

Page 22: ...s Connected device may be damaged Circuit voltage rating 24 Vdc 5 Vdc When connecting the cable do not forget to turn OFF the power switch of the printer and all other devices to be connected It may c...

Page 23: ...of the computer or SCSI devices to be connected The SCSI is an interface specification which allows very high speed data transfer Consequently the electrical characteristics of the cable is very seve...

Page 24: ...side to the back of Printer at the connector with displaied as PARALLEL as shown on right and the other side to the Computer For use of the printer parallel type interface equipment in europian count...

Page 25: ...voltage drop as much as possible When the power is turned OFF wait for at least 3 sec before turning ON again Check that the power switch is OFF before connecting the power cord to the outlet Settinga...

Page 26: ...r This alarms that the printer is in Error LED Red error Power ON indicator This shows the power is ON Power LED Green Normal Use this key when taking out the ribbon cassette Ribbon Change before the...

Page 27: ...Please refer to Paragraph 10 Countermeasure for Trouble After releasing the error press Clear key to resume to Ready to Print If appears on the resolve the trouble and Cannot Recover Please Reset LCD...

Page 28: ...function is invalid EXE Key Print regardless of the setting in the user mode if the system is designed so that th data is not stored in the printer memory to prevent double printing Stopping thecontin...

Page 29: ...on in the User Mode As the User Menu has the following layer structure select the desired item wit the key and change the setting values using key or key MENU EXE Clear By pressing key at it goes one...

Page 30: ...s by pressing key and decreases by key Standard value is 0 EXE CLEAR Example of color adjustment The color image to be printed on the card consists of the 3 colors Cyan C Magenta M and Yellow Y These...

Page 31: ...CSI ID Checking connection ofOptional Devices ROMVersion If Encoder ROM display is included in the ROM Version menu it indicates that the internal encoder is connected Absence of this display means no...

Page 32: ...back Encode Mode When this is ON data in the memory is printed by Exe key EXE Key Print When this is ON card with error is re output by Clear key Print Retry Encoding and printing are executed simult...

Page 33: ...ith re listed in thenextpage Push MENU key Card count Total count Color Adjustment YELLOW EXE sub menu CLR 3 MAGENTA 2 1 CYAN 0 1 Black 2 3 Color Sample EXE EXE Print Image Test EXE Print Return to ON...

Page 34: ...Menu Printer Status Printer Status CLR EXE sub menu Push MENU key EXE Ring M Auto clr Memory Mode Ring M DataHold Ring M Dualside Single DataHold Economy Dualside EXE Parity Set EXE OFF ON Encoder Typ...

Page 35: ...become even Place the card weight on top 4 of the card and close the Hold the card s by the edge cover When loading the cards with mag stripe be careful to the direction of the card Regarding the dir...

Page 36: ...When loading the cards stack the cards evenly as marked with in the figure below If it is stacked unevenly as shown with the mark in the figure below it may casue Pick Up Error or the stack may colla...

Page 37: ...bbon Cartridge without lifting the Print Head by pressing RIBBON CHANGE key Normal print quality of the next printing will not be obtained Do not leave the ink ribbon cartridge off hand When loading a...

Page 38: ...side of the cartridge to use as take up bobbin Set new ribbon onto the supply side of the cartridge Peel off the leading tape at the beginning of new ribbon and put it onto the empty bobbin Attach the...

Page 39: ...the cleaning operation leave the machine for about 5 min before restarting Correct printing may not be obtained if printed before the alcohol is completely dried Do not touch the rollers with hand Fin...

Page 40: ...installing After wiping off wait till it becomes completely dry before inserting it agai b Cleaning of the card transportrollers in Flip Turn Block 6 Before beginning this operation please read the ge...

Page 41: ...clean the whole surface of all 4 pairs of rubber rollers shown with and white mold rollers To clean them easily use the green handle located on front access area as shown in figure on right This hand...

Page 42: ...this operation please read the general advicewhich appears in the beginning part of this section Wet and squeeze the soft cloth with alcohol for OA equipments and wipe the all surface of the roller i...

Page 43: ...tion It may cause a trouble and or to have electrical shock Do not use solvents other than alcohol for cleaning OA equipments Using the solvent other than alcohol may damage the parts and may cause tr...

Page 44: ...be used Input Roller Every 40000 frames N A Print Head Every 20000 frames Loader Application Number of the printed frames is displayed on the LCD panel a Replacing Input Roller 7 Hold the tab and pul...

Page 45: ...ouch there To replace a print head The figures on next page showing a print head fixed showing a print head removed A To take the print head off Release the lever as pointed with C in fig Then hold th...

Page 46: ...44 A...

Page 47: ...rintingSize Max 85 5mm card longitudinal direction x54 5mm card transverse direction 6 Printing Speed 45 seconds oneside excluding comunication time at whole area printing at the sizeasshown above 7 I...

Page 48: ...nit Printing Unit C The card moves through thisunitfivetimes to be printed 3 colors black color and protective overlay coating PrintHeadispositionedrectangularlytothecardtransport line and pressed aga...

Page 49: ...coder Write PrintCarddoes Please Check Error not Exist Ink Ribbon Ribbon Empty Ribbon Type Ribbon Wind up Incorrect miss Basic operation to release troubles By pressing the Clear key afterreleasing th...

Page 50: ...rror Setthecardcorrectly Some error occured Thereisscratchorstainonthemagneticstripe duaring Mag encoding Replacewithothercard Mismatchingofthemagnetic characteristics Check the setting of typeontheen...

Page 51: ...e has been takenoutwithoutpressingthe MENU RibbonChangekeywhilethe ink ribbon isnotusedupto theend P 35 The printer becomes to errorandnormalprintingis notpossible Check theinkribbon RibbonWindup Ink...

Page 52: ...tomatically to the Card Eject Exit bypressingClear key on the operation panel If thecardcan not be ejected in thismethod remove the jammed card manually The location Block ofcardjamisshownontheLCDpane...

Page 53: ...51 Block Layout...

Page 54: ...shardtojudgevisually Please usethespecifiedcardsbythe dealer Card Jam F Turn A card isstuckintheFlipTurnBlock Area First turn OFFthepower Open thetopcoverandremovethecard Ifnecessary rotatethe greenha...

Page 55: ...atelementoftheheadisdamaged P 43 Replacewiththenewhead Thedamageoftheprintheadiscausedbybitinga solid particlebetweentheheadandthecardwhile printing Toavoidthis donotuse a dirty card or leave theribbo...

Page 56: ...on donotforget topressRibbonChange key beforetakingout Themessage RibbonTypeincorrect isshownon theLCD display This doesnotmeanthe machine troublebutmeansincorrectoperation UnsupposedDarkarea appeares...

Page 57: ...owerofthesystemandturnON again Please be surethat theprinterandtheother devicesstartbefore thecomputer Check theconnectionofthecables P 21 Keep the lengthoftheSCSIcableasshortas possible Check theposi...

Reviews: