background image

5

44$5353"7$8%4)035$0634&536$,t*/4536$5*0/."/6"-

DRIVING PRECAUTIONS 

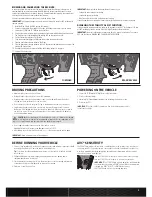
t

Maintain sight of the vehicle at all times.

t

Routinely inspect the vehicle for loose wheel hardware. 

t

Routinely inspect the steering assembly for any loose hardware. Driving the vehicle  
off-road can cause fasteners to loosen over time.

t

Do not drive the vehicle in tall grass. Doing so can damage the vehicle or electronics.

t

Stop driving the vehicle when you notice a lack of power. Driving the vehicle when  
the battery is discharged can cause the receiver to power off. If the receiver loses power, 
you will lose control of the vehicle. Damage due to an over-discharged Li-Po battery is  
not covered under warranty.

CAUTION:

 Do not discharge a Li-Po battery below 3V per cell. Batteries discharged 

to a voltage lower than the lowest approved voltage may become damaged, result-

ing in loss of performance and potential fire when batteries are charged.

t

Do not apply forward or reverse throttle if the vehicle is stuck.  
Applying throttle in this instance can damage the motor or ESC.

t

After driving the vehicle, allow the electronics to cool before driving the vehicle again.

IMPORTANT:

 Keep wires away from all moving parts.

POWERING ON THE VEHICLE

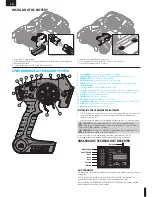
1. Center the ST TRIM and TH TRIM dials on the transmitter.
2. Power on the transmitter.
3. Install a fully charged battery pack per the 

Installing the Battery

 section.

4. Power on the ESC. 

IMPORTANT:

 The vehicle MUST remain on a flat, level surface and motionless 

for at least 5 seconds.

BEFORE RUNNING YOUR VEHICLE

1. Check for free suspension movement. All suspension arms and steering components should 

move freely. Any binds will cause the vehicle to handle poorly. 

Tip:

 To increase the ride height and ground clearance of your vehicle, install the included 

shock spacers.

2. Charge a battery pack. Always charge the battery pack as per the battery and/or  

charger manufacturers’ instructions.

3. Set the transmitter steering trim. Follow the instructions to set the steering trim/subtrim  

so that the vehicle drives straight with no input to the steering.

4. Perform a Control Direction Test.

AVC

®

 SENSITIVITY

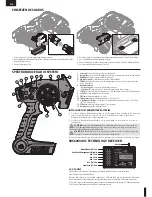
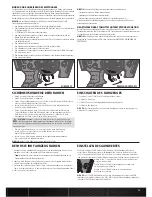
The ST RATE dial adjusts the sensitivity, or stability, value in the receiver. If you increase the 
sensitivity, the AVC

®

 system becomes more sensitive to the vehicle drifting left or right. You 

would use maximum sensitivity during high speed driving or drag racing, when you want  
the vehicle to stay in a straight line.

Turn the ST RATE knob counter-clockwise to reduce the sensitivity. 
Turn the ST RATE knob clockwise to increase the sensitivity.

IMPORTANT:

 The ST RATE knob will only adjust the sensitivity when 

the transmitter is bound to a DSMR

®

 receiver. When the transmitter 

is bound to a DSM

®

, DSM2

®

 or DSM Marine receiver,  

the ST RATE knob controls the steering dual rate.

FORWARD

BRAKE/REVERSE

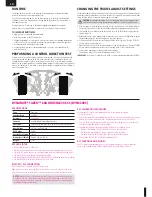
BINDING AND CALIBRATING THE RECEIVER 

In order to operate, the receiver must be bound to the transmitter. Binding is the process of 
programming the receiver to recognize the GUID (Globally Unique Identifier) code of a single 
specific transmitter. When a receiver is bound to a transmitter/model memory, the receiver will 
only respond to that specific transmitter/model memory.
You must calibrate the receiver each time it is placed in bind mode.

IMPORTANT:

 The following sequence of steps must be followed in order for AVC technology to 

function properly.
1.  Insert the Bind Plug in the BIND port on the receiver.
2.  Power on the receiver. The orange LED flashes, indicating the receiver is in bind mode.
3.  Center the ST TRIM and TH TRIM on the transmitter.
4.  Put your transmitter in bind mode by powering on transmitter while holding down bind button. 
5.  The bind process is complete when the orange LED on the receiver is solid.
6.  Pull the transmitter trigger to Full Throttle.
7.  Push the transmitter trigger to Full Brake, then return the trigger to center.
8.  Turn the transmitter steering wheel to Full Right.
9.  Turn the transmitter steering wheel to Full Left, then return the steering wheel to center. The 

orange LED flashes once.

10. Remove the bind plug once the calibration and binding process is complete.
11. Power off the transmitter. 

IMPORTANT:

 You must rebind the transmitter and receiver if you:

t

Change the servo reverse after binding

t

Change the travel after binding

t

Want to use the receiver with a different model memory

If you change the servo reversing or travel adjust after binding, AVC will not work properly.

DISABLING THE STABILITY ASSIST FUNCTION

If you participate in organized racing, you may be required to turn AVC

®

 technology off. To turn 

off AVC technology, insert a second Bind Plug in the Disable port before binding.

IMPORTANT:

 You must calibrate the receiver each time it is placed in bind mode. To activate 

AVC, see the steps in BINDING AND CALIBRATING THE RECEIVER.

Summary of Contents for 22S Maxxis

Page 1: ...y removed place the vehicle upside down and pull full throttle for a few short bursts until the water has been removed CAUTION Always keep hands ngers tools and any loose or hanging objects away from...

Page 2: ...rsonal transponder or lights If AVC is disabled see DISABLING THE STABILITY ASSIST FUNCTION all 6 channels including the Aux channels can operate as servo channels SPEKTRUM DX2E ACTIVE RADIO SYSTEM 1...

Page 3: ...ight You would use maximum sensitivity during high speed driving or drag racing when you want the vehicle to stay in a straight line Turn the ST RATE knob counter clockwise to reduce the sensitivity T...

Page 4: ...d point 5 Right Steering End Point Hold the steering wheel in the full right position Turn the ST TRIM knob to adjust the right end point Return the steering wheel to the center position 6 Power off t...

Page 5: ...force A higher value provides stronger braking but can also cause the wheels to lock resulting in loss of control of the car 6 Punch Select from start mode Level 1 Soft to Level 9 Very aggressive If...

Page 6: ...ears stripped Replace transmission gears Drive pin broken Check and replace drive pin Steering does not work Servo plug not in receiver properly Make sure the steering servo plug is connected to the r...

Page 7: ...urchaser or user are not prepared to accept the liability associated with the use of the Product purchaser is advised to return the Product immediately in new and unused condition to the place of purc...

Page 8: ...lich es in einer Art und Weise zu benutzen die eine eigene Gef hrdung und die anderer oder Besch digung an anderem Eigentum ausschlie t Das Modell ist ferngesteuert und anf llig f r bestimmte u ere Ei...

Page 9: ...ben ein paar Mal kurz Vollgas bis das Wasser aus dem Reifen entfernt ist ACHTUNG Entfernen Sie Wasser in den Reifen durch Gas geben Nehmen Sie die Karosserie ab drehen das Fahrzeug auf den Kopf und ge...

Page 10: ...eaktivieren der Stabilit ts Assistenzfunktion nach SPEKTRUM DX2E RADIO SYSTEM 1 Sicherstellen dass der Geschwindigkeitsregler ausgeschaltet ist 2 DieVerriegelung derAkku Abdeckung drehen so dass der a...

Page 11: ...der bei Drag Racing wenn das Fahrzug auf einer geraden Linie bleiben sollten So verringert sich bei erh hen des Gainwerts der m gliche Lenkausschlag Drehen Sie den ST Rate Drehknopf gegen den Uhrzeige...

Page 12: ...d in der voll links Position Drehen Sie den ST TRIM Knopf um die Gr e des linken Lenkausschlages zu justieren 5 Endpunkt Lenkung rechts Halten Sie das Lenkrad in der voll rechts Position Drehen Sie de...

Page 13: ...werden Im Gegensatz zu den vorgegebenden Werten beziehen sich die programmierbaren Werte auf die Gesamtspannung und nicht die einzelne Zellenspannung 4 Start Mode Setzt den initialen Gaspunkt bei der...

Page 14: ...g for 3S batteries When using 2S batteries changing the pinion gear to a 23T 48P pinion will optimize speed power and ef ciency Installing a pinion gear with fewer teeth or a spur gear with more teeth...

Page 15: ...usma es f hren Dieses Produkt ist nicht f r den Gebrauch durch Kinder ohne die Aufsicht eines Erziehungsberechtigten vorgesehen Die Anleitung enth lt Sicherheitshinweise und Vorschriften sowie Hinweis...

Page 16: ...terf rences peuvent provoquer une perte momentan e de contr le Il est donc conseill de garder une bonne distance de s curit tout autour de votre mod le ce qui aidera viter les collisions ou les blessu...

Page 17: ...S HUMIDES t Evacuez l eau collect e par les pneus en les faisant tourner haute vitesse Retirez la carrosserie retournez le v hicule et donnez des courts coups d acc l rateur plein gaz jusqu ce que l e...

Page 18: ...sactiv Voir la section DESACTIVATION DE LA FONCTION DE STABILISATION pour d sactiver l AVC les voies auxiliaires pourront commander des servos METTEUR SPEKTRUM DX2E ACTIVE 1 Assurez vous que le contr...

Page 19: ...s d acc l ration en ligne droite Plus la sensibilit est lev e plus le d battement de la direction est faible Faites tourner le potentiom tre ST RATE dans le sens anti horaire pour r duire la sensibili...

Page 20: ...l arr t pleine vitesse de fa on r p t e nira par endommager la batterie et l lectronique Les acc l rations brutales r duisent l autonomie POUR AM LIORER L AUTONOMIE t Ayez toujours un v hicule entret...

Page 21: ...in jusqu l arr t complet du v hicule rel chez le frein puis freinez de nouveau le v hicule va reculer Quand vous reculez ou que vous freinez si vous appliquez de l acc l rateur la marche avant passe i...

Page 22: ...ed with optimal gearing for 3S batteries When using 2S batteries changing the pinion gear to a 23T 48P pinion will optimize speed power and ef ciency Installing a pinion gear with fewer teeth or a spu...

Page 23: ...produit Il est absolument indispensable de lire et de comprendre ces indications avant la premi re mise en service C est uniquement ainsi qu il sera possible d viter une manipulation erron e et des a...

Page 24: ...ossa causare danni al modello o ad altre propriet Questo modello controllato da un segnale radio potenzialmente soggetto a interferenze da molte fonti che non potete controllare Queste interferenze po...

Page 25: ...gliere la carrozzeria e rovesciare il veicolo poi dare alcune brevi accelerate nch l acqua non viene rimossa ATTENZIONE Durante l operazione precedente tenere sempre lontano dalle parti rotanti mani d...

Page 26: ...andare dei servi aggiuntivi SISTEMA RADIO SPEKTRUM DX2E ACTIVE 1 Accertarsi che l ESC sia spento 2 Ruotare il fermo del vano batteria per allineare la sezione piatta con il bordo del vano batteria 3 A...

Page 27: ...la sensibilit massima quando si va ad alta velocit e si vuole che il veicolo vada diritto Man mano che la sensibilit aumenta la corsa dello sterzo diminuisce Girare in senso antiorario la manopola ST...

Page 28: ...endo il volantino tutto a sinistra girare la manopola ST TRIM per regolare il ne corsa dello sterzo a sinistra 5 Fine corsa sterzo a destra Mantenendo il volantino tutto a destra girare la manopola ST...

Page 29: ...o regolare dei valori di soglia personalizzati A differenza dei valori preselezionati i valori personalizzati valgono per la tensione totale della batteria non per le celle singole 4 Modalit di accele...

Page 30: ...quelli della corona 3 Avvicinare gli ingranaggi e stringere le viti del motore 4 Togliere la carta Controllare il gioco in 3 5 punti differenti sulla corona muovendo leggermente gli ingranaggi AVVISO...

Page 31: ...ostante Questo prodotto non concepito per essere usato dai bambini senza una diretta supervisione di un adulto Il manuale del prodotto contiene le istruzioni di sicurezza di funzionamento e di manuten...

Page 32: ...Set molle LOS233021 Spring Cups and Clip Set LOS233022 Shock Seal Set LOS233023 Shock Caps 2 LOS233024 Shock Ends LOS234024 Suspension Arm Set LOS234025 Front Caster Block Set LOS234026 Hub and Spind...

Page 33: ...x 5 mm Ringschneide 10 Vis STHC M2 5 x 5mm CUV 10 Grani M2 5 x 5 mm con punta a coppa 10 TLR6288 Set Screws M3 x 2 5mm 10 TLR6313 Locknut M3 x 5 x 5 5mm 10 Einstellmutter M3 x 5 x 5 5 mm 10 crou auto...

Reviews: