background image

- 27 -

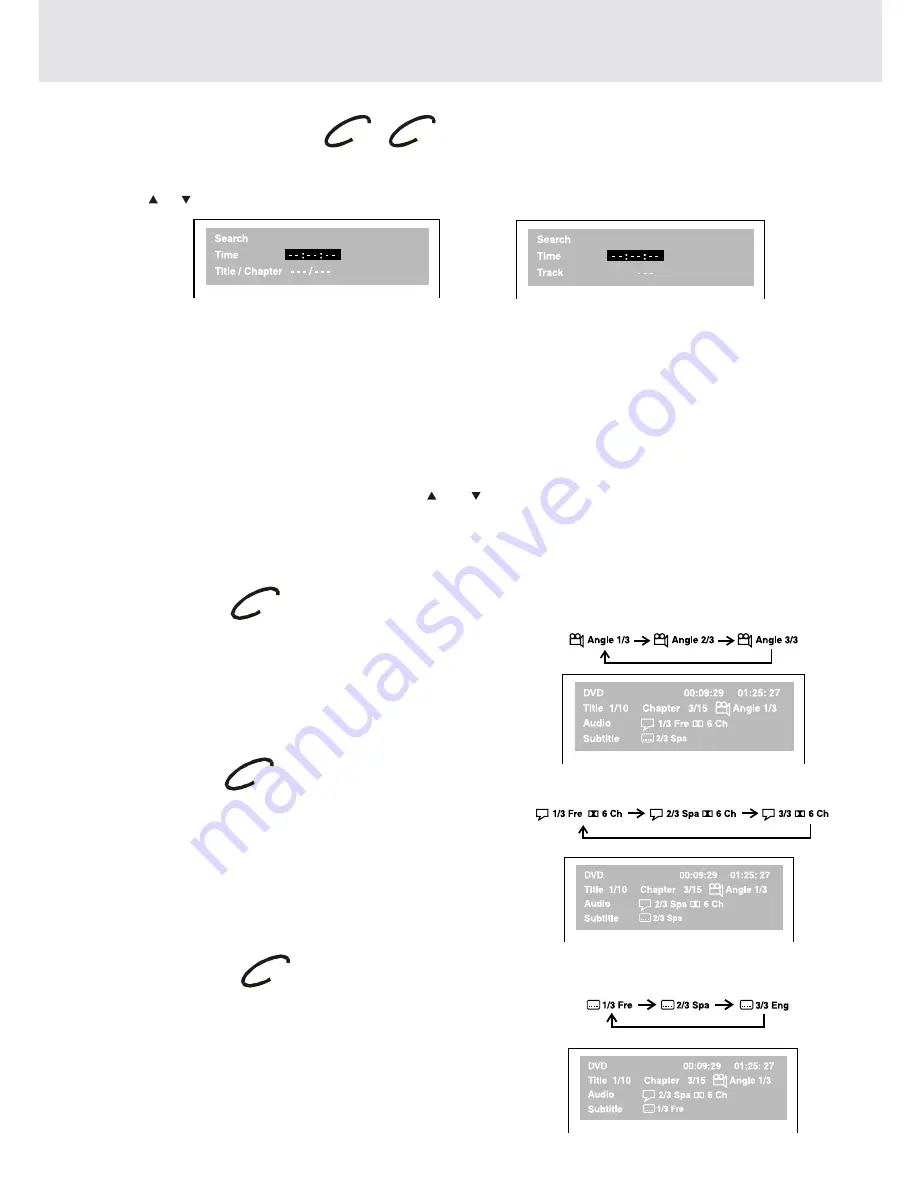
Locating a specific time

You can move to a specific location by entering its corresponding time (hours, minutes, seconds)
1. Press the GOTO button.
2. Press   or   button to highlight time.

3. Press the corresponding number buttons for the setting point you want.

• The first two numbers you entered represent hours.
• The second two numbers you entered represent minutes.
• The third two numbers you entered represent seconds.

4. Press the ENTER button to confirm. The Unit will start playback about 3 seconds later.

Notes :
• Some discs may not respond to this process.
• Some scenes may not be located as precisely as you specified.
• This method for accessing specific locations is available only within the current title of the DVD disc.
• You can move through the menu by pressing the   and   buttons.
• Pressing the CLEAR button resets the time.

Angle setting

1. Press the DISPLAY button twice. The FUNCTION menu is

displayed on the screen and you can see how many angles are
recorded on the disc.

2. Press the ANGLE button repeatedly to select your desired angle.
3. The Unit will change to your desired angle about 3 seconds later.

Audio setting

1. Press the DISPLAY button twice. The FUNCTION menu is

displayed on the screen and you can see how many audio formats
are recorded on the disc.

2. Press the AUDIO button repeatedly to select your desired type of

audio.

3. The Unit will change to your desired type audio about 3 seconds

later.

Subtitle setting

1. Press the DISPLAY button twice. The FUNCTION menu is

displayed on the screen and you can see how many subtitle
formats are recorded on the disc.

2. Press the SUBTITLE button repeatedly to select your desired

language.

3. The Unit will change to your desired language about 3 seconds

later.

DVD

CD

DVD

Special Functions

Basic playback

DVD

DVD

DVD

CD

Summary of Contents for PL-D1620M

Page 1: ...1 DVD HOME THEATER SYSTEM WITH ACTIVE SUBWOOFER PL D1620M OWNER S MANUAL R 4 R IMPORTANT WARRANTY INFORMATION INSIDE PLEASE READ FOR INQUIRIES CALL 1800 656 700 OR WWW TEAC COM AU...

Page 2: ...nt or parts m ust be sent to the nearest authorised TE AC Service C entre After the repair the unit w ill be available for collection by the owner or it w ill be returned to the owner The w arranty do...

Page 3: ...your purchase receipt as your proof of purchase and the follow ing details com pleted for a valid W arranty Ow ner s Nam e O wner s A ddress Postcode M odel N am e N o Serial N o Dealer s Nam e D eale...

Page 4: ...lace with poor air flow by covering it with a cloth or by placing it on carpeting On Safety When connecting or disconnecting the AC cord grip the plug and not the cord itself Pulling the cord may dama...

Page 5: ...mats 6 Before You Start 7 Usingtheremotecontrol 7 Parts and Functions 8 11 FrontPanel 8 RearPanel 9 RemoteControl 10 11 Display 12 FrontPanelDisplay 12 DisplayInformation 12 Setup 13 18 Forbetterrecep...

Page 6: ...to play back some DVD discs on this unit if they were purchased from outside your geographic area or made for business purposes Title Chapter and Tracks DVDs are divided into titles and chapters If t...

Page 7: ...avoid damage caused by battery leakage corrosion Do not mix old and new batteries Do not mix ALKALINE standard CARBON ZINC or rechargeable NICKEL CADMIUM batteries 2 Insert two AA or UM 3 size batteri...

Page 8: ...lable Scan all available radio stations Front Panel 8 VOLUME buttons Changetheloudnessofthesoundfromthespeakers connected to the Unit 9 Remote sensor Receive the remote control unit signals 10 DIGITAL...

Page 9: ...AUDIO OUT L R jacks 23 S VIDEO DVD output jack 24 FM ANTENNA jacks 25 AM MW LOOP ANTENNA terminal 26 AUDIO IN L R jacks 27 VIDEO IN VCR jack 28 COMPONENT VIDEO jacks Y PB CB PR CR 29 VIDEO OUT jack 30...

Page 10: ...s 11 SLOW button Perform slow reverse playback of DVDs 12 TUNING buttons Fast reverse playback Fast forward playback TUNING Scan all available radio stations 13 STOP button Stop playback 14 PREV butto...

Page 11: ...ions 32 ZOOM button Zoom into an image NTSC PAL button In stop mode select whether to output the video signal TV shows AUTO which means output signal depends on DVD disc either NTSC or PAL TV shows PA...

Page 12: ...not loaded correctly upside down etc The display changes to show other indicators Freezes the image on the screen or pauses audio playback The display changes to show other indicators Does not functio...

Page 13: ...s to the VIDEO IN and left right AUDIO IN jacks on your TV or S Video Jack Use an S Video cable not supplied and the Audio cable not supplied 1 Use an S Video cable to connect the S VIDEO DVD jack on...

Page 14: ...lug PB CB VIDEO OUT jack on your Unit to PB CB VIDEO IN jack on your TV andtheRedplugPR CR VIDEOOUTjackonyourUnittoPR CR VIDEOINjackonyourTVto enjoy highest quality picture with less flicker Connect t...

Page 15: ...cart input channel for the DVD amplifier Unit 3 On the VCR select the television programme you want to watch 4 On the DVD amplifier Unit select normal stereo or Pro Logic decoder modes according to yo...

Page 16: ...manual of the connected equipment as well C Connecting another source Analogue connection Using the Audio cable not supplied connect the left right AUDIO OUT jack on your Unit to the AUDIO IN jack on...

Page 17: ...rspeaker which is slightly longer than the rest 3 Use the included RCA plug to connect subwoofer out jack on the rear of the main unit and subwoofer in jack on the rear of the active subwoofer Turn th...

Page 18: ...peakers are connected correctly Be sure the AC power cord is disconnected and all functions are off before making connections When you are not going to use the Unit for a long period of time disconnec...

Page 19: ...rom two channel sources This is done using an advanced high purity matrix surround decoder that extracts the spatial properties of the original recording without adding any new sounds or tonal colorat...

Page 20: ...A product must not offer both original Pro Logic and the Pro Logic emulation mode DTS and DTS Digital Out are trademarks of Digital Theater Systems Inc ThisUnitdoesnotdecodeDTSDigitalSurroundsignal T...

Page 21: ...LOSE button to close the disc tray after you remove the discs If you use the OPEN CLOSE button on the front panel to open the disc tray the unit will stop playing The disc holder will rotate half circ...

Page 22: ...return to the normal playback speed Playing a Disc DVD Zooming into an image While a disc is playing press the ZOOM NTSC PAL button While an image is zoomed you can use and button to shift the view a...

Page 23: ...rrent angle Sequence of angle shots Example Notes This function can only be used for discs on which scenes shot from multiple angles have been recorded If only one angle is recorded 1 1 is displayed c...

Page 24: ...change About two seconds later playback continues with the new subtitle you selected The number of languages recorded differs depending on the disc If no button is pressed within a few seconds playbac...

Page 25: ...GOTO button to set your desired chapter then press the ENTER button to confirm Time skip Elapsed time from the beginning of the currently playing chapter and the remaining time from the beginning of...

Page 26: ...k If you know the title chapter track number you want to play you can locate a specifc title chapter track by directly selecting a title chapter track number 1 Press the GOTO button to search your des...

Page 27: ...the CLEAR button resets the time Angle setting 1 Press the DISPLAY button twice The FUNCTION menu is displayed on the screen and you can see how many angles are recorded on the disc 2 Press the ANGLE...

Page 28: ...ons will be cleared If you press the CLEAR button while you are entering a title or chapter the currently entered numbers will be erased and you can reset the numbers again 3 Use or button to other fi...

Page 29: ...ress the REPEAT DISC button until the Off indicator displays on the screen DVD Repeat Playback continued on next page continued on next page continued on next page continued on next page continued on...

Page 30: ...at the end of the section Rep A B is displayed 3 The Unit will immediately begin replaying your selection To resume normal playback 4 While the disc is playing press the REPEAT A B button until the O...

Page 31: ...ton Note You can not play in Fast reverse or Fast forward during MP3 playback On screen display Turn on your TV to view the on screen display of MP3 files Press the or CURSOR button on the remote cont...

Page 32: ...onfirm The image you selected will show on TV in Full Screen and automatically display one by one again in about 6 seconds intervals You can press the PAUSE button to interrupt playback and press the...

Page 33: ...e display 2 Press the BAND button to select the desired band 3 Use the TUNING button to find your desired station 4 Press the MEMORY button on the remote 5 Press the NEXT or PREV button to select the...

Page 34: ...anguage then press the ENTER button 5 Use or button to English then press the ENTER button The screen will change to English Wordings immediately 6 To exit the FUNCTION SETUP MENU and return to the no...

Page 35: ...creen This is the correct mode for playing wide screen videos on a wide screen TV You must also set the screen mode on your wide screen TV to FULL The actual appearance of the image depends on the scr...

Page 36: ...ess 1 Press the SETUP button 2 Use or button to select Video then press the ENTER button 3 Use or button to select Brightness and then press the ENTER button 4 Use or button to shift and select the Of...

Page 37: ...ften Soft focus effect Off Picture will be returned to normal Edges 1 Press the SETUP button 2 Use or button to select Video then press the ENTER button 3 Use or button to select Edges and then press...

Page 38: ...utton L R Speaker 1 Press the SETUP button 2 Use the cursor or button to select the Audio press the ENTER button 3 Use the cursor or button to L R Speaker and then press the ENTER button 4 Use the cur...

Page 39: ...fer On should be selected if your subwoofer is connected If Off is selected no sound will be emitted by subwoofer Surround Delay 1 Press the SETUP button 2 Use the cursor or button to select the Audio...

Page 40: ...e comes out from rear surround right speaker for testing Subwoofer Pink noise comes out from subwoofer for testing Note When using the pink noise generator to test your speakers you can press the SOUN...

Page 41: ...to Portuguese Quechua Rhaeto Romance Kirundi Romanian Russian Kinyarwanda Sanskrit Sindhi Sangho Serbo Croatian Singhalese Slovak Language Name Slovenian Samoan Shona Somali Albanian Serbian Siswat Se...

Page 42: ...to clean the disc Do NOT use irregular shape discs example heart shaped octagonal etc They may cause malfunctions Check that the AC power cord is connected The region number of the disc doesn t match...

Page 43: ...cks are dirty Wipe them with a cloth slightly moistened with alcohol Clean the disc Vibrations from the speakers are affecting the Unit Remove any obstacles between the remote and the Unit Use the rem...

Page 44: ...ty 5 to 85 no condensation Video Output Input Output level 1 Vp p 75 Input level 750mV input Jack RCA Pin jack Audio Output Input Output level 1 80 0 2 Vrms 1 kHz 0dB Input level 750mV input Jack RCA...

Page 45: ...ne VIC 3043 Phone 03 8336 6500 SERVICE DIVISION MELBOURNE VIC 30 Tullamarine Park Road Tullamarine VIC 3043 Phone 03 8336 6544 SYDNEY NSW Unit 8 20 22 Foundry Rd Seven Hills NSW 2147 Phone 02 8811 400...

Reviews: