background image

RBK-X1


PN 2234800-1


    Page 8                                                                                                                           Rev A        Sept 2019 


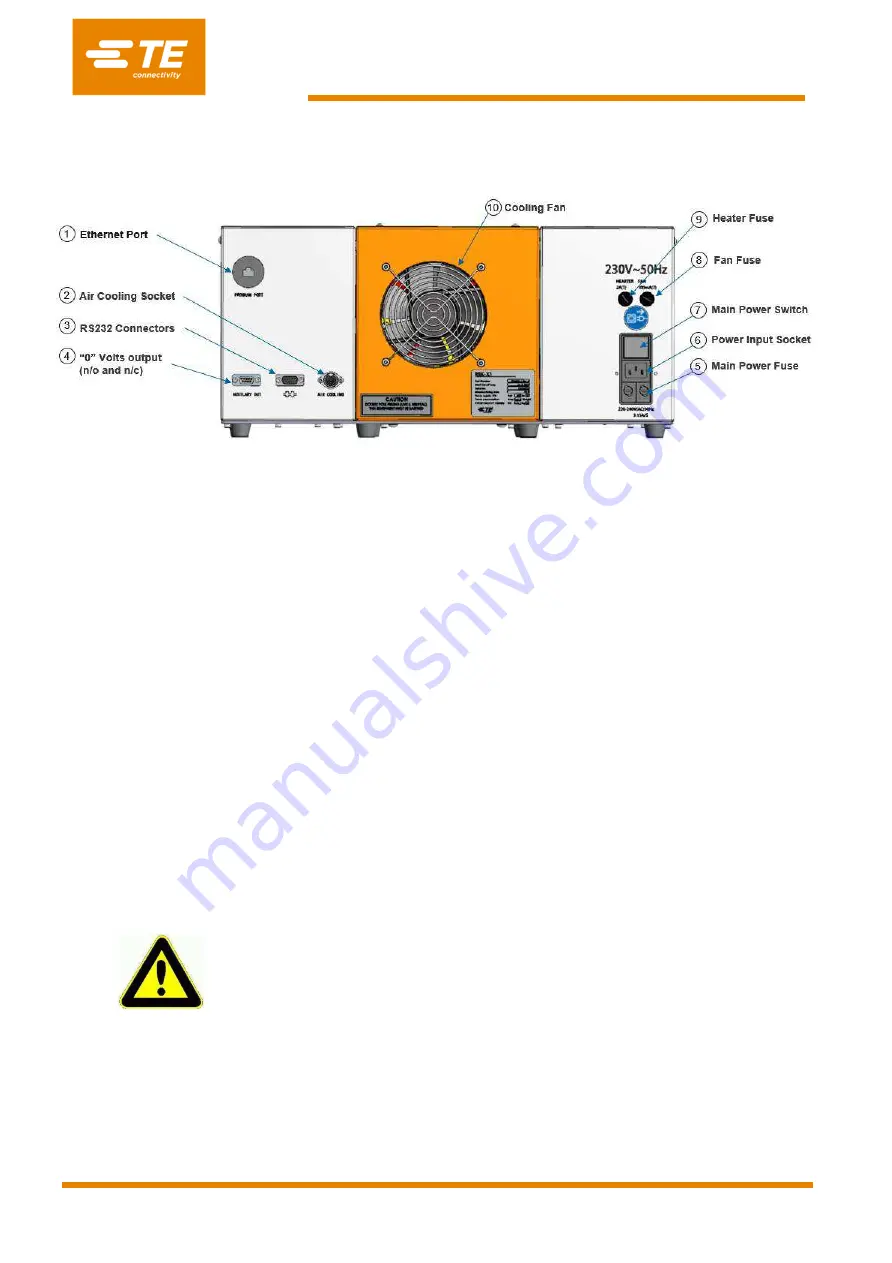
1.4  Rear Panel 


Fig. 1-4: Rear Panel 


1. 

Ethernet Port


            (Access to upgrade program to PLC and touch screen) 

2.  Air Cooling Socket 

            (Connect to air cooling kit 1-529533-7)


3.  RS 232 Connector 

(Connect to welding machine, like Schunk welding machine.) 


4. 

“0” Volts output


       (n/o and n/c, normally open and normally closed) 


5.  Main Power Fuse 

(2 X 230V, 3.15A anti-surge) 


6.  Power Input Socket 

(230V) 


7.  Main Power Switch  

(Used to turn off power to the RBK-X1, when in stand-by mode)


8.  Fan Fuse  

(240V, 1A anti-surge) 


9.  Heater Fuse 

            (240V DC, 3A anti-surge)


10.  Cooling Fan  

(Operates above 190

 °C heater temperature


Do not use the Mains Power Switch or E-stop button as normal process to turn off the 
machine, as this will cause a significant reduction to the life of the heater element. 
Turn off the Heater using the I/O Switch. The temperature will drop and cooling will 
continue, once below 190º C, the fan will turn off and the machine will enter the 
stand-by mode. The power can now be switched off using the Main Power Switch.


Summary of Contents for 2234800-1

Page 1: ...1 P a g e 1 111 Page 1 Customer Manual RBK X1 PN 2234800 1 Operating manual no 409 35012 Language English...

Page 2: ...product and in no case will TE Connectivity Raychem are liable for any incidental indirect or consequential damages arising from the sale resale use or misuse of the product TE Connectivity Raychem S...

Page 3: ...2234800 1 Page 2 Rev A Sept 2019 Disposal RBK X1 This product must not be disposed of as municipal waste Amendment Record Rev Content Amended By Date Change Request No Rev A Initial Release Cham Zhu...

Page 4: ...s 12 2 3 5 Servicing 12 2 4 Warnings and Labels 13 3 Software 14 3 1 Heat Parameter 16 3 2 Sequence Production 17 3 3 Sequence Setting 18 3 4 Production Setting 19 3 5 Maintenance 20 3 6 Auto Calibrat...

Page 5: ...3 Troubleshooting 36 4 3 1 Preliminary Checks 36 4 3 2 Troubleshooting Table 36 4 4 Recommended Spare Parts 39 4 5 Repair 42 4 5 1 Circuit Protection Device 42 4 5 2 Gaining Access 43 4 5 3 Heater El...

Page 6: ...is within 10 C editable of the set operating temperature Activated by two start buttons the heating chamber moves forward enclosing the joint area It remains in place for the set timed period and then...

Page 7: ...on to interrupt cycle 4 Dual Release allow removal of splice by hand 5 Grippers hold cable splice in heating chamber 6 Calibration Socket Connect to the UHI temperature probe to access auto calibratio...

Page 8: ...rrent PN Display product size or PN stored in the current selected process button 5 Set Value Display temperature time stored in the current selected process button 6 Production Counter 7 Real time St...

Page 9: ...7 Main Power Switch Used to turn off power to the RBK X1 when in stand by mode 8 Fan Fuse 240V 1A anti surge 9 Heater Fuse 240V DC 3A anti surge 10 Cooling Fan Operates above 190 C heater temperature...

Page 10: ...y external device to the following outputs below a ferrite core must be clamped to every connection used The ferrite clamp must contain one loop Connection requiring ferrite clamp WITH ONE LOOP 2 Air...

Page 11: ...ded during the process cycle Jamming of the operating mechanism may prevent the auto retraction of the heater chamber In this event the RBK processor heaters will switch off automatically Follow Heate...

Page 12: ...STING Do NOT Flash Test protection circuits fitted to this equipment may be damaged INSULATION RESISTANCE TESTING Do NOT exceed 250V DC protection circuits fitted to this equipment may be damaged Powe...

Page 13: ...hen handling finished wiring assemblies immediately after ejection from the heating chamber Special care must be taken when handling the calibration UHI probe immediately after ejection from the heati...

Page 14: ...The RBK X1 carries a label shown below which displays the product part number PCN product description electrical rating information The following conventions are used in the manual Information to pre...

Page 15: ...ity Input ID and password in this window For example we are trying to log on as Engineer then we should input B in user ID column and input 12345 in Password column Then click on OK button You would f...

Page 16: ...main interface Choose the setting item access to below different interface Main Interface Sequence production Heat parameter Production setting Maintenance Sequence setting System Parameter Error Log...

Page 17: ...it the parameter 2 Press on the quick button then you would find the original parameter stored in will show on and 3 Click on the value on to input the new value 4 Press on the quick button for 5 seco...

Page 18: ...0 4 After finishing the current process 3 the green light will jump to the next process 2 5 When we completed the last process 5 the green light will jump to the first process 3 We already completed...

Page 19: ...ck buttons according to the sequence you would like to set 3 2 1 3 5 for example 5 You would find the quick button you selected will show on Currently touch screen can store 15X sequence Each sequence...

Page 20: ...re a If you input the value when processor complete the setting production quantity on the main interface will pop up a tip complete to remind the operator production is completed see below capture b...

Page 21: ...operation cycle after leave factory Can be reset by engineer 5 Heating element timer which is designed to indicate the hours the heating element operate It is required to reset when replaced the heat...

Page 22: ...r the probe has been inserted into the front socket This allows the heating chamber to stabilise 2 Connect the UHI probe to the front panel socket a Touch screen entry Auto Calibration interface autom...

Page 23: ...esired value measured value negative result If above adjust OFST to measured value desired value positive result 5 Wait 25 minutes for temperature to stabilise 6 Repeat 3 and 4 if necessary 7 After OF...

Page 24: ...elding equipment 2 Switch to allow the the processor to communicate with external device 3 These values are showing the parameter temperature time transferred from external devices 4 These values are...

Page 25: ...racter received including the SOH the longitudinal addition checksum is maintained up to and including byte 11 Overflow of the checksum beyond a byte boundary is discarded This single byte checksum is...

Page 26: ...5 PID control These parameters have to be carefully adjusted together and are factory set Proportional Band Area around the selected process temperature where the output is at a level other than 100...

Page 27: ...tan by time the machine is in standby mode automatically Press the IO button for 5s to power on the machine Failed to find home position When power on the machine the heating chamber isn t on home pos...

Page 28: ...achine work well before leaving factory To start the circle test 1 Switch to 2 Edit the test time if need on default value 60 min 3 Press on both start button then test cycle will start 4 When time di...

Page 29: ...regulations 4 1 3 Location RBK X1 is designed to be installed and operated in industrial environments However it should not be used near explosive or flammable materials or in a location where it wou...

Page 30: ...r and its stored parameter will be shown on the main interface and they can be used repetitively until another process button is selected 10X process quick buttons 4 2 3 Sequence Production mode Allow...

Page 31: ...rrect process button is selected for the task required a The active button is shown on the main interface 6 When the Heater Indicator turn green machine is ready to start process Switch OFF 1 Ensure t...

Page 32: ...d position over splice to be processed 3 Insert the cable splice into the Processor grippers Align the center of the splice and product ends with the guide markers on the Perspex shield and Guard 4 Pr...

Page 33: ...the E STOP is activated it will immediately move to the rear and eject the splice being processed Care should be taken in handling the splice as the splice nugget and surrounding area may be hot The...

Page 34: ...ected to an AC mains electricity supply Before undertaking any maintenance or repair always turn off the equipment and ensure it is isolated from the AC supply Allow machine to cool down before starti...

Page 35: ...ly as if the operator were preparing to switch the machine off The equipment is connected to an AC mains electricity supply Before undertaking any maintenance or repair always turn off the equipment a...

Page 36: ...ck the cooling fan is operating correctly and air is flowing through the rear vent panel 2 Remove front cover Check for correct clearance a minimum of 75mm clear space and obstructions 3 Wire Grippers...

Page 37: ...hooting Table Problem Possible Cause Verification Solution All LED s OFF No power Unplug mains power cable Check mains supply present Restore power supply Mains Switch not in the ON position and or th...

Page 38: ...ring and connections Adjust sensor position or replace if required Load sensor failed or stuck ON Check sensor gap and position Sensor should be illuminated Check wiring and connections Adjust sensor...

Page 39: ...h off procedure not being observed Switch off at I O switch Fan will continue to run until 190 C and then switch off Blue stand by led will be lit Ensure correct switching procedures are carried out C...

Page 40: ...art No Note Main Equipment 2234800 1 View Window 2234897 1 Start button 2234980 1 Contact Start button 2234984 1 Storage Battery 2234971 1 Each machine would need 2X Process Quick button 2234981 X X b...

Page 41: ...f lower heater 2234991 1 See section 5 3 2 how to replace the heating element Thermocouple 2234990 1 Mounting on lower heating element Cooling Fan 2234963 1 Remove the Top cover to replace this Fan St...

Page 42: ...Right cover PLC Module 2234964 1 Locate in Right Cover Safety Relay 2234967 1 Locate in Right Cover Touch Screen 2234977 1 Temperature controller 2234968 1 Locate in left cover Reset Spring Latch Ass...

Page 43: ...Y REPAIR OR REPLACEMENT THE MACHINE HAS A CAPACITOR AS PART OF THE AUTO RETRACT FEATURE NORMAL PRECAUTIONS REGARDING DISSIPATION OF STORED ENERGY MUST BE TAKEN PRIOR TO ANY SERVICE OR REPAIR AFTER COM...

Page 44: ...00 1 Page 43 Rev A Sept 2019 4 5 2 Gaining Access To gain access to the internal components the side and top covers must be removed Use the correct size Key Top Cover Securing Screws 4X Left Cover Sec...

Page 45: ...RBK X1 PN 2234800 1 Page 44 Rev A Sept 2019 Right Cover Securing Screws 7X...

Page 46: ...be easily removed from cover See picture above in yellow circle 4 Remove the 2X upper heater mounting screws on top of red heating element cover with one hand to hold the heating element avoid falling...

Page 47: ...alibration tools 288869 000 Standard UHI temperature calibration probe 952687 000 Extension cable 4 6 2 Power Cord Transformer 2234780 1 Power Cord EU Packed in standard machine Processor use in Europ...

Page 48: ...4800 1 Page 47 Rev A Sept 2019 4 6 3 Centering Device TBD Centering Device Fixture TBD Software upgrade 4 6 4 Multi wire Fixture 2234710 1 Multi wire Fixture 4 6 5 Stub Splice Fixture 2234801 1 Stub S...

Page 49: ...9533 7 Air Cooling kit air flow controller 4 6 7 Welding machine interface Schunk 2234989 1 Service Welding machine interface Schunk 4 6 8 Barcode Scanner 2234781 1 Scanner 2234782 1 Cable assembly wi...

Page 50: ...ding on wire size and number of wires used Mains Fuses 2 x 240V 3 15A T anti surge Line and Neutral Product Range RBK ILS 125 QSZH Sizes 1 to 3A RBK ILS 85 Sizes 6 1 to 12 3 For other Raychem TE Produ...

Reviews: