background image

5

DITTO JAM X2 LOOPER User Manual

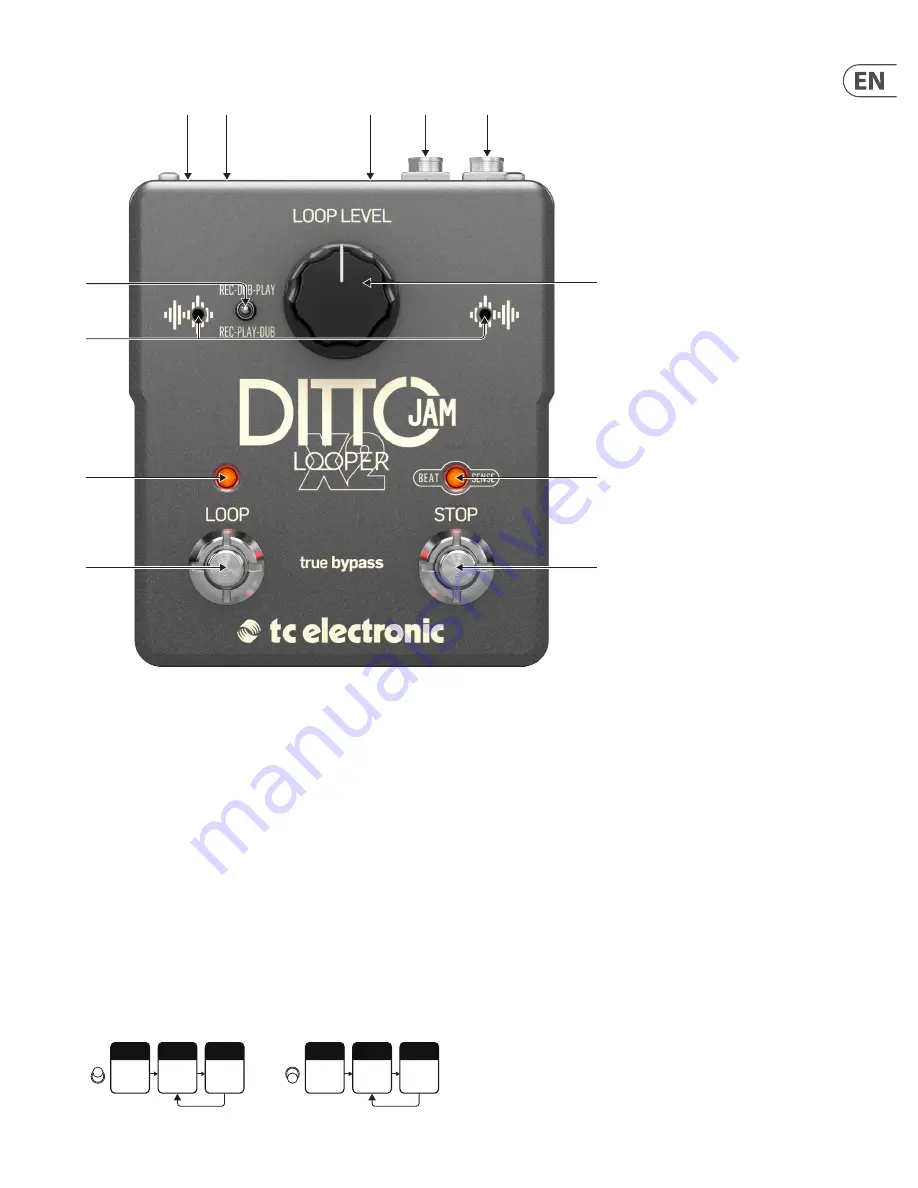
3.  Controls and Connectors

(5)

(4)

(3)

(2)

(1)

(6)

(

11

)

(

12

)

(

10

)

(9)

(8)

(7)

1. 

Input

 – Connect your guitar via 1/4" TS cable. 

2. 

Output

 – Send the loops and direct signal to your amp via 1/4" TS cable. 

3. 

Ext Mic input

 – Connect the included external microphone to this input, 

then attach the mic directly to a drum for optimal tempo detection. 

If necessary, you can increase the reach of the mic with a 1/8" TRS headphone 

extension cable. 

4. 

Power input

 – Connect a 9 V / >150 mA center-negative power supply 

(not included). 

5. 

USB port

 – Use a USB cable to connect to a computer for firmware updates. 

6. 

Loop Level

 – Adjust the volume of the loops with this knob. 

7. 

Overdub mode switch

 – Use this switch to determine the overdub 

behavior. With the switch down, you record your loop, and upon completing 

the loop, the Ditto X2 Jam goes directly into playback. However, some 

players prefer to record a loop of silence or ambient soundscape, or even a 

rhythmic layer for their first loop, and then immediately overdub another 

layer of harmonic content on top before beginning normal playback. In this 

case, set the switch to the up position.

8. 

Onboard BeatSense mics

 – These mics will monitor the tempo of the 

performance and keep your loops in time with the band. Make sure that 

the Ditto X2 Jam is placed close to the drums so it can pick up the rhythmic 

accents clearly. Note that the onboard mics are muted if the external mic 

is connected. 

9. 

Record LED

 – The status of the looping process and other functions are 

indicated on this LED. See chapter 5 for details. 

10. 

LOOP footswitch

 – Control several loop-related functions with this switch, 

including record/overdub/play and undo/redo. See chapter 5 for details. 

11. 

BeatSense LED

 – Indicates the detected tempo as well as other 

looping functions. 

12. 

STOP footswitch

 – Press the switch once to stop loop playback, and hold 

the switch to clear the loop. This switch also allows manual tempo input 

during Practice mode. 

Press Once

Record

Overdub

Press Once

Play

Press Once

Press Once

Record

Play

Press Once

Overdub

Press Once

Summary of Contents for DITTO JAM X2 LOOPER

Page 1: ...User Manual DITTO JAM X2 LOOPER Intuitive Looper Pedal with Responsive BeatSense Technology Rec Play Rec Dub Modes and Unlimited Overdubs...

Page 2: ...ntroduction 4 2 1 Unpacking 4 2 2 Setting Up 4 2 3 Check for Updates 4 3 Controls and Connectors 5 4 Hookup Scenarios 6 5 Operation 7 5 1 Mode Descriptions 7 5 2 Selecting Modes 7 5 3 Modes Operation...

Page 3: ...dwith theapparatus Whenacart isused usecautionwhen movingthecart apparatus combinationtoavoid injuryfromtip over 13 Unplugthisapparatusduringlightningstormsor whenunusedforlongperiodsoftime 14 Referal...

Page 4: ...TC Electronic effect pedal Rubber feet for non Velcro use External microphone Quick Start Guide sheet TC Electronic sticker Inspect all items for signs of transit damage In the unlikely event of tran...

Page 5: ...r even a rhythmic layer for their first loop and then immediately overdub another layer of harmonic content on top before beginning normal playback In this case set the switch to the up position 8 Onb...

Page 6: ...a result of the extra level that loopers produce when overdubbing or playing live over loops Example 2 Ditto X2 Jam in an amp s FX loop This setup generally produces the best result when using a loop...

Page 7: ...close to a percussion instrument Loop LED flashes red during power up only then BeatSense LED lights solid green until it hears a beat Gimme a beat Ask your percussionist drummer to play a steady groo...

Page 8: ...rding process as well as during playback During these times it needs to hear a steady groove from the percussionist Basic drum fills are okay but mega syncopated rapid meter changes are not Think of D...

Page 9: ...single ultimate answer so experiment with switch 2 in the up position to hear what sounds best to you 6 Maintenance 6 1 Firmware Update TC may provide updates for the built in software of your pedal t...

Page 10: ...onic on the Web tcelectronic com Facebook facebook com tcelectronic Google Plus plus google com tcelectronic Twitter twitter com tcelectronic YouTube youtube com user tcelectronic 8 Specifications Max...

Page 11: ...antee that interference will not occur in a particular installation If this equipment does cause harmful interference to radio or television reception which can be determined by turning the equipment...

Page 12: ......

Reviews: