


8
DITTO JAM X2 LOOPER User Manual
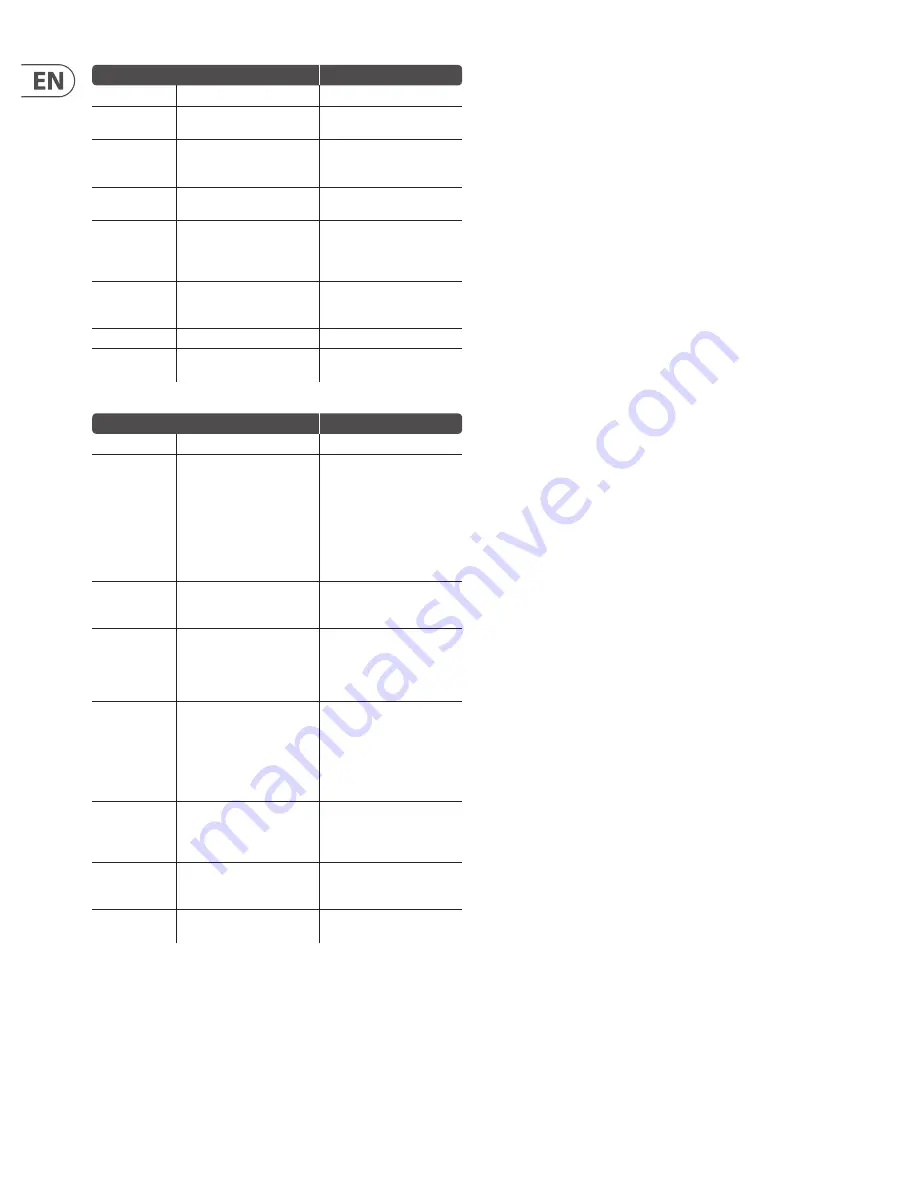
Classic mode
LED activity
Ready
No loop. Waiting for record.
No LEDs
Record
Tap Loop button and record
something cool on your guitar.
Loop LED solid red during
recording.
Play your loop
Tap Loop button on the downbeat
where you want to start looping.
Tap Stop to play the loop later.
Loop LED solid green during
playback.
Jam
Play something complimentary on
your guitar to go with the loop.
—
Overdub
Tap Loop during playback to enter
Overdub recording. Add as many
layers as you want. Tap Loop to end
Overdubbing.
During Overdub, Loop LED solid red
with a blink at loop point.
Undo/Redo
Hold Loop footswitch to undo the
most recent overdub. Hold again
to redo.
Loop LED flashes green until Undo/
Redo is complete*
Stop
Tap Stop to halt loop playback.
Loop LED flashing green.
Clear
Hold Stop to clear out the current
loop so you can record another.
No LEDs.
Practice mode
LED activity
Ready
Waiting for guitar rhythm.
BeatSense LED solid or flashing red.
Gimme a beat!
Play the chords or riff on your
guitar before recording to set
tempo. If you want to start
recording immediately, you can
tap 4 beats, and on the 5th, hit the
Loop switch to start recording at
the new tempo while it senses
the ongoing beat of your loop
recording.
BeatSense LED will flash red in time
when it’s acquired your rhythm.
Record
Tap Loop button and record
something cool on your guitar at
the tempo you set.
Both LEDs flash red in time.
Play your loop
Tap Loop button on the downbeat
where you want to start looping.
Once the loop is playing,
BeatSensing stops and tempo will
remain at where you played it.
Loop LED solid green, then blinks at
loop point. BeatSense flashes red
at tempo.
Adjust tempo
Playback speed can be adjusted
during Stop or Play. Tap Stop to
halt loop playback, then tap in
a new slower or faster tempo so
you can practice those super-fast
runs or hear them played at
superhuman speeds.
Both LEDs at tempo: Loop = green,
BeatSense = red.
Overdub
Tap Loop during playback to enter
Overdub recording. Add as many
layers as you want. Tap Loop to end
Overdubbing.
Loop LED flashes red in time.
BeatSense shows red tempo.
Undo/Redo
Hold Loop footswitch to undo the
most recent overdub. Hold again
to redo.
Loop LED flashes green until Undo/
Redo is complete*
Clear
Hold Stop to clear out the current
loop so you can record another.
BeatSense LED solid or flashing red.
* Only when Undo/Redo DIP switch set to Immediate. If the position of the DIP
switch is changed to Loop Point, the Loop LED will continue to flash until the loop
point, at which time it will play or mute the overdub.
5.4 BeatSense notes
To get the most from Jam, check out the following points.
Percussion tips
Ditto Jam senses beats during the loop recording process as well as during
playback. During these times, it needs to hear a steady groove from the
percussionist. Basic drum fills are okay, but mega-syncopated rapid meter
changes are not. Think of Ditto Jam as a real band member; if the drummer,
without warning, starts playing 30 BPM faster, chances are somebody in the
band is going to get confused and might drop out for a while. Ditto Jam is no
different. The product was designed to follow subtle, natural tempo movements
- not ace a Frank Zappa audition!
Ditto Jam needs a lot of the percussion hits to land on the on-beats. If Jam
sees lots of syncopation such as a string of 8th or 16th note anticipations
(“pushed” notes) in a row, they’ll be interpreted as downbeats and this will affect
playback timing. As your percussionist gets used to you using the product in
certain song sections, simpler playing during those bits will yield better looping.
Beyond 4/4
If you like to stray away from the 4/4 time signature, Ditto Jam can do that! As
long as your time signature is based on quarter notes (3/4, 5/4, 7/4, etc.), you can
record and play loops.
Tempo hinting
If the BeatSense LED glows solid or “hunts” during an otherwise solid percussion
groove, it may be a large mismatch between tempo history of the previous song
and the current one. If you see this before recording a loop you can:
1. Hold Stop again to perform a Clear/Reset even if you cleared recently.
2. Tap Stop at the tempo to “hint” at the tempo so Ditto Jam can focus more
directly on it.
If your loop played successfully earlier but now the BeatSense LED is wandering
or solid,
during playback
you can also tap the Loop footswitch to hint at the
downbeats. Of course, the normal function of the Loop footswitch causes an
overdub to be triggered when pressed during playback, but if Jam receives more
than 2 taps, the overdub will be overridden and only tempo information will
be entered.
In other words, tap the Stop footswitch to hint the tempo
before recording
a loop, or tap the Loop footswitch more than 2 times to hint the tempo
during playback
.
Double time hint
Ensure that the BeatSense LED is showing the downbeats in your music,
not offbeats. If you see (1) AND (2) AND… instead of ONE (and) TWO (and)…
then you can tap STOP a couple of times at twice the tempo (ONE AND TWO
AND) which will orient the beats properly before you record and then play back
your loop.
If the song tempo is very slow, double time hinting will effectively extend Ditto
Jam’s BeatSense range.
If Ditto Jam has automatically sensed a tempo that is doubletime (exactly twice
as fast) by itself, it’s fine to record and play loops with no hinting.
Do the Tighten Up…
Ditto Jam can help your playing sound more on-beat. If, during recording, some
guitar notes landed a little wide of the mark, Ditto Jam will try to move recorded
audio near beats closer to where it’s sensing that the beats are falling. Each time
around it’ll sound a little tighter.
Summary of Contents for DITTO JAM X2 LOOPER
Page 12: ......


