


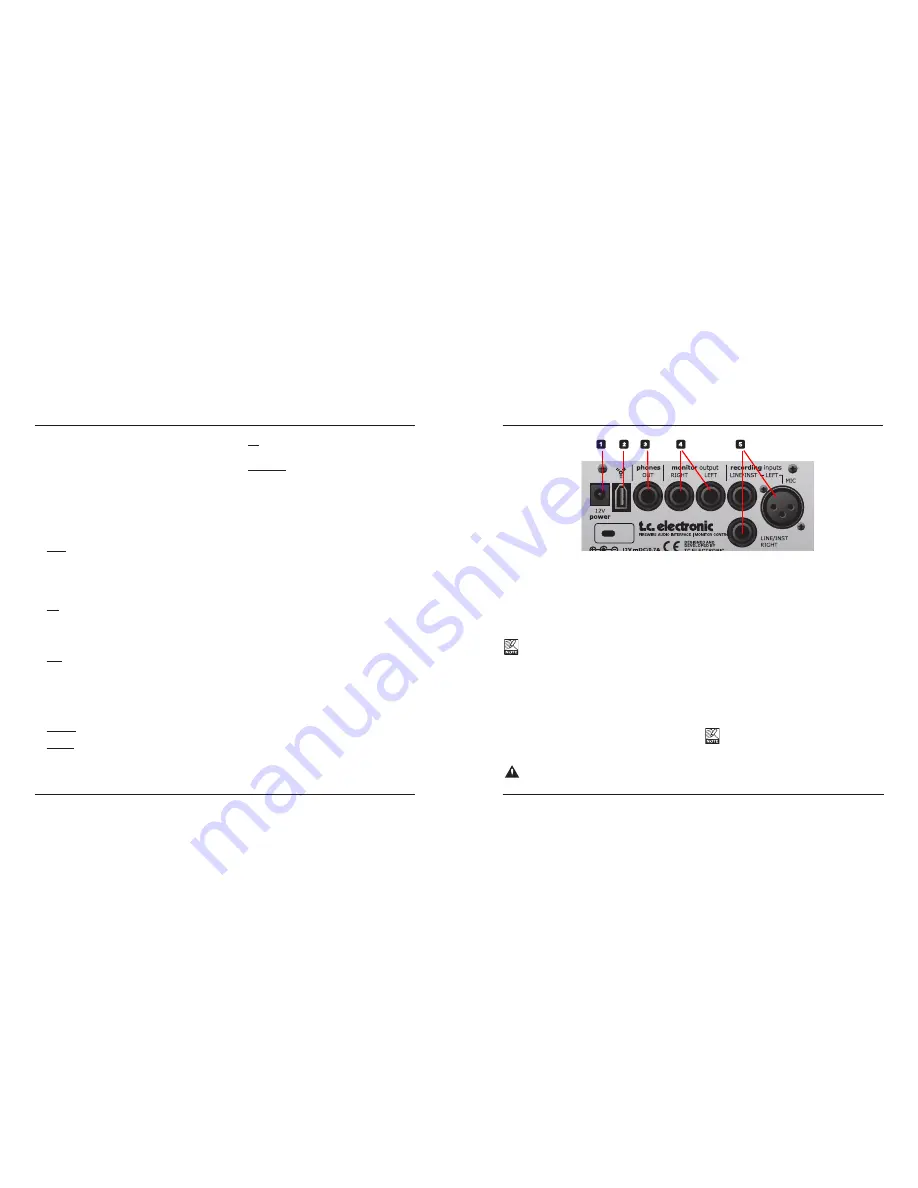
1 Power In
Use the power-supply supplied with the product or a
power-supply with equivalent specifications. (12V DC 0.3
Amp).
2 FireWire connector
This is an IEEE 1394 connector for connecting the
Desktop Konnekt 6 to a computer.
The Desktop Konnekt can be bus-powered via
FireWire if your computer supports bus power. Please
refer to the Appendix section of this manual.
Before plugging in the FireWire connector, make sure that
the plug is positioned correctly (not upside-down).
3 Phones Out
This is a 1/4” TRS jack connector for headphones. The
phones output level is set using the PHONES knob.
However, you can also assign the big volume knob
to control the phones level if you prefer. This is set
up via the Setup page in the TC Near Control Panel.
Notice that the PHONES knob will always set the max
phones level.
Warning!
Excessive sound pressure from earphones and
headphones can cause hearing loss.
4 Monitor Output
These are the balanced main outputs of the Desktop
Konnekt. Connect them to a set of active speakers
(such as Dynaudio Acoustics BM series), to an
amplifier with passive speakers or to a mixer.
5 Recording Inputs
– Use the two LINE INST 1/4” jack connectors for
line-level or Hi-Z instruments to connect line-level
instruments, electric or acoustic guitars directly.
– You may connect a microphone to the XLR
connector and benefit from the Desktop Konnekt’s
IMPACT™ mic pre-amp renowned for its high quality.
48V phantom power for condenser microphones can
be activated via the Mixer page in the TC Near Control
Panel. For microphones with a particular low output,
the Boost should be activated. This is also done via
the Control Panel’s Mixer page.
If you want to, you can leave a microphone and
your instruments connected to the three recording
inputs all the time. Input selection is done using the
SCENE buttons.
FRONT PANEL OVERVIEW
REAR PANEL OVERVIEW
13
12
11 Phones level
Individual levels can be set for the Phones and
Monitor outputs. This knob sets the output level for
the Phones out. It is also possible to link the phones
level output to the big volume knob. This option can
be selected on the Setup page of the TC Near Control
Panel.
12 Meter Select (In/Pre/Post)
This switch allows you to switch between metering
the signal at three different stages.
Input: When this LED is lit, the meters show the
signal level at the input. The best signal to noise ratio
is achieved when the input signal only occasionally
peaks at “0”. Adjust the level on the sending device
and set the in-gain of the Desktop Konnekt 6 using the
GAIN 1 and GAIN 2 knobs.
Pre: When this LED is lit, the meters show the sum of
the following signals:
- Input signal after the gain trims
- Reverb output
- DAW output.
Post: When this LED is lit, the meters show the level
on the MAIN outputs after the master volume control.
13 FireWire/Power LED Indicator
When the Desktop Konnekt 6 is hooked up via
FireWire, the blue LED can indicate the following
states:
Steady lit:
Status OK
Flashing:
Uploading, hardware error or FireWire
communication error.
Off:
The Konnekt has no connection to the
driver, maybe because the driver is not
installed.
Single flash: If your setup includes several Desktop
Konnekt 6 units, you can alter between
these by selecting the relevant tab
in the TC Near Control Panel. When
selecting
Konnekt unit, the blue LED on that unit gives a single
flash to identify that this is the Konnekt you have
selected.
14 Master Volume
This is the master volume control for monitor outputs.
The knob has red LEDs inside indicating the level. The
higher the setting, the more intense the red light.
The light can be disabled completely via the Setup page if
you prefer.
15 Meters
Three color LED meters.
Green:
-60 to -9 dB
Yellow:
-9 to 0 dB
Red: Overload


