


7
66
7
UP AND RUNNING IN TEN MINUTES
This quick-guide will help you set up the Desktop Konnekt
6 in a typical application. For further details please refer
to later sections of this manual.
Unpacking
• Open the box from the top and remove cabling.
• Lift out the styrofoam insert, then lift out the Desktop
Konnekt using both hands.
• Remove the Konnekt from its plastic bag.
• Inspect your Konnekt for signs of transit damage.
• In the unlikely event of transit damage having
occurred, inform the carrier and the supplier.
• Keep all the packaging if damage has occurred, as
this will show evidence of excessive handling force.
• It is also a good idea to keep the packaging for future
transportation.
Check contents
The package should contain the following items:
• Konnekt audio interface
• Power supply
• FireWire cable
• DVD with software etc.
• Konnekt Installation Guide
COMPUTER REQUIREMENTS
Mac
• PowerPC (1 GHz or higher) or Intel CPU
• 256 MB RAM
• FireWire (IEEE 1394) port
• OS X 10.4.11 or 10.5
Windows
• Pentium 4, 1.6 GHz or faster
• 256 MB RAM
• FireWire (IEEE 1394) port
• Windows XP or Vista 32 bit
* We recommend running your Konnekt(s) on a dedicated FireWire
bus.
If your computer has one or more FireWire connections on the
chassis they will typically run on the same FireWire bus. You may
connect the Konnekt to one of these. If you intend to run additional
FireWire devices simultaneously, for example an external hard drive,
we recommend running each device on its own, separate bus.
This separate bus would typically be on an installed FireWire PCI
card. Note that such a FireWire PCI card typically has three ports,
but these ports also operate on a single bus.
Software installation
• The software MUST be installed before connecting the
Konnekt.
• Refer to the Konnekt Installation Guide supplied in
the package and on the Konnekt DVD.
• If you are familiar with software installation
procedures in general, you may simply insert the
accompanying DVD-ROM in your computer’s DVD
drive and follow the instructions.
TC Near Control Panel
When the Konnekt drivers have been installed correctly,
you can open the TC Near Control Panel.
On Mac computers:
/Applications/TC Near
You may also start the application from System
Preferences.
On Windows computers:
Press: Start/Programs/TC Electronic/TC Near
The TC Near Control panel can also be accessed via
Windows’ control panel section.
We encourage you to ensure that you have the
latest software and manual version by visiting our
website at www.tcelectronic.com
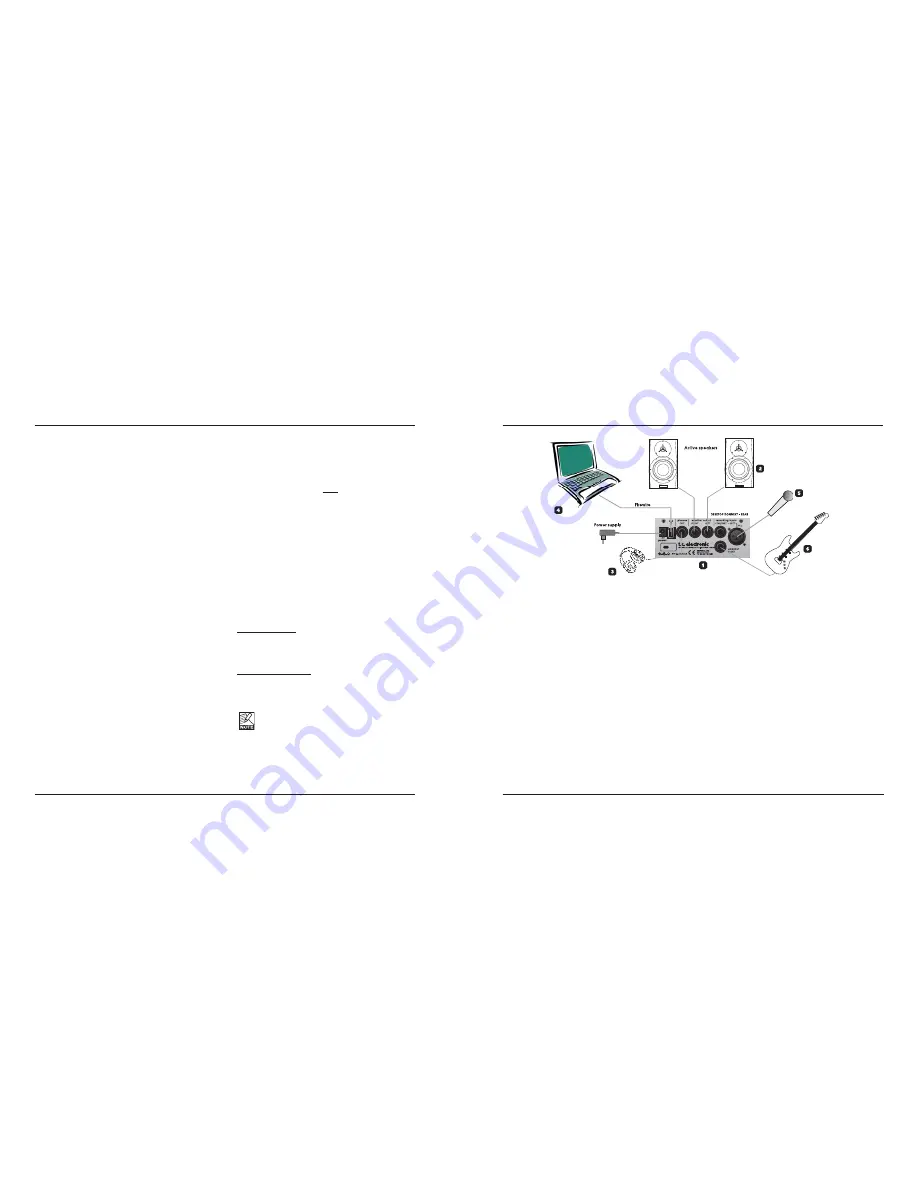
QUICK SETUP GUIDE
TYPICAL SETUPS: MICR INSTRUMENT
Linked level control is ideal if you record yourself
in front of the computer using headphones, simply
because of using the big volume knob is more comfortable.
4 Computer
Use the Desktop Konnekt 6 with a laptop or desktop
computer with a FireWire interface. Please read the
“System requirements” section in this manual for
information on minimum requirements.
5 Microphone
Connect either a dynamic or a condenser microphone
to your Desktop Konnekt 6. If you use a condenser
microphone, the +48 option in the channel strip on
the TC Near mixer page must be enabled. Depending
on the output level of the connected instrument, you
may need to activate the boost function in the channel
strip on the TC Near mixer page.
6 Guitar
Connect a guitar, a bass or a line level instrument to the
LINE/INST RIGHT jack. The instrument inputs are Hi-Z,
meaning you can connect any electric guitar or bass,
whether active or passive.
1 Desktop Konnekt 6 – Rear Panel
This is the rear panel view of the Desktop Konnekt 6.
2 Active Monitors
In this setup, we use a set of active monitors
connected to the Monitor outputs. Of course, you
can also connect your Desktop Konnekt 6 to a pair
of channels on a mixer or directly to a hi-fi amplifier
instead.
3 Headphones
Use this jack to connect a set of headphones. You
have a couple of choices when it comes to controlling
the level of the headphones output. By default, the
PHONES knob on the front panel controls the phones
level. However, via the Setup page it is possible to link
the phones level to the big volume knob on the front
panel.
Notice that when the big volume knob is assigned to
controlling the headphones level, the PHONES knob
still sets the max headphones level.
Separate level control is ideal such as when you are
in the control-room and a singer in the recording room
needs a different headphone level.


