TC Electronic Desktop Konnekt 6 User'S Manual And Operation Manual Download Page 16

29

28

FAQ

TC Near prevents computer standby mode

Before setting your computer in standby mode, the TC 
Near Control Panel must be shut down. Computers 

handle standby mode and hibernation in different ways. 
To prevent instability on the audio interface after the 

computer is turned back on, the TC Near Control Panel 

must be closed. Most likely you will also need to close 
you host application (e.g. Cubase or Logic).

No Reverb

There can be several reasons why you don’t hear the M40 
Studio Reverb.

Control Panel closed:  
The M40 Studio Reverb can only be active when the 

TC Near Control Panel is open.


Reverb Disabled:  

It is possible to disable the reverb on the TC Near 

Control Panel’s Setup page. Uncheck this box:


TIPS

Disconnecting the Desktop Konnekt 6

We recommend closing the TC Near Control Panel before 

disconnecting or powering off your Desktop Konnekt 6.

Tool tips

Place the mouse over buttons, knobs, tick boxes etc. 

in the TC Near Control Panel to have relevant tool tips 

displayed next to the exclamation mark in the lower part 
of the Control Panel.

SHORTCUT KEYS

The various main pages can be accessed using the 
following shortcut keys:

Function Press

Device pages
Mixer   = M or 1
Setup   = S or 2
About   = A or 5

System settings page  

= CTRL + S

Alternate between devices = CTRL + 1 to 4

UPDATING SOFTWARE

From time to time, the TC Near Control Panel and the 

software for the Desktop Konnekt 6 will be updated, 
and new features will be added. We urge you to stay 
up-to-date and download the latest software via www.
tcelectronic.com.

One you have downloaded the new software, updating is 
easy:

-  Close the TC Near Control Panel.

-  Power off your Desktop Konnekt 6.
-  Run the installer by double-clicking it.
-  Follow the instructions.

For detailed instructions on software installation, please 
see the Installation guide included in the product box.

Updating Firmware

Firmware is a computer program that is embedded in a 
hardware device, for example a microcontroller.
Some software updates also require an update of the 
firmware. The Konnekt firmware is updated via the 
“About” page.

APPENDIX

When updating the unit’s firmware, we recommend 

NOT running the unit on FireWire bus power. Please 

attach the supplied power-supply before pressing 
the UPDATE FIRMWARE button.

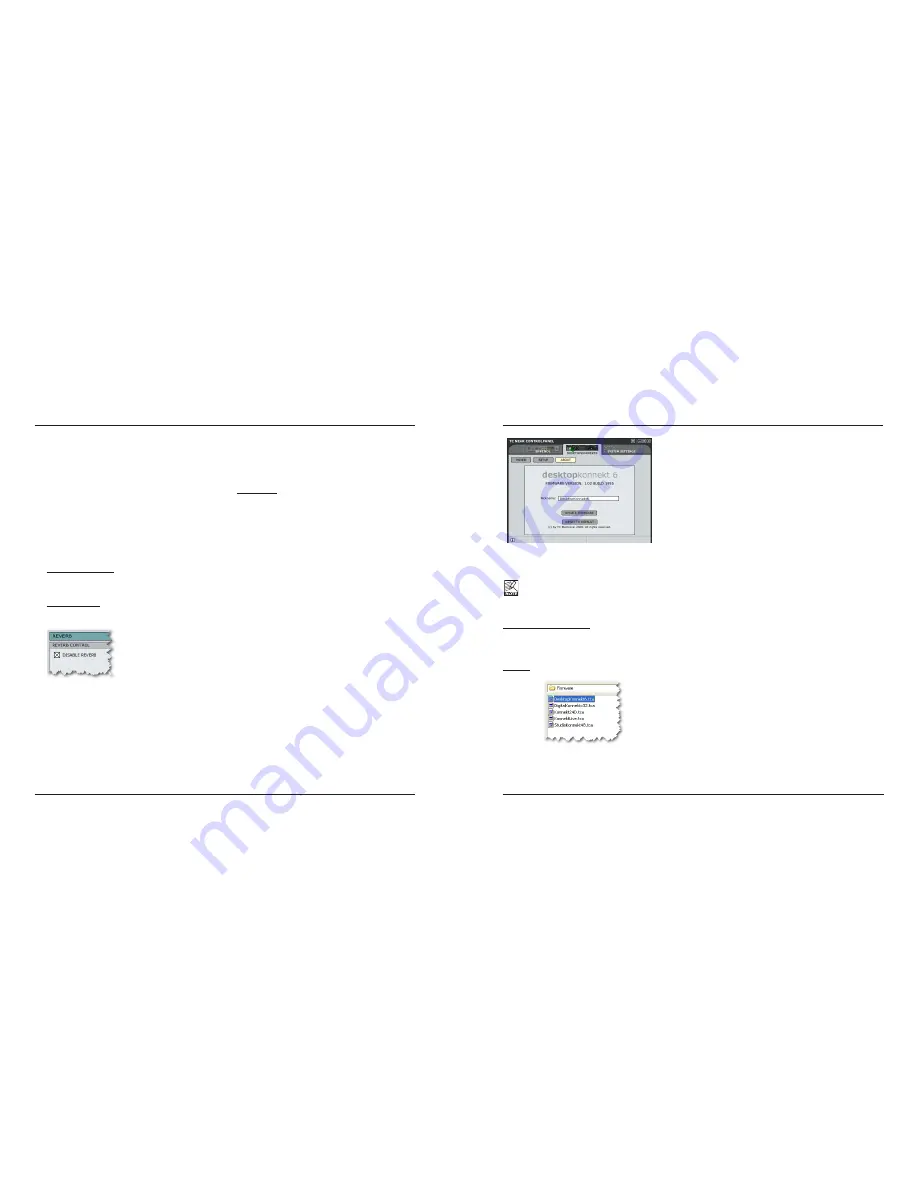
Firmware Update procedure:
Simply click the “UPDATE FIRMWARE” button and select 
the relevant firmware for your Konnekt model. Then 
press “Open”.

Example: Updating the Firmware of a Desktop Konnekt 6:

FIREWIRE BUS POWER

The Desktop Konnekt 6 can use FireWire bus power. With 
FireWire bus power, the device is powered directly from 
the FireWire connection, and you do therefore not need to 
use the external power supply.

There are a few things to be aware of regarding bus 
power:

4-pin FireWire connectors

Please note that not all FireWire ports are able to provide 
bus power at all. Some laptop computers carry 4-pin 
connectors. These do not provide bus power.

Several Konnekt units on a single FireWire bus

If you run more than one Konnekt device on a FireWire 
bus, only one of them can be bus-powered; the others 
require power from the external power supply.

Insufficient bus power

Some laptop computers – even those with 6-pin 
connectors – do not provide enough bus power for a 

single Konnekt unit to run properly. If you experience any 
problems, please use the provided external power supply 
as the first effort to solve the problems.

CONNECTING/DISCONNECTING

We recommend closing the TC Near Control Panel when 

plugging or unplugging the FireWire cable on Konnekt 
units.

“Hot-plugging/unplugging” is NOT supported.


APPENDIX

Summary of Contents for Desktop Konnekt 6

Page 1: ...User s Manual English Version Desktop Konnekt 6...

Page 2: ...ipment should be installed near the socket outlet and disconnection of the device should be easily accessible To completely disconnect from AC mains disconnect the power supply cord from the AC recept...

Page 3: ...an be determined by turning the equipment off and on the user is encouraged to try to correct the interference by one or more of the following measures Reorient or relocate the receiving antenna Incre...

Page 4: ...r top notch sound quality Desktop Konnekt 6 s unique design not only makes it fit perfectly onto your desktop for easy operation it will also make you want to leave it right next to your laptop just f...

Page 5: ...Control Panel On Mac computers Applications TC Near You may also start the application from System Preferences On Windows computers Press Start Programs TC Electronic TC Near The TC Near Control pane...

Page 6: ...rols the phones level However via the Setup page it is possible to link the phones level to the big volume knob on the front panel Separate level control is ideal such as when you are in the control r...

Page 7: ...ST 1 4 jack inputs When you work with a variety of recording sources you do not have to change the routing every time You can leave microphone and instruments connected to the three recording inputs a...

Page 8: ...l the time Input selection is done using the SCENE buttons FRONT PANEL OVERVIEW REAR PANEL OVERVIEW 13 12 11 Phones level Individual levels can be set for the Phones and Monitor outputs This knob sets...

Page 9: ...as you wish Simply click on the channel label and enter a name of your choice MIXER PAGE MIXER PAGE 15 14 CONTROL PANEL Press the Mixer tab to enter the Mixer page To change position of knobs and fade...

Page 10: ...he A B button you will toggle between these two memory locations The A B memory locations are temporary settings only Saving a preset will save the currently selected memory location only The setting...

Page 11: ...AW 13 100 Deactivates the mix control and sets a 100 wet mix This is the setting to use when you are using the M40 reverb as a send effect and also when using it as a cue reverb for recording When usi...

Page 12: ...the Setup page Disabling the Reverb Control will of course have no influence on the VST AU version of the M40 Studio Reverb The reverb section on the mixer page will then show 7 Reverb Control Reverb...

Page 13: ...48 units connected via FireWire a computer and an ADAT interface We assigned the nicknames SK48 No1 and SK48 No2 to the two Studio Konnekt 48 units Nicknames are set on the Setup page The intention is...

Page 14: ...tudio Konnekt 48 will auto coast and immediately shift to the latest received valid clock rate AUTO INTERNAL NO REFERENCE This message appears when a valid external reference sync source has not been...

Page 15: ...units will appear in this drop down menu Output Assuming that Desktop Konnekt 6 is the only Konnekt device connected to your computer you can select between the following output channels for each outp...

Page 16: ...licking it Follow the instructions For detailed instructions on software installation please see the Installation guide included in the product box Updating Firmware Firmware is a computer program tha...

Page 17: ...dB 20 Hz to 20 kHz 1 4 Phone Jack Ground Sensing Design 100 Ohm 100 dBu to 13 dBu 95 dB 0 002 1 kHz 1 dBFS 102 dB 20 Hz to 20 kHz 0 0 1 dB 20 Hz to 20 kHz 100 dB 20 Hz to 20 kHz DAC D to A Conversion...

Reviews: