THDC / THDCP - 954 / 955 / 974 (Rev. 06/03)
THDC / THDCP - 954 / 955 / 974 (Rev. 06/03)
1-2
1-2
SS
Avoid touching exhaust components while
Avoid touching exhaust components while
changing the oil for severe burns could
changing the oil for severe burns could
occur.
occur.
SS
Some state and federal agencies in the
Some state and federal agencies in the
United States have determined that used
United States have determined that used
engine oil can be carcinogenic and can
engine oil can be carcinogenic and can
cause reprodu
cause reproductive toxicity
ctive toxicity.
. Avo
Avoid inhala-
id inhala-
tion of vapors, ingestion and prolonged
tion of vapors, ingestion and prolonged
contact with used engine oil.
contact with used engine oil.
CAUTIONS:
CAUTIONS:
SS
Dispose of oil and filter in accordance with
Dispose of oil and filter in accordance with
federal and
federal and local regulation
local regulations.
s.
SS
Do not use a strap wrench to tighten the oil
Do not use a strap wrench to tighten the oil
filter
filter.
. Mechani
Mechanical over-tight
cal over-tightening may
ening may
distort the threads or damage the filter
distort the threads or damage the filter
gasket.
gasket.
SS
Never operate the engine with the oil level
Never operate the engine with the oil level
below the ADD mark or above the FULL mark
below the ADD mark or above the FULL mark
on the oil dipstick.
on the oil dipstick.
SS
Do not use excessive amounts of starting
Do not use excessive amounts of starting
fluid wh
fluid when startin
en starting the engin
g the engine.
e. The use of
The use of
too much starting fluid will cause engine
too much starting fluid will cause engine
damage.
damage.
1.
1. Opera
Operate the engi
te the engine until t
ne until the wate
he water temp
r tempera-
era-
ture reaches 140
ture reaches 140
˚
˚
F and then shut off the
F and then shut off the
engine.
engine.
2.
2. Plac
Place a suitab
e a suitable cont
le container u
ainer under the dr
nder the drain plug
ain plug
of the oil pan.
of the oil pan. Rem
Remove the drai
ove the drain plug and
n plug and
washer to dr
washer to drain the oil
ain the oil.
. Replace w
Replace washer if
asher if
damaged.
damaged.
3.
3. When the
When the oil has
oil has completel
completely drai
y drained, rei
ned, reinstall
nstall
the wash
the washer and drai
er and drain plug.
n plug. Apply a tor
Apply a torque of
que of
65 ft-lbs of torque to tighten the drain plug.
65 ft-lbs of torque to tighten the drain plug.
4.
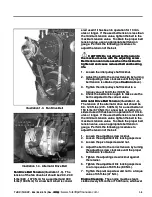
4. Unscrew
Unscrew the spin-
the spin-off t
off type oil
ype oil filter
filter (see
(see
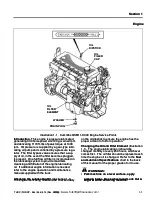
Illustr
Illustration 1-1).
ation 1-1). It should be possi
It should be possible to
ble to
unscrew the oil filter by hand; however, a band
unscrew the oil filter by hand; however, a band
type filter wrench may be used if necessary.
type filter wrench may be used if necessary.
Discard the used oil filter.
Discard the used oil filter.
5.
5. Cle
Clean the area on the fi
an the area on the filte
lter base tha
r base that wil
t will con-
l con-
tact the gasket on the new oil filter.
tact the gasket on the new oil filter.
6.
6. Fil
Fill the new fi
l the new filter w
lter with cl
ith clean engi
ean engine oil
ne oil
before
before install
installation.
ation.
7.
7. Apply a li
Apply a light fil
ght film of engi
m of engine oil on the gas
ne oil on the gasket of
ket of
the new filter
the new filter.
. Screw the new fi
Screw the new filter onto the
lter onto the
filter base until the gasket comes in contact
filter base until the gasket comes in contact
with the filter base and then tighten filter 1/2 to
with the filter base and then tighten filter 1/2 to
3/4 turn by hand only.
3/4 turn by hand only.
8.
8. Rem
Remove the oil fi
ove the oil fill cap and fil
ll cap and fill crank
l crankcas
case with
e with
oil to the FULL mark on the oil dipstick (see
oil to the FULL mark on the oil dipstick (see
Illustration 1-1).
Illustration 1-1).
9.
9. Star
Start the
t the engin
engine and a
e and allow
llow to id
to idle.
le. Vis
Visuall
ually
y
check the drain plug and oil filter for leaks.
check the drain plug and oil filter for leaks.
10.
10. Shut down the engine and wait approx
Shut down the engine and wait approximatel
imately
y
5 minutes for the oil to drain back into the oil
5 minutes for the oil to drain back into the oil
pan.
pan. When the engin
When the engine has cooled, rec
e has cooled, recheck
heck
the oil level and add oil as necessary to bring
the oil level and add oil as necessary to bring
the oil level to the FULL mark on the oil dip-
the oil level to the FULL mark on the oil dip-
stick.
stick.
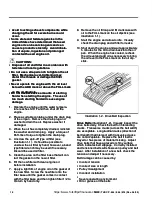
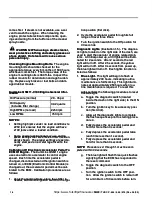
Illust
Illustration 1-2.
ration 1-2. Driv
Drive Belt Inspecti
e Belt Inspection
on
Drive Belts
Drive Belts
(Illustration 1-2)
(Illustration 1-2)
..
Visually inspect the
Visually inspect the
drive belts daily
drive belts daily.
. Check the belt for intersecti
Check the belt for intersecting
ng
crack
cracks.
s. Tr
Transverse crac
ansverse cracks (acros
ks (across the belt width)
s the belt width)
are acceptabl
are acceptable.
e. Longitudinal c
Longitudinal cracks (
racks (directi
direction of
on of
belt length) that intersect with transverse cracks
belt length) that intersect with transverse cracks
are not acc
are not acceptable.
eptable. Replace the bel
Replace the belt if belt i
t if belt is
s
frayed or has piec
frayed or has pieces of materi
es of material miss
al missing.
ing. Adjust
Adjust
drive belts that have a glazed or shiny surface
drive belts that have a glazed or shiny surface
which indic
which indicates belt slippage.
ates belt slippage. Correc
Correctly instal
tly installed
led
and tensioned belts will show even pulley and belt
and tensioned belts will show even pulley and belt
wear
wear.
. After instal
After installation of a new belt, check the
lation of a new belt, check the
tension and adjust if necessary.
tension and adjust if necessary.
Belt damage can be caused by:
Belt damage can be caused by:
SS
Incorrect tension
Incorrect tension
SS
Incorrect size or length
Incorrect size or length
SS
Pulley misalignment
Pulley misalignment
SS
Incorrect installation
Incorrect installation
SS
Severe operating environment
Severe operating environment
SS
Oil or grease on the belts
Oil or grease on the belts
https://www.forkliftpdfmanuals.com/


