


OPERATING PROCEDURES
6-5
Model C723
Operating Procedures
6
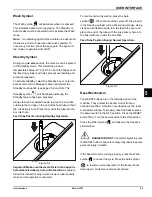
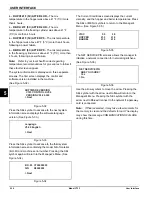
26. Slide two O-rings into one end of the feed tube. Slide
two O-rings on the other end of the feed tube.
Figure 6-18
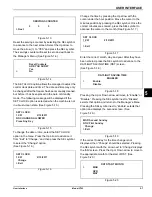
27. Slide the small O-ring into the groove of the air
orifice.
Do not
lubricate the O-ring.
Figure 6-19
Note:
Make sure the hole in the air orifice is clean and
is not clogged. If the hole in the air orifice should become
clogged, use soap and hot water to clear the hole.
Do
not
enlarge the hole in the air orifice.
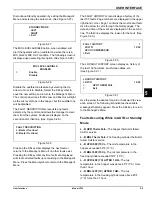
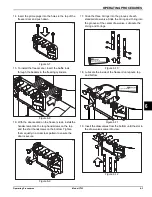
28. Install the air orifice into the hole in the top of the feed
tube (the end of the feed tube without the small hole
on the side).
Figure 6-20
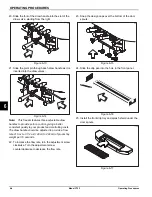
29. Lay the feed tube (with air orifice installed) and the
agitator (factory-equipped agitator machines only) in
the bottom of the mix hopper for sanitizing.
30. Repeat steps 26 through 29 for the other side of the
machine.
Sanitizing
1. Prepare an approved 100 ppm sanitizing solution
(examples: 2-1/2 gal. [9.5 L] of Kay-5® or 2 gal.
[7.6 L] of Stera-Sheen®). Use warm water and follow
the manufacturer's specifications.
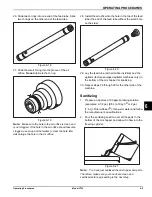
2. Pour the sanitizing solution over all the parts in the
bottom of the mix hopper and allow it to flow into the
freezing cylinder.
Figure 6-21
Note:
You have just sanitized the mix hopper and parts.
Therefore, make sure your hands are clean and
sanitized before proceeding to the next step.
12076
12077
12078
12029
Summary of Contents for C723
Page 14: ...3 4 SAFETY Model C723 Safety 3 Notes ...
Page 42: ...6 10 OPERATING PROCEDURES Model C723 Operating Procedures 6 Notes ...
Page 48: ...9 2 PARTS REPLACEMENT SCHEDULE Model C723 Parts Replacement Schedule 9 Notes ...
Page 52: ...10 4 LIMITED WARRANTY ON EQUIPMENT Model C723 Limited Warranty on Equipment 10 Notes ...
Page 56: ...11 4 LIMITED WARRANTY ON PARTS Model C723 Limited Warranty on Parts 11 Notes ...


