background image

16 

TASCAM  SS-R1/SS-R05

Operations in the menu screens

You can perform operations in the menu screens as 
follows.

To select an item (vertically in the screen):


  Turn the 

MULTI JOG

 dial of the SS-R1/SS-R05.

  Use the cursor 

§

,

 ¶

 keys of the remote.

To confirm the highlighted item:


  Press the 

MULTI JOG

 dial of the SS-R1/SS-R05.

  Press the 

ENTER

 key of the remote.

To move the cursor left/right:


  Use the 

,

 ˚

 keys of the SS-R1/SS-R05.

  Use the cursor 

˙

,

 ¥

 keys of the remote.

To select a sub-screen not currently shown in the 


screen (a 

¥

 is shown at the right):

  Press the 

˚

 key of the SS-R1/SS-R05.

  Press the cursor 

¥

 key of the remote.

To return to the previous menu level:


  Press the 

 key of the SS-R1/SS-R05. Press the 

cursor


˙

 key of the remote.

To return directly to the home screen from menu 


mode:

  Press the 

TIME (ESC)

 key of the SS-R1/SS-R05.

  Press the 

CLR/ESC

 key of the remote.

NOTE

If there is an item above (or below) the currently 

• 

displayed list, a 

§

 or 

 symbol will be shown at the 

top or bottom of the list.

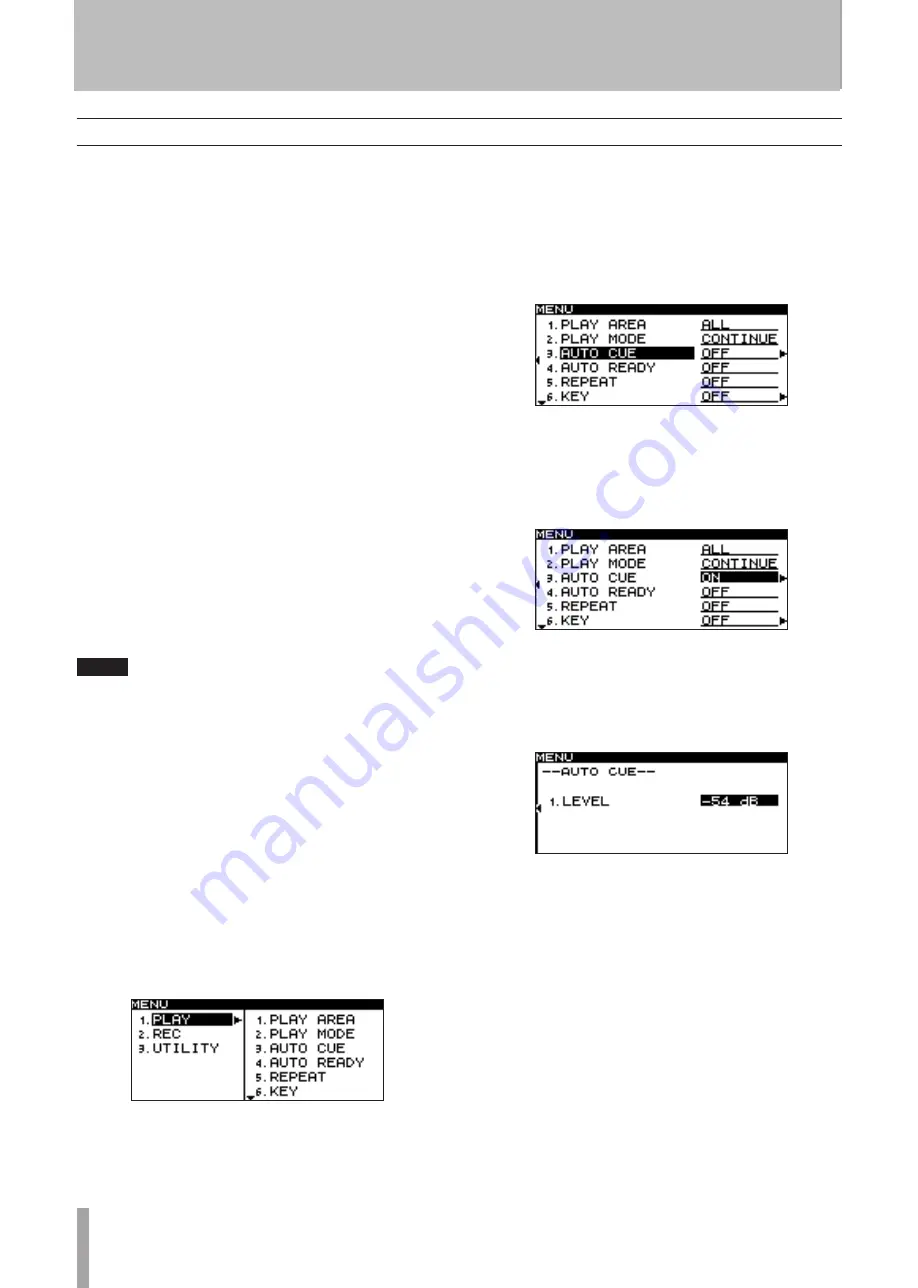
As a specific example, we’ll explain how to turn the PLAY 
menu item AUTO CUE “on”, and then change the auto cue 
level.

1  Press the 

MENU

 key to access the main menu list 

screen.

2  Open the PLAY menu.

From the SS-R1/SS-R05:

Turn the 

MULTI JOG

 dial to highlight PLAY, and then 

press the 

MULTI JOG

 dial or the 

˚

 key.

From the remote:

Use the 

cursor


§

,

 ¶

 keys to highlight PLAY, and 

press the 

ENTER

 key or the cursor 

¥ 

key.

3  Select the AUTO CUE item.

From the SS-R1/SS-R05:

Turn the 

MULTI JOG

 dial to highlight AUTO CUE, and 

then press the 

MULTI JOG

 dial (or the 

˚

 key).

From the remote:

Use the cursor 

§

,

 ¶

 keys to highlight AUTO CUE, 

and then press the 

ENTER

 key (or the cursor 

¥

 key).

4  Turn the AUTO CUE item 

ON

.

From the SS-R1/SS-R05:

Turn the 

MULTI JOG

 dial to highlight 

ON

 .

From the remote:

Use the 

cursor


§

,

 ¶

 keys to highlight 

ON

.

5  Proceed to the AUTO CUE sub-screen.

From the SS-R1/SS-R05:

Press the 

˚

 key.

From the remote:

Press the 

cursor


¥

 key.

6  Set AUTO CUE LEVEL to the desired level.

From the SS-R1/SS-R05:

Turn the 

MULTI JOG

 dial to select a value.

From the remote:

Use the 

cursor


§

,

 ¶

 keys to select a value.

7  To return to the home screen.

From the SS-R1/SS-R05:

Press the 

TIME (ESC)

 key.

From the remote:

Press the 

CLR/ESC

 key.

3 − Menu screens

Summary of Contents for SS-R05

Page 1: ...D01089720B SS R1 SS R05 Solid State Stereo Audio Recorder OWNER S MANUAL...

Page 2: ...and serial number and retain them for your records Model number Serial number TO THE USER This equipment has been tested and found to comply with the limits for a Class A digital device pursuant to P...

Page 3: ...apparatus Do not install this apparatus in a confined space such as a book case or similar unit The apparatus draws nominal non operating power from the AC outlet with its POWER or STANDBY ON switch n...

Page 4: ...ch Control playback 26 Specifying the Pitch Step 27 Key Control playback 27 Using the remote s dedicated key to turn Key Control on off 28 Auto Cue function 28 Using the remote s dedicated key to turn...

Page 5: ...r information shall be free from infringement of any third party s intellectual property rights or other proprietary rights and further assumes no liability of whatsoever nature in the event of any su...

Page 6: ...on of the display shows a message inc pop up selectable value i e values of DB or ON OFF selection i e SRC ON this is shown in the following typeface MOVE Supplied accessories In addition to this manu...

Page 7: ...it may become hot during operation always leave sufficient space above the unit for ventilation Do not install this unit in a confined space such as a book case and do not put anything on top of the u...

Page 8: ...cation signal maximum voltage 50 V maximum current 50 mA 1 Maximum supplied current is 50 mA 2 Pin 14 Remote Select When this pin is high the input pins for which the above table lists two commands se...

Page 9: ...function see Time skip on page 24 In menu mode this key returns to the previous level If the play area is FOLDER you can select the current folder by pressing this key while stopped If the play area...

Page 10: ...or You can connect a PS 2 keyboard here Set the UTILITY menu KEYBOARD setting appro priately for the type of keyboard you ve connected see Specifying the keyboard type on page 60 i PITCH knob Turn thi...

Page 11: ...ODE key This switches the playback mode between CONTINUE normal consecutive playback SINGLE play one song PROGRAM program playback and RANDOM random playback see Play modes on page 24 6 A CUE key This...

Page 12: ...lecting the input source on page 34 NOTE On SS R05 models ANALOG XLR cannot be selected s Numeric keys 0 9 Use these to select tracks see Specifying a track number on page 23 d CLR ESC key If you pres...

Page 13: ...play area 2 Playback mode This shows the currently specified playback mode 3 Input source indicator This shows the currently selected input source 4 Level meter During playback this shows the playback...

Page 14: ...ion is active 7 INC_PLAY This will be lit if the Incremental Play function is active 8 FLASH This will be lit if Flash Load has been completed While recording or record ready 9 FILE This indicates whe...

Page 15: ...28 AUTO READY Auto Ready on off Page 29 REPEAT Repeat Play on off Page 26 KEY Key Control on of and setting Page 27 PREFERENCE Various playback preferences Page 31 REC INPUT SELECT Input source select...

Page 16: ...example we ll explain how to turn the PLAY menu item AUTO CUE on and then change the auto cue level 1 Press the MENU key to access the main menu list screen 2 Open the PLAY menu From the SS R1 SS R05...

Page 17: ...PUT VOLUME Connecting audio devices outputs Connect an external monitor system or mixer to the recorder s ANALOG OUTPUTS BALANCED SS R1 only jacks ANALOG OUTPUTS UNBALANCED jacks or DIGITAL OUT jack C...

Page 18: ...MENU key to access the menu list screen 2 Turn the front panel MULTI JOG dial or use the remote s cursor keys to highlight the UTILITY item and press the MULTI JOG dial or the remote s ENTER key The U...

Page 19: ...he front panel MULTI JOG dial or use the remote s cursor keys to highlight the UTILITY item and press the front panel MULTI JOG dial or key or the remote s ENTER key or cursor key NOTE This is an exam...

Page 20: ...5 Grasp the card and pull it out Inserting a CompactFlash card In order to record or play back on the SS R1 SS R05 a CompactFlash card must be inserted in the front panel CompactFlash card slot TIP Y...

Page 21: ...S R1 SS R05 is powered on 5 Playback Tracks and files The audio data on a CompactFlash card is saved as audio files These files are handled as tracks by the SS R1 SS R05 s recorder For this reason thi...

Page 22: ...is inserted and that the display is showing the home screen Playback Press the PLAY key to begin playback NOTE If the CompactFlash card or specified folder or playlist does not contain any audio file...

Page 23: ...ime from the beginning of the track XXhours XXminutes XXseconds two digits each For example if you want to locate to 1 minute 30 seconds from the beginning of track 2 you would press the keys in the f...

Page 24: ...The tracks in the play area will play back in order of their track numbers Single playback Only the currently selected track will play back and then playback will stop Program playback The tracks will...

Page 25: ...een 1 Press the front panel TIME ESC key or the remote s TIME key Each time you press this key you will cycle through four types of time display The currently selected display mode is shown above the...

Page 26: ...ill continue and when it reaches the end of the play area it will return to the beginning and continue playing If you turn on repeat playback while stopped repeat playback will begin when you press th...

Page 27: ...u opera tions refer to Operations in the menu screen on page 16 1 Press the MENU key to access the main menu list screen 2 Open the PLAY menu 3 Select the KEY item In this state you can turn Key Contr...

Page 28: ...etting for details on operations in the menu screen refer to Operations in the menu screens on page 16 1 Press the MENU key to access the main menu list screen 2 Open the PLAY menu 3 Select the AUTO C...

Page 29: ...ady function on off from the front panel via the menu for details on operations in the menu screen refer to Operations in the menu screens on page 16 1 Press the MENU key to access the main menu scree...

Page 30: ...an switch the Incremental Playback mode on off by pressing the remote s INC PLAY key INC PLAY key When the Incremental Playback mode is on I NC_PLAY will light in the home screen Call function The Cal...

Page 31: ...e finished making settings press the front panel TIME ESC key or the remote s CLR ESC key to return to the home screen NOTE This setting is remembered even when the power is turned off Using the menu...

Page 32: ...ne or more tracks are registered data for the first twenty tracks from the beginning will be loaded When the data has been loaded the lower right of the home screen will indicate FLASH Resume Playback...

Page 33: ...PARALLEL connector connect the device that will receive the EOM tally signal 2 Power on the SS R1 and the receiving device 3 Begin playback on the SS R1 When the remaining time of the current track or...

Page 34: ...access the main menu list screen 2 Open the REC menu 3 Select the INPUT SELECT item 4 Turn the MULTI JOG dial or use the remote s cursor keys to select one of the following A UNBAL analog unbalanced i...

Page 35: ...if the sampling rate does not match see Using the sampling rate converter on page 36 Specifying the recording file format The SS R1 SS R05 can record in MP3 or WAV format The file format setting is ma...

Page 36: ...en NOTE If a digital signal whose sampling rate differs from the sampling rate specified in the REC FORMAT item is being received at the DIGITAL IN jack and you attempt to record with SRC off an error...

Page 37: ...to highlight LEVEL 8 Turn the MULTI JOG dial or use the remote s cursor keys to highlight BALANCE and then press the front panel key or the remote s cursor key to highlight the balance value 9 Turn t...

Page 38: ...nutes 4 GB 6 hours 24 minutes 5 hours 52 minutes 8 GB 12 hours 48 minutes 11 hours 44 minutes WAVE Mono Label on media 44 1 kHz 48 kHz 512 MByte 1 hour 36 minutes 1 hour 28 minutes 1 GByte 3 hours 12...

Page 39: ...s 6 Set the following items LEVEL Specify the sync level You can set this in a range of 72 dB 24 dB 6 dB steps The default setting is 54 dB DELAY Specify the time in steps of one frame from when a sig...

Page 40: ...elow the sync level for the duration specified by STOP TIME default 5 seconds the SS R1 SS R05 will automatically switch to the record ready condi tion SYNC LEVEL STOP TIME REC ready Time Level NOTE I...

Page 41: ...ed settings described below after having stayed below it for two seconds or longer Level Time A_TRACK LEVEL At least 2 sec Track increment DD When recording a digital source CD DAT MD via the DIGITAL...

Page 42: ...time you press the remote s A TRACK key the Auto Track function mode will cycle in the order of OFF LEVEL DD T I ME Assigning a new track number manually You can assign a new track number manually by...

Page 43: ...ote s cursor key to proceed to the REC PREFERENCE screen 5 Select the COMP item 6 Turn the MULTI JOG dial or use the remote s cursor keys to select one of the following as the compressor mode OFF The...

Page 44: ...ill be the file name To edit and store a text string proceed as follows 1 With one of the choices USER0 1 USER03selected press the key The editing screen will appear 2 Edit the text string as follows...

Page 45: ...ile name or delete files or folders If you perform this type of editing from your computer please be aware that the playback order of the files on the SS R1 SS R05 may differ after editing on your com...

Page 46: ...e READY key The SS R1 SS R05 will pause and you will return to the home screen If the play area is FOLDER the folder that contains the highlighted file will be the current folder To view the propertie...

Page 47: ...panel DISPLAY INFO key or the remote s DISPLAY key To insert a space Press the CALL key To cancel editing Press the STOP key 4 When you ve finished editing press the front panel MULTI JOG dial or the...

Page 48: ...h folder is selected in the folder finder screen when you open the folder menu screen 1 Turn the front panel MULTI JOG dial or use the remote s cursor keys to highlight the UNDO item 2 Press the front...

Page 49: ...the remote s ENTER key The folder will be added to the playlist Undoing a folder menu operation UNDO Some of the operations in the folder menu folder name editing adding a new folder deleting a folde...

Page 50: ...TER key The RENAME screen will appear 3 Edit the name as follows To change the editing location cursor position Use the front panel keys or the remote s cursor keys To change the character at the curs...

Page 51: ...ration after executing it Undoing a file menu operation UNDO on page 53 You can t divide an MP3 file 1 Use the PLAY key keys time search function and time skip function etc to locate to the point in t...

Page 52: ...y NOTE If the file has been registered in a playlist the P L I ST ENTRYpopup will appear If a file you re editing was registered in a playlist it will no longer be possible to play that playlist You l...

Page 53: ...anel TIME ESC key or the remote s CLR ESC key If there is no file operation that can be undone the display will indicate CAN T UNDO Moving or copying a file You can move a file within a folder or move...

Page 54: ...l and keys or the remote s cursor keys to navigate within the folder finder to open the move destination folder When you move the cursor to where the file name is displayed the blinking file to be mov...

Page 55: ...to the playlist menu screen where you can add a file to the playlist delete a file from the playlist or move a file within the playlist 8 Using the playlist finder Opening the playlist finder screen...

Page 56: ...ISPLAY INFO key or the remote s DISPLAY key once again the property dis play will disappear and you will return to the play list finder screen In the playlist menu you can delete files from the playli...

Page 57: ...s can be registered in a playlist If you attempt to register more than 99 tracks an indi cator of P L I ST FULLwill appear and the track s will not be registered You cannot register the same track mor...

Page 58: ...l MULTI JOG dial or the remote s ENTER key The playlist screen will appear In the screen the file to be moved will be blinking 3 Turn the front panel MULTI JOG dial or use the remote s cursor keys to...

Page 59: ...mpactFlash card to FAT format Before a CompactFlash card used by another device can be used with the SS R1 SS R05 you must format it on the SS R1 SS R05 NOTE When you format a card all folders and fil...

Page 60: ...track name just as when typing text into a computer NOTE You cannot edit names that include characters other than alphabetic character numeral or symbol charac ters If even one such character is incl...

Page 61: ...s PITCH key SHIFT F1 key To DELETE of edit mode SHIFT F2 key No assignment SHIFT F3 key To FORMAT of edit mode SHIFT F4 key To MOVE of edit mode SHIFT F5 key To DIVIDE of edit mode SHIFT F6 key To COM...

Page 62: ...n Backspace key Delete the character preceding the cursor location Insert key Inserts a character at the cursor location ESC key Cancels editing or title editing and exits menu mode Enter key The same...

Page 63: ...the appropriate setting for each item BAUD RATE Specify the baud rate communication speed Choose from 4800 9600 1 9200 and 38400bps default 1 9200 PARITY BIT Specify the communication parity bit sett...

Page 64: ...t possible because the track was protected 11 caut i on NAME FULL The name has reached the maximum number of characters 12 caut i on PROGRAM FULL Registration is not possible because you have reached...

Page 65: ...st the recording level A setting you changed is not remembered The SS R1 SS R05 backs up the settings when you change them This backup may fail if you turn off the power at an inappropriate time so do...

Page 66: ...r RCA pin jack IEC 60958 3 S PDIF Input sampling frequencies supported 32 kHz 48 kHz Input impedance 75 unbalanced Variable gain amount 10 dBFS Digital output COAXIAL Connector RCA pin jack Supported...

Page 67: ...m 19 x 1 8 x 11 9 in Weight SS R1 3 3 kg 7 3 lb SS R05 3 3 kg 7 3 lb If you would like to change the maximum balanced output level please contact the service department Specifications and appearance a...

Page 68: ...90 9888 5939 Wallace Street Mississauga Ontario L4Z 1Z8 Canada TEAC MEXICO S A de C V www teacmexico net Phone 52 55 5010 6000 R o Churubusco 364 Colonia Del Carmen Delegaci n Coyoac n CP 04100 M xico...

Reviews: