background image

XT-1/XT Mini Manual 


 13-111 05, 2015-08-14 


Page 10 of 32 


Wire Connections 

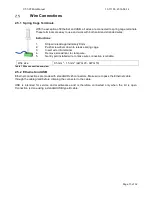
2.5.1  Spring Cage Terminals 


With the exception of Ethernet and USB, all wires are connected to spring cage terminals. 
These terminals are easy to use and work with both solid and stranded wires. 
 
Instructions 
 
1. 

Strip wire lead approximately 9 mm. 

2. 

Push screwdriver down to release spring cage. 

3. 

Insert wire into terminal. 

4. 

Remove screwdriver to clamp wire. 

5. 

Gently pull installed wire to make sure connection is reliable. 


Wire size 

0.5 mm

2

 - 1.5 mm

2

 (AWG 20 - AWG 16) 

Table 1 Wire connection overview 

2.5.2  Ethernet and USB 

Ethernet connections are made with standard RJ45 connectors. Make sure to pass the Ethernet cable 
through the cable gland before crimping the connector to the cable. 
 
USB  is  intended  for  service  and  maintenance  and  is  therefore  connected  only  when  the  lid  is  open. 
Connection is done using a standard USB type B cable. 


Summary of Contents for XT Mini

Page 1: ...XT 1 XT Mini Manual ...

Page 2: ...ssly approved by the party responsible for compliance could void the user s authority to operate the equipment Caution To comply with Council Recommendation 1999 519 EC and FCC regulations this reader must be installed to provide a separation distance of at least 25 cm XT 1 or 20 cm XT Mini from all persons and must not be co located or operating in conjunction with any other antenna or transmitte...

Page 3: ...ng 13 3 3 2 Magstripe Timing 14 Ethernet 14 RS232 15 RS485 16 Inputs 17 Light and Sound 17 Relay 18 USB 18 MicroSD Memory Card Slot 18 Tamper Switch XT Mini only 18 DIP Switches 19 3 13 1 Interface Configuration DIP Switch S301 19 3 13 2 Software Configuration DIP Switch S101 19 4 Configuration 20 Web Interface 20 4 1 1 Start 20 4 1 2 Information 20 4 1 3 Settings 21 4 1 4 Access Controller 21 4 1...

Page 4: ... 24 Wiegand Magstripe 24 5 1 1 Easy Configuration 24 OSDP RS485 27 5 2 1 Easy Configuration 27 Push RS232 RS485 TCP IP 28 TAGP TCP IP 28 Other Protocols 28 6 Built in Access Controller 29 7 Troubleshooting 30 8 Definitions and Abbreviations 30 9 References 30 10 Technical Specification 31 ...

Page 5: ... control and therefore has a few weaknesses in these applications Even if all modern tags have a unique ID this is often too long for existing access control systems and tags cannot be bought with the IDs in sequence User programmed tags can often be cloned by anybody with access to an EPC Gen 2 reader To address this issue TagMaster has developed the SecureMarkID format that uses an encryption al...

Page 6: ...ith windshield or headlight tags C Access control at the gate and vehicle identification at the weighbridge The trucks are equipped with ISO card tags that are mounted in a holder on the windshield and read from the side D Traffic control Readers are used to enable a green wave for buses Figure 2 XT 1 installations Figure 3 shows two installations with side mounted readers A XT Mini is optimal for...

Page 7: ...not work if they are mounted on metal or objects containing water Metallized windshields may prevent tag reading as they block radio waves Most EPC Gen 2 tags have a donut shaped radiation pattern as shown in Figure 5 This means that the tags can be read not only when the front side is facing the reader but also when the backside or long edges are facing the reader If the tag is turned such that o...

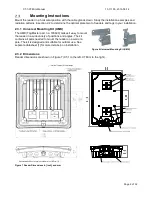
Page 8: ... 1 Universal Mounting Kit UMK The UMK TagMaster part no 193600 makes it easy to mount the reader in a wide variety of positions and angles The kit contains all parts needed to mount the reader on a wall or a pole The kit is designed and suitable for outdoor use See separate datasheet 1 for more details in on installation 2 3 2 Dimensions Reader dimensions are shown in Figure 7 XT 1 to the left XT ...

Page 9: ...d wire Ground the reader chassis using the grounding screw Figure 8 XT 1 with open lid left cable gland with insert for two cables right 2 4 2 XT Mini In XT Mini cables should be connected through the two M16 cable glands A cable tie should be used to guide the wires when the lid is closed Make sure to use cables with flexible wires It is recommended to use the left cable gland for Ethernet connec...

Page 10: ... spring cage 3 Insert wire into terminal 4 Remove screwdriver to clamp wire 5 Gently pull installed wire to make sure connection is reliable Wire size 0 5 mm2 1 5 mm2 AWG 20 AWG 16 Table 1 Wire connection overview 2 5 2 Ethernet and USB Ethernet connections are made with standard RJ45 connectors Make sure to pass the Ethernet cable through the cable gland before crimping the connector to the cable...

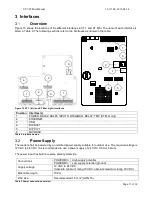
Page 11: ... 3 USB 4 DIP S301 5 DIP S101 6 MICROSD Table 2 Interface names Power Supply The reader shall be powered by an isolated power supply suitable for outdoor use The required voltage is 12 VDC to 24 VDC It is recommended to use a power supply of 24 VDC 0 5 A minimum The power input has built in reverse polarity protection Connections POWER DC High supply potential POWER DC Low supply potential ground S...

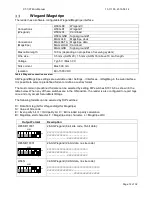
Page 12: ...or define a custom format The most common predefined formats can be selected by setting DIP switches S101 6 8 as shown in the table below When any of these switches are in the ON position the reader is also configured to report tags once and only accept SecureMarkID tags The following formats can be selected by DIP switches D Data from tag bit for Wiegand digit for Magstripe S Value of Site code E...

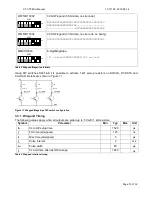
Page 13: ...s possible to activate 1 kΩ pull up resistors on D0 CLK D1 DATA and CL LOAD Details are shown in Figure 11 Figure 11 Wiegand Magstripe DIP switch configuration 3 3 1 Wiegand Timing The following values apply when all outputs are pulled up to 5 V with 1 kΩ resistors Symbol Parameter Min Typ Max Unit tSU CL to D setup time 1520 µs tF Fall time all signals 125 ns tR Rise time all signals 5 µs tPI Pul...

Page 14: ... diagram note data low logic one Ethernet The reader has a 10 Mbps 100 Mbps Ethernet interface with one XT Mini or two XT 1 ports The interface supports auto crossover Auto MDIX so that installation can be done using either patch cables or crossover cables Each port has two LED indicators for Link Activity Yellow Flashing Yellow and 10 Mbps 100 Mbps speed Off Green Connections ETHERNET A Ethernet ...

Page 15: ...t As a client the reader automatically connects to a specified TCP server when it has data to send The IP address and port of the server and the protocol to use can be configured under Settings Interfaces Ethernet in the web interface Supported protocols are Push and TAGP As a TCP server the reader supports several protocols including TAGP RS232 The RS232 interface can be used for communication wi...

Page 16: ... DIP S301 4 5 ON of 620 Ω bias on the receive side to be used at one node in the RS485 chain The options using DIP switches are detailed in Figure 15 and also described in section 3 13 With factory default settings the reader should always be configured in 4 wire mode DIP S301 1 2 OFF since the TAGP protocol requires a full duplex link Other protocols require different settings Figure 15 RS485 DIP...

Page 17: ...hicle is present All inputs have a debounce filter that is enabled by default When the debounce filter is enabled short pulses on the inputs are ignored Pulses must be at least 20 ms to guarantee that they are detected The polarity of the inputs can be inverted to cope with signals that are active high or active low The read enable disable input can be configured to work in different modes Read ti...

Page 18: ...ngs are available under Settings Interfaces Relay in the web interface USB The reader has a USB connector that is used for service and maintenance Connections USB USB connector Type B Jack Speed 12 Mbps Full Speed MicroSD Memory Card Slot The reader is equipped with a microSD memory card slot for additional storage Connections MICROSD The microSD card is needed to use the built in access controlle...

Page 19: ...3 Interface Configuration DIP Switch S301 3 13 2 Software Configuration DIP Switch S101 Position s Description 1 Firmware upgrade mode S101 1 is used for firmware upgrade See section 4 4 for more information 2 Factory defaults S101 2 is used to restore the reader to factory default settings See section 4 5 for more information 3 Fixed IP address S101 3 forces the reader to use the following IP set...

Page 20: ... be 169 254 1 1 and the subnet mask 255 255 0 0 A PC that is directly connected to a reader will usually get an IP address in this subnet automatically If the PC does not have an IP address that is in the same subnet as the reader it is necessary to change the PC s address In Windows 7 this is done using Network and Sharing Center in Control Panel Click on Local Area Connection Properties TCP IPv4...

Page 21: ...s available in the following sections 4 1 4 Access Controller The built in access controller is configured on the Access Controller pages See section 6 for more information 4 1 5 Web Tools The Web Tools pages contain tools that are useful during installation and testing 4 1 5 1 Read Tag The Read Tag page makes it easy to read tags and display tag contents Figure 19 Read Tag 4 1 6 Documentation The...

Page 22: ...Carrier setting is used to enable disable reading When Carrier is on default the reader reads tags The Read level setting controls the read range The default value 100 corresponds to maximum read range 4 3 2 EPC Select The EPC select setting defines which tags the reader will talk to Selection is done by specifying a binary value and a part of tag memory that must match the value Only tags that ma...

Page 23: ...3 6 Data Format The Data Format settings under Settings Data Format in the web interface specifies the output format for data that is pushed to RS232 RS485 TCP Client and the built in access controller Firmware Upgrade The latest version of the reader firmware can be downloaded from ftp partner 245ghz ftp tagmaster com Vigilant Firmware Follow the instructions in the README document that is availa...

Page 24: ...nder Settings Interfaces Wieg Mag in the web interface 5 1 1 Easy Configuration The reader can be configured to work with common access control systems using DIP switches S101 6 8 When any of these switches are in the ON position the reader is configured to report tags once accept SecureMarkID tags only and use the specified Wiegand Magstripe format The following sections describe how to connect t...

Page 25: ... system to use H10302 format GND 0V IN1 N C CL LOAD N C IN1 N C D0 CLK D0 CLK IN2 N C D1 DATA D1 DATA IN2 N C S101 S301 Vigilant pull ups disabled Bewator Entro 6 5 Wiegand format W37N H10302 Older versions Wiegand format W37R H10302 Tested version Bewator Entro 6 55 011 5 1 1 4 Bewator Omnis with E2V The Vigilant reader behaves as a RB500 reader in Clock Data mode GND Conn G IN1 Conn G 12V CL LOA...

Page 26: ...t W26S H10302 To get all digits from the SecureMarkID tag it is necessary to solder a strap at P14 on the RCO DB 50W board Without this strap it is only possible to get the last four digits from the tag 5 1 1 7 Vanderbilt Aliro On the circuit board in the access point set the EOL jumper for the reader to OFF In the Aliro software set reader type to Wiegand and card format to H10302_37 Configure Ou...

Page 27: ...s OSDP For common access control systems OSDP can also be enabled using DIP switch S101 as described below 5 2 1 Easy Configuration 5 2 1 1 AXIS A1001 In the A1001 software set the reader protocol to OSDP RS485 half duplex Define a new card format with name SecureMarkID and bit length 28 Set the field map like this Name CardNr Range 1 28 Encoding BinLE2Int RS485 TX READER DATA n B RS485 GND READER...

Page 28: ...d 245ghz PuTTY TagMaster Edition can be downloaded from ftp partner 245ghz ftp tagmaster com All TAGP messages start with a 4 character message identifier and ends with a new line character To initiate communication with the TAGP server in the reader a client has to send a HELO message specifying the required TAGP version The TAGP server replies with a RPLY message HELOTAGP 2 RPLYHELO00 The client...

Page 29: ...cess controller connection diagram To use the access controller or log a microSD card must be inserted into the microSD memory card slot Make sure to power off the reader before inserting or removing the microSD card The built in access controller is configured using the web interface as shown in Figure 24 Figure 24 Built in access controller web interface Settings Users Log Max number of users 10...

Page 30: ... be restored to factory default settings as described in section 4 5 Make sure that working and correctly formatted EPC Gen 2 tags are being used 8 Definitions and Abbreviations AES Advanced encryption standard ASCII American standard code for information interchange AWG American wire gauge CR Carriage return DES Data encryption standard DIP Dual in line package EPC Electronic product code FCC Fed...

Page 31: ... 60068 2 1 Ad EN 60068 2 2 Bd EN 60068 2 14 Nb Storage temperature 40 C to 85 C 40 F to 185 F Power supply 12 24 VDC supply Inputs 3 isolated inputs Outputs 3 isolated outputs shared with Wiegand Magstripe Relay 1 relay output 60VDC 2A Interfaces RS232 RS485 Wiegand Magstripe Ethernet 2 ports on XT 1 USB service Interface Tamper switches XT Mini only Certificates CE Certificate according to R TTE ...

Page 32: ...Technical Support Phone 46 8 632 19 50 E mail support tagmaster com Office Address TagMaster AB Kronborgsgränd 11 164 46 KISTA SWEDEN Phone 46 8 632 19 50 Web www tagmaster com ...

Reviews: