background image

Remote Controller Sensor

Remote Controller

5m

Replacement of the battery 

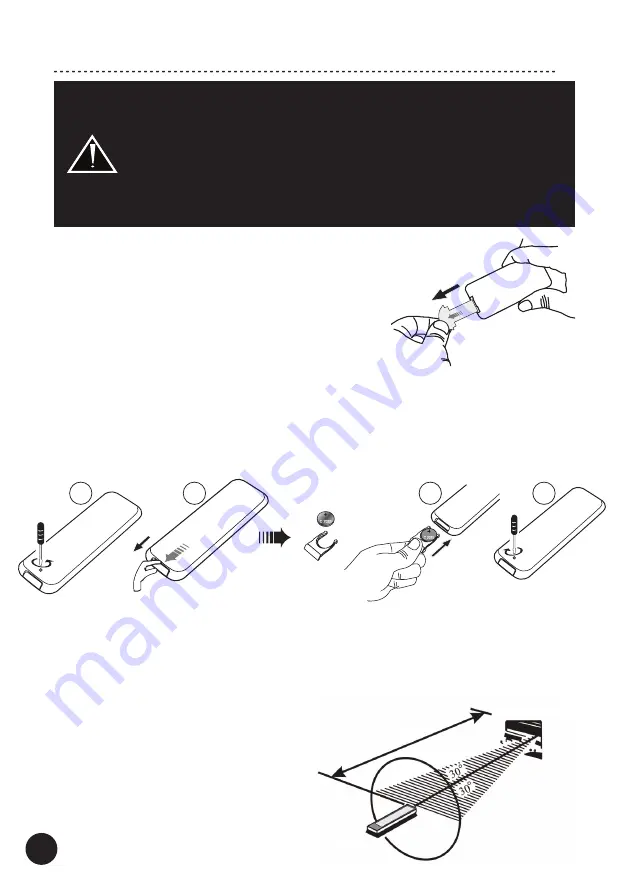
Prepare a single 2025 battery.

1. 

Using a screwdriver, loosen the battery compartment screw, which is located on the back side 

of the remote controller.

2. 

Pull out the battery compartment with your fingernails and remove the old battery.

3. 

Insert the new battery in the battery compartment keeping the same position like the original 

battery to maintain the correct polarity.

4. Tighten the battery compartment screw.

Remote Controller 

Battery Installation

First use of remote controller

To activate the battery remove the protection which is located 

on the bottom back side of the remote controller.

•  Always use 2025 battery and do not use the rechargeable batteries.

• 

If the battery runs out, remove the old battery and replace it with a new one 

within several minutes.

• 

If the battery is placed incorrectly, it can cause explosion.

•  Remove the battery if the remote controller is not used for a long period of time.

•  Do not handle and store the batteries together with metallic tools.

• 

KEEP AWAY FROM CHILDREN! 


Remember that small button cell batteries such as used in this product may be 

easily swallowed by young children and are dangerous for their health.

1

2

3

4

Operating range 

Use the remote controller by aiming it at the remote controller sensor. 

The remote controller can operate in the maximum range


of 5 meters away from the CD-Receiver and within 30 degrees


from the axis of the controller sensor.


Note! 

Exposing the remote controller sensor


to direct sunlight or strong light may cause faulty operation.

6

Summary of Contents for HTR-1000CD

Page 1: ...HTR 1000CD v 2 HYBRID STEREO CD RECEIVER Instruction Manual Edition 04 2021 ...

Page 2: ...usic from smartphones tablets or computers 2 analog inputs including a 3 5mm input on the front to quickly connect external analog audio devices smartphones MP3 players etc Digital Optical input to connect a range of digital audio devices CD DVD Blu ray player video game console etc Subwoofer output to provide extra amount of deep bass by adding an active subwoofer to the system Headphone output f...

Page 3: ...ration 14 ECO Power Standby features 14 Setting the Clock 15 INPUT selection 15 Sound Control 16 Headphone connection 17 Dimmer 17 DAB radio operation 18 FM radio operation 19 CD player operation 20 Play from a USB Flash Drive 23 Bluetooth Connection 24 Setting the Sleep Timer 25 Setting the Alarm Timer 25 Additional Information 26 Specifications 28 Kit Content 32 ...

Page 4: ... FUSE REFER REPLACEMENT TO QUALIFIED SERVICE PERSONNEL WARNING THE UNIT MAY BECOME HOT ALWAYS PROVIDE ADEQUATE VENTILATION TO ALLOW FOR COOLING DO NOT PLACE THE UNIT NEAR A HEAT SOURCE OR IN SPACES THAT CAN RESTRICT VENTILATION An exclamation mark in a triangle is intended to alert the user to the presence of important operating and maintenance servicing instructions in the literature accompanying...

Page 5: ...ked on or pinched by items placed upon or against them paying particular attention to cords at plugs convenience receptacles and the point where they exit from the product 12 Lighting For added protection for this product during a lighting storm or when it is left unattended and unused for long periods of time unplug it from the wall outlet and disconnect the antenna or system cables This will pre...

Page 6: ...ttery and do not use the rechargeable batteries If the battery runs out remove the old battery and replace it with a new one within several minutes If the battery is placed incorrectly it can cause explosion Remove the battery if the remote controller is not used for a long period of time Do not handle and store the batteries together with metallic tools KEEP AWAY FROM CHILDREN Remember that small...

Page 7: ...RING 13 Album Up Button ALB 14 Album Down Button ALB 15 Mute Button MUTE 16 Number Buttons 0 9 10 17 Open Close Button 18 USB function Button 19 Bluetooth function Button AUX function Button AUX 20 Repeat A B Button A B 21 Dimmer Button DIM 22 Super Bass Button S BASS 23 Sleep Button SLEEP 24 Timer Button TIMER 25 Information Button INFO RDS Information Button INFO 26 Long press Search Forward But...

Page 8: ...6 Play Pause Button 7 Stop Button 8 Previous Button Search Backward Button Tuning Backward Button 9 Next Button Search Forward Button Tuning Forward Button 10 USB Port 11 Input Selector 12 Bass Regulator 13 Treble Regulator 14 Display 15 Volume Regulator 16 AUDIO IN 3 5 mm 1 8 Stereo Input 17 Headphone 3 5 mm 1 8 Output 1 2 3 4 5 8 9 10 11 12 14 7 13 6 ...

Page 9: ...d Rear Panel Rear Panel 18 Digital Input OPTICAL 19 AUX Stereo RCA Input 20 Subwoofer RCA Output 21 Speaker Connectors Right and Left Channel Output 22 DAB FM Antenna Socket 23 Power Cable Input 18 19 20 21 23 22 ...

Page 10: ... each speaker group speakers should be connected RED with RED CD Receiver connector BLACK with BLACK CD Receiver connector Please refer to your speaker instruction manual for more information 2 4 3 L 1 1 Tighten the speaker connector 2 Insert the banana plug into the end of the corresponding connector 1 2 Banana plug Connecting speaker cables Speaker cables have 2 conductors Each conductors should...

Page 11: ...ions keep the antenna away from the other cables in the system 3 Using speaker cables not supplied with this product connect your speakers to the SPEAKERS OUT connectors located on the rear panel Check Hooking Up Speaker Cables for more details DAB FM antenna Outdoor DAB FM antenna 4 If you want to add an active subwoofer to your system using a subwoofer cable not supplied with this product connec...

Page 12: ...io source CD DVD Blu ray player video game console etc equipped with an optical output connect it to the optical input on the rear panel OPTICAL Use a digital optical cable not supplied with this product Note This input supports the PCM format BluRay player Video game console etc Optical cable Interconnect mini jack 3 5 mm Smartphone computer etc b equipped with an analog 3 5 mm 1 8 output using a...

Page 13: ...n the front panel Check Headphones connection PHONES for more details 9 If you want to stream music via Bluetooth from compatible devices check Bluetooth Connection for more details 10 If you want to listen to music via a built in tuner FM or DAB or a CD player select the relevant input Check Operation for more details 11 Your CD Receiver is ready for operation Only speakers within the range of im...

Page 14: ...play A countdown of 10 seconds will start for preheating of the CD Receiver Then the CD Receiver will switch to the last selected input Press the Standby button to switch the CD Receiver back to the Standby mode The words BYE BYE will be shown on the Display Switching the CD Receiver to ECO Power Standby mode Press and hold the Standby button for 2 seconds or more to switch to the ECO Power Standb...

Page 15: ...lure occurs or the CD Receiver is disconnected from the electrical outlet the Clock setting will be lost Setting the Clock Automatically When the CD Receiver is tuned in the DAB RDS station for the first time and when the Clock is not set the CD Receiver can synchronize with the time transmitted by the DAB RDS station with CT information automatically After that Press the INFO button for over 2 se...

Page 16: ... TREBLE BASS regulation or the curren tly selected sound control function S BASS or LOUDNESS To switch off the P EQ function select one of sound control functions S BASS or LOUDNESS or use the TREBLE BASS regulators TREBLE regulator You can adjust treble output of the CD Receiver The default is 0 Turn the knob counterclockwise to decrease the amount of high frequencies Turn the knob clockwise to i...

Page 17: ...he currently selected sound control function P EQ or S BASS Using the TREBLE BASS S BASS LOUDNESS and P EQ functions at high volume levels may damage this CD Receiver and or speakers This may void your warranty Headphone connection Headphone connection PHONES When headphones not supplied with this product are plugged to the headphone output Phones the transmission of sound to the speakers is switc...

Page 18: ...SET l l buttons to allocate a number to this radio station Note If you select a number higher than 30 then the preset number will be changed to 1 auto matically 4 Press the PROG button again to store the station 5 Repeat above steps 1 to 4 for each station you want to store in the memory with a preset number Tuning to a DAB radio station Repeatedly press the l l buttons on the front panel or butto...

Page 19: ...ays the frequency of the current station Audio Bit Rate Displays the digital audio bit rate being received Stereo Mono The Display will show if the station being received is in mono or stereo FM radio operation Note Make sure that you have correctly connected and fully extended the DAB FM antenna You can program up to 20 FM radio stations Tuning in to a Station 1 Rotate the INPUT knob on the front...

Page 20: ...adcast Clock Displays the current time provided automatically by the broadcaster The RDS CLOCK system may not properly operate in areas where RDS CLOCK service is not available Once RDS CLOCK service is available the RDS CLOCK system will start operation Text The broadcaster may include a message that displays information about the current program Frequency Displays the frequency of the current st...

Page 21: ...it Third press To cancel repeat play the word REP A B will disappear Note The section A and B can be set only within the same track Text Display During Playback CD disc Repeatedly press the INFO button to show the current track number and single elapsed time or single remain time or total elapsed time or total remain time MP3 WMA Disc Playing Note MP3 WMA music playback from CD maybe be affected d...

Page 22: ...laying album the words ALB will blink and TRK REP ALB will stay lit Third press To repeat playing all tracks on a disc the words TRK and REP ALL will stay lit Fourth press To play tracks randomly the words TRK and SHUF will stay lit Fifth press To cancel the repeat playing the word TRK will stay lit Repeat A B can be set by pressing the A B button First press Select the start point the words REP A...

Page 23: ...orarily pause the playing press the button again to continue playing 4 Press the button to stop playing Access a folder During playing press the ALB buttons to select a folder In the Stop mode press the ALB buttons to select a folder and press the l l buttons on the front panel or l l buttons on the remote controller to select a file and then press the ll button to start playing Depending on the U...

Page 24: ...on the front panel or l l on the remote controller To stop play press 7 Press the PAIRING button for approximately 2 second to clear the Bluetooth pairing history Note Please refer to your audio source user instruction for details on operating the Bluetooth Operation and names of specific functions may vary on different devices Important Notes Bluetooth Connection 1 When you want to use another Bl...

Page 25: ... the input is displayed e g DISC 2 Press the l l buttons on the front panel or buttons on the remote controller to select an input 3 Press the TIMER button the hour indicator will blink 4 Repeat steps 2 3 to set the hour minute and adjust the volume Note To exit the Alarm Timer setting mode without storing press the button If no button is pressed in 90 seconds the unit exits the Clock setting mode...

Page 26: ...s generated by nearby electronic equipment try to eliminate such a problem by moving this product away from the source of interference or trying to power it from a different power line than other equipment e g from a power outlet in another room Vacuum Tube Replacement The lifetime of vacuum tubes may vary and depends on their operation time and ambient temperature playback volume levels and the n...

Page 27: ...st with a soft cloth wipe the disc lightly with a slightly moistened cloth and finish with a dry cloth Do not use any type of solvent such as thinner benzine commercially available cleaners or antistatic spray They may damage the disc Storing Discs Do not store discs in places subjected to direct sunlight or near heat sources Do not store discs in places subjected to moisture and dust such as a ba...

Page 28: ...al Analog inputs AUX AUDIO IN stereo jack 3 5 mm front panel Analog outputs SUB frequency 20 300Hz Headphone output Impedance 32Ω Output power 10mW 32Ω Frequency response 30Hz 20KHz 6dB Total Harmonic Distortions 1 Signal Noise ratio 50dB AC power power consumption 220 240V 50 60Hz 70W max Dimensions H x W x D 14 x 24 5 x 29 5 cm Bluetooth is a registered trademark of Bluetooth SIG Inc We reserve ...

Page 29: ...29 Notes ...

Page 30: ...30 Notes ...

Page 31: ...31 Notes ...

Page 32: ...t as household waste or commercial waste Waste electrical and electronic equipement should be appropriately collected and recycled as required by practices established for your country For information on recycling of this product please contact your local authorities your household waste disposal service or the shop where you purchased the product Your product is marked with the symbol as showed o...

Reviews: