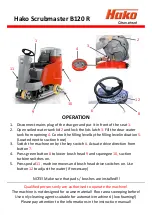
background image

12

Fig 18

WARNING!

 After each use, it is necessary to 

clean the recovery tank to prevent deposits 
or scaling and the growth of bacteria, odors 
or mold.

• Remove the cover, and clean the inside of 

the cover and the vacuum safety float with 
running water.

• Leaving the hose lowered and the cap off, 

run water though the upper opening, cleaning 
the inside of the tank until clean water comes 
out of the drain hose.

• Replace all components in reverse order.

5.3 Draining and cleaning the solution tank

WARNING! 

– After each use, it is necessary to 

drain and clean the solution tank to prevent 
deposits or scaling.

• Position the machine over a drain outlet.
• Turn the drain connector outwards (Fig 19).

Fig 19

• Push the blue ring inward while pulling the 

red plug outward Fig 19).

•  Allow tank to drain completely.
• Wash the inside of the tank, leaving the drain 

open and adding clean water though the 
front opening.

• After cleaning, replace the plug. 
• 

IMPORTANT

 – To dispose of unused cleaning 

solution, comply with the local, state, and 
federal standards in force in the country in 
which the machine is being used.

5.4 Cleaning the squeegee blades

  To clean the squeegee correctly it is 

necessary to remove it as follows (Fig 20):

Fig 20

Summary of Contents for Powr-Flite PAS14G

Page 1: ...MANUAL WARNING OPERATOR MUST READ AND UNDERSTAND THIS MANUAL COMPLETELY BEFORE OPERATING THIS EQUIPMENT Tacony Corporation All rights reserved Save These Instructions Automatic Scrubber PAS14G PAS14G...

Page 2: ...n tank 7 3 Controls 7 4 Operation 8 4 1 Checks before use 8 4 2 Preparing the machine and choosing the cycle 8 4 3 Using the machine 9 5 Warnings while using the machine 9 5 1 When cleaning is finishe...

Page 3: ...Recovery tank 7 Recovery tank lid 8 Solution tank 9 Solution tank filling opening 10 Wheels 11 Brush guard 12 Brush 13 Squeegee 14 Recovery tank drain hose 15 Vacuum hose 16 Battery charger lead 17 Ba...

Page 4: ...ain power supply voltage corresponds with the voltage shown on the rating plate All parts are to be positioned as indicated in the instructions before using the machine Do not operate the machine if i...

Page 5: ...or stored outdoors or in wet conditions CAUTION If it is suspected that there is hazardous dust or flammable materials stop cleaning the area immediately and consult your supervisor WARNING Only use a...

Page 6: ...th GFI circuit breaker WARNING Charge batteries in a well ventilated area which complies with local state and federal regulations and with standards in force in the country of use WARNING Check that t...

Page 7: ...is switched off before adding or changing accessories The solution tank and recovery tank must be emptyprior to changing brushes pads Ensure handle is in upright position and the squeegee is in the up...

Page 8: ...ch off the machine and empty the recovery tank before refilling the solution tank 3 Controls The operating controls are located on the handle Fig 9 The icons adjacent to each switch identify the funct...

Page 9: ...eight 4 Operation 4 1 Checks before use Check that the drain hose tube of the recovery tank is properly coupled and sealed Check that the squeegee vacuum hose is correctly coupled and inserted in the...

Page 10: ...achine without a brush or pad attached Set the handle at a comfortable working height Start the machine and select the type of cycle Start the cleaning operation by pressing the levers and holding the...

Page 11: ...y lit Brush unit outlet open circuit 5 4 3 2 1 NOTE When any of the above mentioned error signals are displayed it is necessary to turn off the machine and then turn the machine back on again in order...

Page 12: ...fter each use it is necessary to drain and clean the solution tank to prevent deposits or scaling Position the machine over a drain outlet Turn the drain connector outwards Fig 19 Fig 19 Push the blue...

Page 13: ...en the machine must be lifted for any maintenance operations it is necessary to work safely by placing fixed supports underneath it When the machine must be lifted for any maintenance operations it is...

Page 14: ...the brush pad driver NOTE It is possible to have two types of rubber blades Para rubber blades for all types of floors and polyurethane rubber blades for mechanical workshop floors which are dirty wit...

Page 15: ...d Fig 25 Fig 26 Make sure that the solution tap is fully closed Refer to Fig 16 Unscrew the transparent filter cover 1 and remove the filter 2 Clean the filter 2 in running water If it is blocked repl...

Page 16: ...measured at a distance of 10 inches from machine and 5 feet above floor when scrubbing a hard floor Measurements recorded using a hand held meter Handle vibration does not exceed 2 5 m 5 when operati...

Page 17: ...let over current error or vacuum unit circuit error Vacuum button not pressed on handle controls See paragraph Warning signals while using the machine Section 5 Press the button The machine does not d...

Page 18: ...A Tacony Company 3101 Wichita Court Fort Worth TX 76140 1755 1 800 880 2913 Fax 1 817 551 0719 PAS14GA MAN 02 2020 For warranty information go to www Powr Flite com...

Reviews: