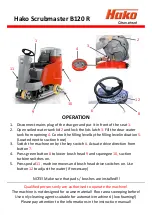
10
4.2 Preparing the machine and choosing
the cycle
• Press the brush motor button (#3, Fig 9). The
light illuminates.
• Pull the squeegee lifting lever and release it
to lower the squeegee to the floor (Fig 14).
Fig 14
The machine can perform 4 working cycles:
•
Drying only cycle
Press button 2 (Fig 9) to start the vacuum.
•
Brushing only cycle
Pull and hold lever 5 (Fig 10). Releasing
the lever stops the brush.
•
Washing, brushing cycle:
Press button 4 (Fig 9) to enable dispensing
of solution. Press lever 5 (Fig 10) to release
solution onto floor.
•
Washing, brushing, drying cycle
Press button 2 to start the vacuum, button 4
(Fig 9) to release solution and pull the lever 5
(Fig 10) to start the cycle.
4.3 Using the machine
WARNING!
Never start the machine
without a brush or pad attached.
• Set the handle at a comfortable working
height.
• Start the machine and select the type
of cycle. Start the cleaning operation by
pressing the levers and holding them pressed
to start rotation of the brush or pad and to
dispense cleaning solution, then push the
machine in a forward direction using handles
on the handle bar.
• Releasing the lever stops the rotation of the
brush and the dispensing of solution.
WARNING
– to avoid damaging the floor
DO NOT use the machine in a fixed
position with the brush rotation
activated. The machine must be moving
while the
brush is rotating.
•
IMPORTANT
– the correct way of cleaning
and drying the floor is to move the machine
forward. Moving the machine backwards
damages the squeegee blades and does not
allow water to be vacuumed from the floor.
• If necessary, adjust the volume of solution
using the tap (See pic 15 & 16).
Fig 15 Solution tap fully closed