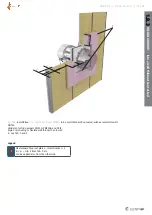
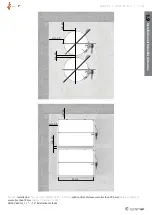
background image

PKIR, PKIS


|    PP-28_201612    |    43 / 48

5 Warranty Conditions:

For warranty conditions ask please our Systemair colleagues 


in your country.

Before you can install the fire damper, it‘s functionality must

be tested as per chapter 3 (Fire Damper Functionality Check)

DO NOT INSTALL NON-FUNCTIONING FIRE DAMPERS!

Changes of fire damper functionality, caused by transport or

installation, aren‘t reclaimable after installation (deformations,

damages, mechanical damage of the sealing material,

foreign objects which can constrain the blade movement, wrong 

handling of the activating mechanism etc.)

Before you can connect the fire damper into the ductwork,

the fire damper functionality must be checked again (according

to chapter 3, in Fire Damper Functionality Check).

4 Damper Inspection

The activating mechanism keeps the dampers on stand-by 

during their entire life cycle in accordance with the Operation 

manual issued by the manufacturer. Without the manufacturer’s 

consent it is not permitted to alter the dampers in any way nor 

perform any changes to their structure.
The operator performs regular checks of the dampers as per 

established regulations and standards at least once 


in 12 months. The check needs to be performed by an employee 

who has been specifically trained for this purpose by the manu-

facturer. The current fire damper condition determined during 


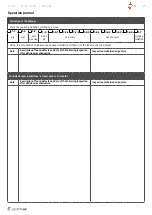
the inspection needs to be entered into the operating logbook 

along with the date of the inspection, a legible name, surname 


and signature of the employee who performed the inspection. 

The journal includes a copy of the employee’s authorization. 


If any discrepancies are discovered, these need to be entered in 

the operating journal along with a proposal for their removal. 


The journal can be found on the last but one page of this manual. 

Immediately after the damper installation and activation it needs 

to be checked with the identical conditions as apply for the 

above mentioned 12-month inspections. The table for damper 

activation can be found on the last but one page of this manual.
The visual check enables visible damages on the inspected dam-

per parts to be seen. On its external side the damper housing and 

the activating mechanism are checked. Due to the need to per-

form a visual check of the damper’s internal parts, it is necessary 

to dismount the base plate with the activating mechanism, which 

will enable us to access the inside of the damper or open the 

inspection lid if the damper is equipped with one. The removable 

mechanism always needs to be dismounted from the damper 

and returned back into the damper with the damper blade being 

closed. We check the damper’s internal casing, thermal fuse, 

sealings, foaming substance, the damper blade condition and ac-

curacy of its closure during its leaning against the backstop in the 

closed position. There must not be any strange objects or a layer 

of impurities from the air distribution systems inside the damper.

NEVER OPEN THE INSPECTION LID WHEN THERE IS AIR FLOWING  

IN THE DUCT CONNECTED TO THE FIRE DAMPER!

Recommended course of action and inspection  

log as per EN 15 650:

1.  Damper identification

2.  Date of inspection

3.  Check of electric connection of the activating mechanism 

(where applicable)

4.  Check of the damper for cleanliness and possible need 


for cleaning (where needed)

5.  Check of the blade and sealing condition, possible correction 

and log (where needed)

6.  Check of the proper fire damper closure – details can be 

found in the previous paragraphs

7.  Check of the damper functionality – opening and closing using 

the control system, physical examination of the damper’s 

behavior, possible correction and log (where needed)

8.  Check of the end switches’ functionality at an open and a 

closed position, possible correction and log (where needed)

9.  Check whether the damper is fulfilling its role as part 


of the regulation system (where needed)

10. Check whether the damper remains in its standard operating 

position. 

The damper is usually part of a system. In that case the whole 

system needs to be checked as described in its operation and 

maintenance requirements published by the builder of the system.

Summary of Contents for OCWATERLOO EKIR

Page 1: ...PKIS3GA Ex Round PKIR3G EKIR Rectangular PKIS3G PKIS3GA PKIS EI90S PKIS EI120S ORIGINAL INSTALLATION OPERATION AND INSPECTION MANUAL EVERY FIRE DAMPER NEEDS TO BE INSTALLED IN ACCORDANCE WITH THIS MANUAL 1396 CPD 0062 1396 CPR 0076 1396 CPR 0077 Newest versions of all FSP relevant documents are at www systemair com FSPoverview ...

Page 2: ...MANUFACTURER Rigid Flexible wall Only rigid wall ceiling Dimension range mm Certificate No Product type Fire resistivity Supporting construction Installation tested at underpressure Pa Wet Dry Soft crossing Instal kit On a wall Out of a wall 100 DN 400 PKIR3G PKIR3G Ex ATEX EI60 ve ho i o S ve 500 300 300 500 300 W 300 W ho 500 300 EI90 ve ho i o S ve 500 300 300 500 300 W 300 W ho 500 300 EI120 v...

Page 3: ...ard Modulated fire dampers activation mechanism DV9 T SR in Tab 26 are manufactured PKIS3G with H 160 mm IN ACCORDANCE WITH EN 15650 EACH FIRE DAMPER MUST BE INSTALLED ACCORDING TO THE INSTALLATION INSTRUCTIONS PROVIDED BY THE MANUFACTURER Dimension range mm Certificate No Product type Fire resistivity Supporting construction Installation tested at underpressure Pa Wet Dry Soft crossing Instal kit...

Page 4: ... 1 Concrete Masonry Cellular concrete Legend Fire resistivity min s mm Wall Ceiling Concrete Masonry Cellular Concrete Concrete Cellular Concrete 60 110 10 110 10 110 10 125 10 90 120 150 10 150 10 150 10 150 10 Tab 3 Thickness of standardized walls ceilings under EN 1366 2 NOTE Dimensions øD1 W1 H1 are defined in every installation by Tab 5 through 24 ...

Page 5: ...y see Tab 4 maximum spacing in the opening area 625 mm 3 Horizontal CW profiles profile width sCW based on fire resistivity see Tab 4 must be firmly embedded into the vertical profiles 4 Mineral wool thickness cubic weight see Tab 4 Legend Fire resistivity min s sCW Insulation mineral wool Thickness Cubic density mm kg m3 60 100 50 40 40 90 125 75 60 50 120 150 100 60 100 Tab 4 Thickness of standa...

Page 6: ...f the internal frame D2 mm RRW øDN 80 FRW øDN 80 DN 100 Nominal dimension DN mm LD mm ZV DV1 through DV6 DV7 DV9 100 400 210 450 282 192 500 242 560 630 1000 342 1 Bendable hanger 2 Plaster mortar concrete filling 3 Screw 5 5 DIN7981 Legend Tab 5 Wall opening NOTE øD1 W1 H1 see Fig 1 4 Tab 6 Distance of the connected duct s ending from the wall WET gypsum mortar concrete EI120S 1 1 LD 3 1 2 ø D N ...

Page 7: ...l and opening type Dimensions of the openings W1 H1 mm Dimensions of the internal frame mm RSW W 120 H 120 FSW W 120 H 120 W 120 H 120 LD mm PKIS3G PKIS EI60S PKIS EI90S PKIS EI120S 185 254 1 Bendable hanger 2 Plaster mortar concrete filling 3 Screw 5 5 DIN7981 Legend Tab 7 Wall opening NOTE øD1 W1 H1 see Fig 1 4 Tab 8 Distance of the damper s ending from the wall 2 3 1 H W LD ...

Page 8: ...120 Nominal dimension DN mm LD mm ZV DV1 through DV6 DV7 DV9 100 400 230 450 282 192 500 242 560 630 1000 342 1 Bendable hanger 2 Mineral wool filling min 50 kg m3 3 Screw 5 5 DIN7981 4 Coverplate PRR PKI accessories 5 Screw 5 5 DIN7981 6 Fire resistive mastic e g Intumex AC Legend Tab 9 Wall opening NOTE øD1 W1 H1 see Fig 1 4 Tab 10 Distance of the connected duct s ending from the wall DRY minera...

Page 9: ...ons of the internal frame mm RSW W 120 H 120 FSW W 120 H 120 W 120 H 120 LD mm PKIS3G PKIS EI60S PKIS EI90S PKIS EI120S 205 254 3 1 4 PKIS EI90S PKIS3G 5 3 1 4 5 2 1 Bendable hanger 2 Mineral wool filling min 50 kg m 3 3 Screw 5 5 DIN7981 4 Coverplate PRS PKI accessories 5 Screw 5 5 DIN7981 6 Fire resistive mastic e g Intumex AC Legend Tab 11 Wall opening NOTE øD1 W1 H1 see Fig 1 4 Tab 12 Distance...

Page 10: ...l dimension DN mm LD mm ZV DV1 through DV6 DV7 DV9 100 400 210 450 282 192 500 242 560 630 1000 342 1 Bendable hanger 2 Mineral wool segment 150 kg m3 3 Screw 5 5 DIN7981 4 Layer of fire resistive mastic e g Intumex AC at least 2 mm thick Legend Tab 13 Wall opening NOTE øD1 W1 H1 see Fig 1 4 Tab 14 Distance of the connected duct s ending from the wall SOFT CROSSING mineral wool EI90S 1 3 4 3 1 LD ...

Page 11: ...W W 120 H 120 W 120 H 120 LD mm PKIS3G PKIS EI60S PKIS EI90S PKIS EI120S 185 254 1 Bendable hanger 2 Mineral wool segment 150 kg m3 3 Screw 5 5 DIN7981 4 Layer of fire resistive mastic e g Intumex AC at least 2 mm thick 5 L profile 60 40 3 mm see chapter 1 3 6 Screw 5 5 DIN7981 7 Screw 3 9 max 13 DIN7504 Legend Tab 15 Wall opening NOTE øD1 W1 H1 see Fig 1 4 Tab 16 Distance of the damper s ending f...

Page 12: ...ble installation kit RRW øD1 Tab 19 IKRR PKI FSW W1 W1 Tab 19 W1 50 W1 50 IKRS PKI Tab 17 Wall opening NOTES øD1 W1 H1 see Fig 1 4 Internal surfaces of the opening need to be covered by two layers 12 5 mm of plasterboard across their entire perimeter Distance of the connected duct s ending from the wall 1 Screw 5 5 DIN7981 Legend INSTALLATION KIT insulation assembled from factory EI120S 1 4 1 265 ...

Page 13: ...stallation kit Wall and opening type Dimensions of the ope nings W1 H1 1 mm Dimensions of the internal frame mm RSW W 100 H 100 FSW W 100 H 100 W 150 H 150 Tab 18 Wall opening NOTES øD1 W1 H1 see Fig 1 4 Internal surfaces of the opening need to be covered by two layers 12 5 mm of plasterboard across their entire perimeter 1 Screw 5 5 DIN7981 Legend 1 185 H W ...

Page 14: ...587 560 660 810 647 660 647 600 700 850 687 700 687 630 730 880 717 730 717 Tab 19 Dimensions of the installation kit and opening in the wall NOTE øD1 W1 H1 see Fig 1 4 Installation kit can not be delivered separately The deli very is always with the damper as a complete assembly Rectangular instal kit only up to 800 600 mm IKRR PKI IKSS PKI IKRS PKI INSTALLATION KIT insulation assembled from fact...

Page 15: ... 120 Tab 20 Wall opening NOTE øD1 W1 H1 see Fig 1 4 1 Steel threaded rod M12 2 Sheet metal ringlet for damper suspension e g MP MX HILTI 3 Ceramic tape e g A KERA width 40 mm thickness 2 mm 4 Sheet metal belt 40 2 mm bent into a shape L with sides 35 and 160 mm 5 Screw 5 5 DIN7981 6 Screw 3 9 max 13 DIN7504 7 Mineral wool 66 kg m3 in a wall 8 Layer of fire resistive mastic e g Intumex AC at least ...

Page 16: ...r s ending For LD 1500 mm the maximum spacing between threaded rods must be 1500 mm and one more point of suspension must be added in the position of damper blade as close as possible to the connection flange 16 15 6 17 16 1 1 PKIS EI90S ON A WALL 1 5 1 OUT OF A WALL Mineral wool EI90S 1 6 1 9 8 7 6 4 5 11 12 10 1 13 14 2 3 9 LD 150 c 140 b a H W 18 2 3 18 2 2 3 1 1 PKIS3G ...

Page 17: ...ade of tubular profiles 60 40 3 mm 16 Sheet metal 85 40 2 5 mm 17 Damper insulation frame s screw 18 Steel threaded rod M8 Legend Fig 15a Part of the accessory IPOS PKI see TPI 28 top without welding pins side 20 pins m2 bottom 20 pins m2 distance between pins max 260 mm distance of the pin from the edge 80 mm Selection dimensions in mechanism s protective covers PKIS3G PKIS EI90S a 40 65 b 155 32...

Page 18: ... 120 DN 120 Tab 22a Wall opening NOTE øD1 W1 H1 see Fig 1 4 wall type RRW and FRW see Tab 3 4 1 Steel threaded rod M12 2 Sheet metal ringlet for damper suspension e g MP MX HILTI 3 Standard sheet metal ringlet for damper suspension 2 4 Mineral wool 66 kg m3 5 Layer of fire resistive mastic e g ISOVER Protect BSF on both side at least 2 mm thick 6 Mineral wool th 100 66 kg m3 e g ISOVER Ultimate U ...

Page 19: ...k 5 Layer of fire resistive glue e g ISOVER Protect BSK 6 Mineral wool th 80 mm min 66 kg m3 e g ISOVER Ultimate U Protect Slab 4 0 Alu1 7 Welding pin length 80 mm 8 Stiffening rods horizontal for W 600 mm vertical for H 400 mm 9 Aluminium tape around the front side and on places uncovered with aluminium foil Legend Tab 22b Wall opening NOTE øD1 W1 H1 see Fig 1 4 Top without welding pins side 20 p...

Page 20: ... H 120 W 120 H 120 1 Steel threaded rod M10 2 U profile e g MQ41 HILTI 3 Calcium silicate board th 40 mm e g Promatect L500 Promat 4 Calcium silicate board th 40 mm width min 100 mm e g Promatect L500 Promat 5 Installation kit IKOWS W H details see Fig 15e 6 Fire protection glue e g Promat kleber K84 Promat 7 Gypsum board th 15 mm width min 100 mm 8 Steel L profile 25 25 2 mm 9 Mineral wool th 50 ...

Page 21: ...I 3 Calcium silicate board th 20 mm e g Promatect L500 Promat 4 Calcium silicate board th 20 mm width min 100 mm 2 layers e g Promatect L500 Promat 5 Installation kit IKOWS W H details see Fig 15e 6 Fire protection glue e g Promat kleber K84 Promat 7 Gypsum board th 15 mm width min 100 mm 8 Steel L profile 25 25 2 mm 9 Mineral wool th 50 mm 150 kg m3 10 Screw 5 80 DIN7997 11 Mineral wool th 40 mm ...

Page 22: ... than 1500 mm NOTES Valid for all installations with Promatect or mineral wool insulation for details see relevant Fig and Tab in the 1 6 installation methods LP recommended length of the Promatect boards from producer is 1250 mm the legally allowed support span is 1500 mm 1 Installation kit IKOWS PKI 2 Fire damper PKIR3G or PKIS 3 Support around the blade 4 Support near to the end of the damper L...

Page 23: ... 5 6 4 10 a a 2 8 7 9 4 0 60 H W 1 Duct W H 2 Calcium silicate board th 40 20 20 100 mm e g Promatect L500 Promat 3 Mineral wool th 40 mm min 40 kg m3 only EI60 4 Calcium silicate board th 20 mm EI60 or 40 mm EI90 e g Promatect L500 Promat 5 U profile e g MQ41 HILTI 6 Steel threaded rod M10 7 Screw with coak span max 250 mm 8 Steel L profile 60 40 1 mm 9 Calcium silicate board th 40 60 mm e g Prom...

Page 24: ...0 20 100 mm e g Promatect L500 Promat 3 Mineral wool th 40 mm min 40 kg m3 only EI60 4 Calcium silicate board th 20 mm EI60 or 40 mm EI90 e g Promatect L500 Promat 5 U profile e g MQ41 HILTI 6 Steel threaded rod M10 7 Screw with coak span max 250 mm 8 Steel L profile 60 40 1 mm 9 Calcium silicate board th 40 60 mm e g Promatect L500 Promat 10 Screw 5 80 e g DIN7997 11 Fire protection glue e g Prom...

Page 25: ... see relevant Fig and Tab in the 1 6 installation methods 1 Duct W H 2 Calcium silicate board th 40 20 20 100 mm e g Promatect L500 Promat 3 Mineral wool th 40 mm min 40 kg m3 only EI60 4 Calcium silicate board th 20 mm EI60 or 40 mm EI90 e g Promatect L500 Promat 5 U profile e g MQ41 HILTI 6 Steel threaded rod M10 10 Screw 5 80 e g DIN7997 11 Fire protection glue e g Promat kleber K84 Promat Lege...

Page 26: ...atic stability Wall and opening type Dimensions of the openings øD1 W1 H1 mm Dimensions of the internal frame mm RSW WL 120 HL 120 FSW x x Tab 25 Wall opening NOTE øD1 W1 H1 see Fig 1 4 1 Console 2 Mineral wool 150 kg m3 3 Screw 5 5 DIN7981 4 Layer of fire resistive mastic e g Intumex AC 5 L profile 60 40 3 mm 6 Screw 5 5 DIN7981 7 Screw 3 9 max 13 DIN7504 8 Sheet metal belt 80 0 9 mm 9 Screw 3 5 ...

Page 27: ...ular fire damper PKIS3G into a wall thinner than tested NOTES Valid also for fire dampers PKIR3G PKIS3GA and PKIS Rigid or protruding or flexible wall thinner than tested S see Tab 3 and 4 1 Plasterboard fireproof plates total thickness S S1 S2 min S from Tab 3 or 4 Can be applied also from the other side Legend 1 mi n 200 min 200 S S 1 S 2 ...

Page 28: ...sing see the 1 3 installation method into a wall thinner than tested NOTES Valid also for fire dampers PKIR3G PKIS3GA and PKIS Rigid or protruding or flexible wall thinner than tested S see Tab 3 and 4 1 Plasterboard fireproof plates total thickness S S1 S2 min S from Tab 3 or 4 Can be applied also from the other side Legend 1 mi n 200 min 200 S S 1 S 2 ...

Page 29: ...OTES Valid also for fire dampers PKIS3G PKIS3GA and PKIS Rigid or protruding or flexible wall thinner than tested S see Tab 3 and 4 1 Plasterboard fireproof plates total thickness S S1 S2 min S from Tab 3 or 4 Can be applied also from the other side Legend 1 8 3 INSTALLATION KIT Into a wall thinner than tested 1 mi n 200 min 200 S S 1 S 2 ...

Page 30: ...W H min 60 Fig 19a Installation of fire dampers PKIR3G PKIS3G PKIS3GA with horizontal distances smaller than 200 mm between dampers NOTE Valid for 1 1 1 3 installation methods Installation with smaller distances 1 9 min 60 ø D N ø D N ...

Page 31: ...KIR3G PKIS3G PKIS3GA with vertical distances smaller than 200 mm between dampers or smaller than 75 mm damper from wall ceiling NOTE Valid for 1 1 1 3 installation methods W H min 40 min 60 min 40 min 40 min 60 min 40 ø D N ø D N 1 9 Installation with smaller distances ...

Page 32: ...n connection AC 24 V 230 V DC 24 V ActuatorBLF BFL BFN BF 230 T AC 230 V 24 T AC DC 24 V 24 T ST 24 V 24 SR T 24 V Tab 26 Composition of the activation mechanisms according by ordering codes NOTES Only applicable for PKIR3G with DN 160 mm PKIS3G and for PKIS3GA with H 160 mm It is permitted to exchange the activating mechanisms In case of exchange order the appropriate mechanism according to our o...

Page 33: ...ta Combination of power supply voltage and safety extra low voltage not permitted at both auxiliary switches 1 blue 2 brown S1 violet S2 red S3 white S4 orange S5 pink S6 grey Tf Thermal fuse Cables colours 1 black 2 red S1 violet S2 red S3 white S4 orange S5 pink S6 grey Tf Thermal fuse Cables colours Legend DC Direct current AC Alternating current 230 Servomotor 230 V 24 Servomotor 24 V T Thermo...

Page 34: ... AC 24 V 50 60 Hz 7 VA DC 24 V 9 5 VA Tab 27 Electric parameters of the microswitches electromagnets and servomotors based on the type of activation mechanism NOTE Load factor 40 maximum 120 s under voltage 100 continuous load pressure BELIMO BLF230 T BF230 T Fig 26 Servomotor connection scheme for DV7 T Note Caution Main power supply voltage A device that disconnects the pole conductors minimum c...

Page 35: ... 9 10 85 11 1 2 3 PE 5 24 240 VAC DC 4 1 2 C 6 7 5 8 9 10 85 11 1 2 3 PE 5 24 240 VAC DC 4 a b PA PA On off 1 wire spring return Ex i circuit Integrated aux switches max 24 V 3A 240 V 0 25 A min 5V 10 mA switching at 5 and 85 Supply at aux switches must be the same like supply of the actuator Ex i circuit for passive potential free push button on site and safety temperatu re sensor Type FireSafe a...

Page 36: ...ories PRR PKI PRS PKI coverplates for dry installation CVR PKI CVRF PKI CVS PKI compensators of the thermal dilatation MPC PKI clutches MPA PKI adapters RFA PKI flanges for round dampers SSAR PKI SSAS PKI adapter with smoke sensor IPOR PKI IPOS PKI accessory for installation out of a wall and on a wall IKOWS PKI installation kit for installation out of a wall with Promatect IKRR PKI IKRS PKI and I...

Page 37: ...ughly but in such way that will not deform the damper housing while paying attention to prevent fouling of the damper s functional parts which could limit its correct functionality 6 Close the gap between the damper and the mounting opening for a round damper use PRR PKI coverplates for a rectangular damper use PRS PKI coverplates with screws 5 through pre drilled holes 7 All the gaps between the ...

Page 38: ...max 13 for example DIN7504 Do it around the entire perime ter in such way that for the nominal dimensions up to W and H 1000 mm there will be at least 3 sheets and for H 1000 mm at least 4 units for each side Installation procedure 1 Insert the duct into the load bearing structure along with the damper in such way that the duct will stick out of the wall to the needed distance which however needs ...

Page 39: ...ig 15e and apply a suitable fire resistant mastic pos 6 e g Promat Kleber K84 to the contact surfaces of the boards and the damper Fasten them together using the screws included in the 1 6 2 INSTALLATION OUT OF A WALL EI60S using mineral wool Fig 15b 15ba This installation can be used with LD 1500 mm for fire dampers as per Tab 1 and 2 For the installation of a round damper prepare a round opening...

Page 40: ...ds pos 4 along the entire length with L500 Promatect boards 20 mm thick apply fire resistant glue such as Promat Kleber K84 to all joints 5 Common Bind the damper up in the blade location using a profile e g HILTI MQ31 using min M10 threaded rods and nuts The same profile is to be provided on the upper side the threa ded rods are to be at a distance of max 50 mm from the side insulation surface 6 ...

Page 41: ...hick and 80 mm wide create a backstop of length WL from one side of the installation and attach it with screws 9 If it is necessary to enhance the stability of the PKI 2A damper fix it provisionally into the side of the wall until it is firmly embedded into the wall using an L profile 5 7 Apply the same method for installation of the 2B damper 8 Any empty space that has remained between the damper...

Page 42: ... and Tab 26 and 27 3 Fire Damper Functionality Check 3 1 Manual Open the damper turn the crank using a four square wrench damper dimensions W 1200 and H 800 mm turn the crank into the OPEN position and detent damper dimensions W 1200 and or H 800 mm the crank needs to remain in the OPEN position the microswitch for the open position indication must be braced if installed Close the damper release t...

Page 43: ...table for damper activation can be found on the last but one page of this manual The visual check enables visible damages on the inspected dam per parts to be seen On its external side the damper housing and the activating mechanism are checked Due to the need to per form a visual check of the damper s internal parts it is necessary to dismount the base plate with the activating mechanism which wi...

Page 44: ... NOTE It is also needed to indicate the applied installation method onto the label on the fire damper Date Description of found defects and date of the following inspection after deficiencies elimination Inspection technician s signature Periodic damper inspections at least once in 12 months Date Description of found defects and date of the following inspection after deficiencies elimination Inspe...

Page 45: ... PP 28_201612 45 48 Periodic damper inspections at least once in 12 months Date Description of found defects and date of the following inspection after deficiencies elimination Inspection technician s signature ...

Page 46: ...28_201612 PKIR PKIS Periodic damper inspections at least once in 12 months Date Description of found defects and date of the following inspection after deficiencies elimination Inspection technician s signature ...

Page 47: ... PP 28_201612 47 48 Periodic damper inspections at least once in 12 months Date Description of found defects and date of the following inspection after deficiencies elimination Inspection technician s signature ...

Page 48: ...e S Mechanical stability under E Cross section under E Durability of response delay sensing element response temperature and load bearing capacity Pass Durability of operational reliability Open and closing cycle Pass 12 14 1396 IMOS Systemair 90043 Kalinkovo 371 Slovakia EN 15650 2010 Fire dampers rectangular 1396 CPD 0062 PKIS EI90S PKIS EI120S 1396 CPR 0077 PKIS3G Nominal activation conditions ...

Reviews: