background image

BALANCED FLOW


- When you have to split a solar system as in Fig. 

10

.2 or Fig. 

10

.3, page 

#10

, it is critical that the 

shown plumbing runs be followed to assure equal water flow through both rows of panels. Since water will follow the 

path of least resistance, if one plumbing run is shorter than the other, more water will flow through it than through the 

other one. Keep this in mind if you design a panel layout different than the examples. 

Your Swim Joy representative can 

also assist with this and explain the use of “balancing valves” on larger systems. 

If you are installing the solar panels on a flat roof or flat ground rack, the top (return) header of the panel should be at 

least 3” higher than the bottom (feed) header to assure equal flow through all of the tubes of all the panels. To achieve 

even distribution of water throughout the row of panels, proper flow rates and a little back pressure should be present. 

AUTOMATIC  DRAIN  DOWN


-  The  panels  and  the  PVC  pipe  should  be  installed  so  the  water  will  drain  out  of  them 

when the pool pump shuts off. This is especially important in are

a

s of the country where freezing conditions occur. (The 

Swim Joy solar pool panels are warranted against internal freezing when installed to allow for drain down.) To allow 

for the water to drain, a vacuum breaker (2-1

8

10-02

9

) is installed on the solar feed line above the non-positive three-

way valve as shown in (Fig. 

26

.1, page 

#

2

6

). (Non-positive means that the valve allows for water to drain back through 

the valve even while in the off position. If you have a 3-way valve that is not non-positive, you can make it so by drilling 

an 1/8” hole in the diverter). If, as a result, of a unique roof design or adverse pool equipment location, it is not possible 

to achieve complete automatic drain down, manual drain down valves should be installed in appropriate places in the 

plumbing or at the end of the bottom (feed) header. 

6. Solar Panel Layouts & Hydraulics. 

- Cont.

SOLAR PANEL LAYOUTS & HYDRAULICS

 - CONT


-


14

INSTALLATION MANUAL - SWIM JOY SOLAR POOL HEATER

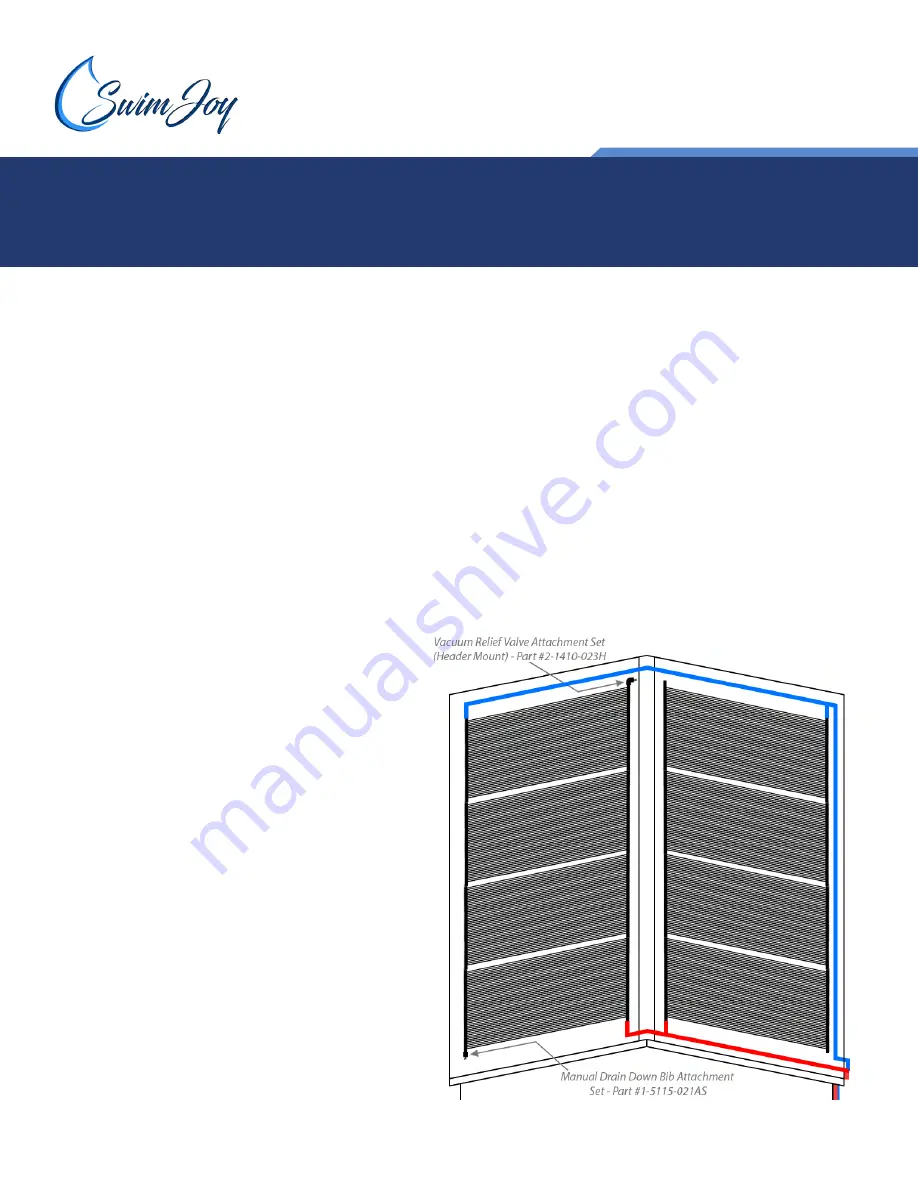
Instead of installing and end cap (2-1810-013) at the 

end of the header, you would install a Manual Drain 

Down Bib Attachment Set (#1-5115-021AS). A top 

header mounted vacuum relief valve (#2-1410-023H) 

would be ideal to allow air into the panel array as 

well. Fig. 14.1

to the right is an example of an 

installation that will not automatically drain and 

details the additional components required to 

manually drain the solar panels

. These valves should 

be opened when shutting down the system for the 

winter months or when freezing conditions are 

possible. Your Swim Joy representative can assist you 

with the parts necessary for the manual drain down 

installations.

NOTE:


Solar panels can be freeze damaged if 

temperatures reach 40 degrees Fahrenheit, so freeze 

damage can occur in virtually any weather climate. It 

is extremely important to take the necessary  steps to 

ensure your system will automatically gravity drain, is 

automated with a control system that features freeze 

protection or is installed with the proper components 

to manually drain the system

.

Summary of Contents for 2-1100-008

Page 1: ...to follow procedure A little time spent understanding the system and its parts will assure a successful trouble free installation CAUTION SAFETY COMES FIRST When working on or around your roof or poo...

Page 2: ...tions contact your Swim Joy Representative for assistance As the installing contractor you are responsible for exercising good judgment when installing Swim Joy systems to protect the long term integr...

Page 3: ...d to complete the installation Don t take shortcuts Whenever possible panels should be installed so they are accessible without being walked on Walking on the panels should only take place when absolu...

Page 4: ...ed layout PUMP HORSEPOWER The horsepower of your swimming pool filtration pump must be adequate to supply the solar system with enough water to provide the recommended flow rate necessary for the pane...

Page 5: ...to allow for drain down If as a result of a unique roof design or adverse pool equipment locations as demonstrated in figure 4 1 below it is not possible to achieve complete automatic drain down manu...

Page 6: ...ROW INSTALLATION KIT One of these kits is required for each row of panels Your DIY System Kit will include one row installation kit It contains the parts necessary to connect the feed and return lines...

Page 7: ...anels you will need to purchase an additional row installation kit for each additional row of panels The row installation kit contains 2 2 1810 004 Panel Clamp Assembly 2 2 1810 003 End Cap and 2 2 18...

Page 8: ...TACHMENT SET Part 2 1410 023A ROW SPACER KIT Part 2 3045 003 PRESSURE TESTING KIT Part 2 3020 022 VACUUM RELIEF VALVE HEADER ATTACHMENT SET Part 2 1410 023H MANUAL DRAIN DOWN BIB ATTACHMENT SET Part 1...

Page 9: ...TOP Part 2 1810 020 PANEL CLAMP GASKET Part 2 1810 017 PANEL CLAMP LATCH Part 2 1810 018 VACUUM RELIEF VALVE Part 2 1810 029 REPAIR PLUGS Part 2 1120 001 PVC PIPE SUPPORT BRACKET BLACK 2 Part 30272 2...

Page 10: ...pe Schedule 40 PVC Fittings 3 Port Valve 2 Port Valve Check Valve Lag Screws Silicone Spray Pipe Supports Zip Ties Electrical Wire Nuts 12ga 14ga Electrical Wire With Ground Electrical Conduit PVC Cem...

Page 11: ...SWIM JOY SOLAR POOL HEATER 6 Solar Panel Layouts Hydraulics The following 4 layout and plumbing diagrams are the most common solar panel installations Fig 10 1 SINGLE ROW Fig 10 2 DOUBLE ROW Fig 10 4...

Page 12: ...e etc For commercial installations please contact a Swim Joy representative for system design assistance Top Mounting Pad Bottom Mounting Pad PVC Pipe Support Bracket Panel Clamp Assembly End Cap CPVC...

Page 13: ...PANEL CONFIGURATIONS There are many ways to configure a solar array The most common and preferred is in one continuous row as shown in Fig 10 1 on page 10 However there are recommended limits to the...

Page 14: ...plumbing techniques which will reduce the necessary flow rates on larger systems Plumbing runs should be as short as possible and the hot return pipe should have the shortest run to reduce potential h...

Page 15: ...e valve allows for water to drain back through the valve even while in the off position If you have a 3 way valve that is not non positive you can make it so by drilling an 1 8 hole in the diverter If...

Page 16: ...in both headers together ensuring the gasket is properly located in both header grooves and fully seated Only one gasket is used for each connection Place the bottom clamp underneath where both of the...

Page 17: ...both top and bottom headers attach end caps and attach pipe connectors NOTE On soft roof surfaces or lesser quality asphalt shingle an EPDM or aluminum pad underneath the panel clamp assembly may be...

Page 18: ...the very outside edge After positioning the mounting pads in the proper location on the first panel Panel A apply an ample amount of roof sealant to both the lag screw and to the roof for the 1st mou...

Page 19: ...um pad underneath the panel clamp assembly may be necessary to eliminate possible roof wear The bottom mounting pads feature a unique design that both secures the bottom header to the mounting surface...

Page 20: ...solar heating performance and reduces wind lift stress on the panels and mounting hardware Fig 19 1 below is an example of a rack constructed of galvanized steel framing stud material Fig 19 2 shows t...

Page 21: ...05 pipe connectors to the headers of the panels to be connected with the 2 1810 004 panel clamp assemblies using the same procedures outlined in the section on connecting solar panels together on page...

Page 22: ...pipe connector and then cement your 2 PVC pipe to the 2 PVC coupling If using 1 5 PVC pipe refer to Fig 21 2 above Cement the 1 5 PVC pipe directly to the 2 1810 005 pipe connector Alternatively a fit...

Page 23: ...tarted section The panel mounting hardware isn t designed to support the weight of the PVC plumbing pipe in addition to the weight of the panels PVC pipe will also sag if not properly supported PVC pi...

Page 24: ...ting the Feed Return Lines to the Filtration System Fig 23 1 INSTALLATION MANUAL SWIM JOY SOLAR POOL HEATER CONNECTING THE FEED RETURN LINES TO THE FILTRATION SYSTEM 23 2 1810 029 or 2 Way Valve or 2...

Page 25: ...our existing plumbing so this equipment is located after the solar system as indicated in Fig 23 1 Cut the pipe after the filter where you have decided to locate the check valve and where your solar r...

Page 26: ...plan on painting the pipe to match the house color IF YOU ARE INSTALLING AN AUTOMATIC SYSTEM The basic difference between the manual system just outlined and an automatic system is the use of a motor...

Page 27: ...the pool pump to completely fill the solar system If the pool pump is not operational shut off the ball valve on the feed line and use the garden hose to fill the system Once the solar system is comp...

Page 28: ...cure and that adequate silicone was used to prevent any roof leaks Be sure all panel riser tubes are snapped into the spacer bars except where they go around obstructions Be sure that the panel riser...

Page 29: ...ient professional looking Swim Joy solar pool heating system Turn the pool pump off Turn the 3 way valve so the closed indicator points toward the solar feed side of the valve If isolating the system...

Page 30: ...e air bubbles in the trap run water over the lid and each joint individually to see if the air bubbles will clear up using a garden hose If there is not a clear lid listen to pump noise for a smoother...

Page 31: ...flow Install issue A If the system is a single row array and there is adequate flow use the 2 way valve on the return line to throttle the flow back to produce more back pressure on the system This wi...

Page 32: ...ibutorforarepairkitandadjust the spacer bars to prevent future damage 3 Birds or squirrels have damaged the tubes Contactdistributorforarepairkitandadjust the spacer bars to prevent future damage THE...

Page 33: ...ess than 10 gallons per minute Adjust the 3 way valve to bypass some of the water 2 Seasonal normal operation In the cooler months of the year or on cool partly cloudy days temperature rise through th...

Page 34: ...ructions for repair Utilizing the repair chisel cut the damaged riser as close as possible to the header carefully avoiding damaging adjacent riser tube The sloped side of the chisel should face away...

Page 35: ...slide it over the stub of the poly insert for a straight eye pleasing fit REPEAT steps 1 4 for the other end of the riser tube At the opposite header 17 Repair Procedures Cont REPAIR PROCEDURES CONT 3...

Page 36: ...deserving of ISO 9001 2008 The solar energy system described by this manual when properly installed and maintained meets or exceeds the minimum standard established by the Solar Rating and Certificat...

Reviews: