background image

English

English

42

43

A

dv

anc
ed C

onfigur

ation

A

dv

anc
ed C

onfigur

ation

Alarm: Motion Detection Configuration

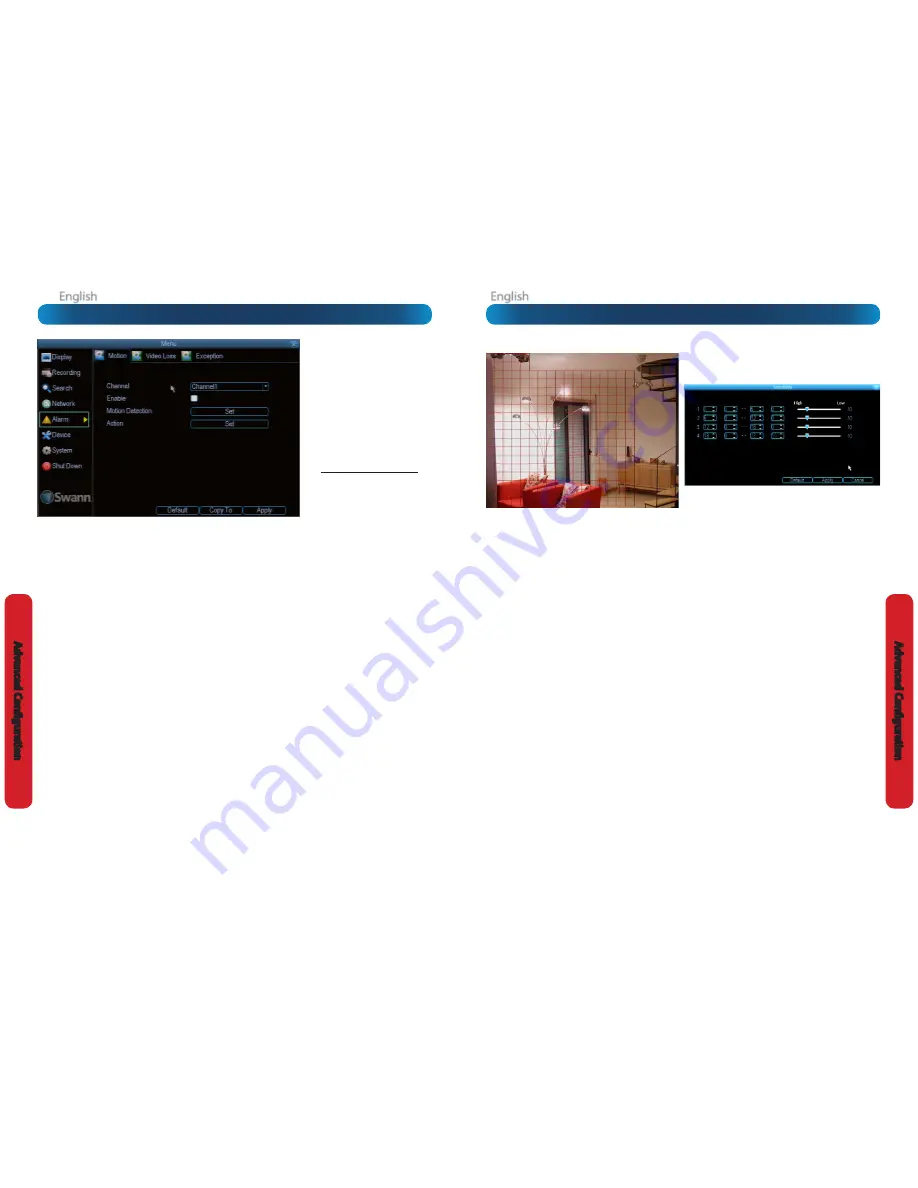
To set the MOTION DETECTION AREA

In the MOTION DETECTION menu, use the mouse or the arrow 

buttons to highlight the SETUP button for the channel you 

wish to setup the MOTION DETECTION AREA for, and confirm 

by pressing select or left clicking.
• 

You will see a grid of red boxes. 

The outlined boxes mark 

the area that is sensitive to motion

. The area 

without


the red outlines is 

not

 sensitive to motion.

• 

Use the mouse to move the cursor around the screen.

• 

By pressing select or left clicking an area in the grid, you 

can toggle motion detection ON or OFF in that location.

• 

Areas marked by red boxes will be sensitive to motion, 

those not marked will not be.

• 

Click and drag to select the area you want to select or de-

select.

In the sample image above, a person moving about the 

room would trigger the motion detection. However, a person 

entering from the right of screen and ascending the staircase 

should avoid the motion sensitive area. This is a good solution 

to monitor the door (centre of image) without getting false 

triggers every time someone ascends the stairs.

Sensitivity:

 To access the Sensitivity setting, press the right 

mouse button. The Sensitivity setting is controlled by a slider, 

allowing you to set a value between 0 and 50. The lower the 

number, the more sensitive the motion detection will be.

There are 

four time periods

 which you can define different 

motion sensitivity values for.
You can change what time(s) each period starts and ends to 

best match the changing lighting conditions in your location.
Typically, values between 5 and 10 will give good results in the 

daytime.
At night, you may get numerous false triggers unless you 

raise the sensitivity setting, perhaps as high as 25 - 30. This is 

because when cameras (particularly CMOS-based ones) use 

active infrared night vision, they dramatically increase the 

gain controls to the image sensor. This creates a lot of “noise” 

in the camera’s images, which are interpreted by the DVR as 

motion. 
By default, the day is divided into four periods:

00:00 (Midnight)

 - 

06:00 (6:00 AM) 

06:00 (6:00 AM)

 - 

12:00 (Midday) 

12:00 (Midday)

 - 

18:00 (6:00 PM) 

18:00 (6:00 PM)

 - 

00:00 (Midnight)

You might need to shift the beginning and ends of these times 

to best suit the time(s) that lighting changes at your location.
The start and end times can be set to anything you like, 

provided the different time periods don’t overlap and there’s 

no gap between one ending and the next starting.
There’s no requirement for all four time periods to have 

different sensitivity levels, although we suggest that usually 

gives the best performance.
To find the best sensitivity values for different times of day/

night, it’s best to test the system during different time periods.
Get an able-bodied volunteer to move about in front of 

the cameras you’d like to tune the sensitivity for. The ideal 

sensitivity level is when your volunteer moving about always 

triggers the motion detection, but there are no false triggers 

(or very few) when your volunteer isn’t moving about.

Alarm: Motion

How Motion Detection Works

The way that the DVR looks for motion is quite straight forward 

- it’s a process where it compares one frame (that is, a single 

image taken approximately a 25th/30th of a second from the 

previous image) with the next. A certain amount of “difference” 

between these two “frames” is interpreted as motion.
As a result, the DVR is able to detect when there is a change 

in the picture. However, this does not necessarily need to be 

something moving in the frame. For example, a light being 

turned on or off, a lightning flash or even the sun coming out 

momentarily on a cloudy day might be enough to trigger the 

motion detection on the DVR. However, as these events last 

only a moment (and are relatively rare) they will only create 

a few very short redundant clips, which will not take up too 

much space or pose a problem with scanning through footage.
This method of motion detection can, however, become 

problematic when using wireless cameras. As wireless 

technology is susceptible to interference, the static and image 

distortion common to wireless systems is often enough to 

trigger the motion detection inadvertently.
As a result, we 

strongly advise against using wireless 

cameras with any of our motion sensitive recording 

equipment

, and advise the use of hard wired cameras. If 

you simply must use wireless technology, we advise using 

digital wireless technology as this technology is much more 

resistant to interference from other wireless equipment and 

environmental causes. However, any wireless technology, 

digital or otherwise, has serious limitations when combined 

with motion detection.
For a similar reason, 

don’t use PTZ systems and motion 

detection simultaneously

. The DVR will interpret the 

camera moving as ‘motion’ and record. This is particularly true 

when using Cruise Mode - as the camera is moving almost 

continually, so too is the DVR recording almost continually! 

Here, you’ll be able to set the motion detection features of 

the DVR for each channel. We suggest that motion detection 

is, under most circumstances, the most practical recording 

method for the DVR to employ.

How it Works:

 Once motion detection has been enabled for 

a channel, it will register to the DVR as a 

Motion Event

. Thus, 

you can use the Motion recording mode in the schedule to 

trigger the DVR to record when motion detection triggers an 

alarm signal. 

Enable:

 Whether or not motion detection is enabled 

on a specific channel. Each channel can be configured 

independently of one another. 

Motion Detection:

 Click the applicable 

Set

 button to setup 

the motion detection area for that channel. See “Alarm: Motion 

Detection Configuration” on page 43 for details on how to do 

this, and what it means.
Say, for example, you are trying to monitor your front yard, 

whilst in the background there is a busy street, and the cars 

driving past continually set off the motion detection. What 

can you do about it? Setting only part of the camera’s view 

to be motion sensitive might be the answer. This is useful in a 

number of circumstances, such as monitoring one particular 

door at the end of a busy hallway, or a backyard with a tree 

that keeps blowing in the wind.

Action: 

Here you can define what will happen when the 

camera you’ve selected detects motion.

Note: If you’ve used the Copy-To feature to copy from 

one camera to another, remember that you’ll still need 

to set the 

Action

 for each channel independently - that 

information isn’t copied.

If you’re planning to use 

Motion 

Detection

 as the primary (or sole) 

recording mode for the DVR, it’s 

worth taking a moment to ensure it’s 

properly configured.

If the motion detection sensitivity is 

too sensitive

, then the DVR will record 

too frequently or continually - any 

benefit of motion detection will be 

lost.

If the motion detection sensitivity is 

not sensitive enough

, then the DVR 

will not record when it should and 

may not record anything at all.

We think that motion detection is the 

best way to get your DVR to operate 

almost autonomously for long periods 

of time (typically weeks to months) 

without you having to worry about 

losing old footage.

Summary of Contents for Advanced D1 series

Page 1: ...English 1 User Manual M48912_BCD1080513E English D1 Digital Video Recorder ...

Page 2: ...lace Do not operate if wires and terminals are exposed Do not cover vents on the side or back of the DVR and allow adequate space for ventilation DEFAULT PASSWORD INFORMATION To ensure your privacy this DVR supports password protection The default all access username is admin If the DVR asks you to log in before you ve set a password enter admin as your username and leave the password blank This w...

Page 3: ...a few things to be set properly before it can do its thing Follow the instructions from page 11 to page 24 to get everything working 3 Optional Advanced DVR Configuration The latter part of this manual covers advanced DVR operations This DVR comes with all the professional grade capabilities you dexpectfromaqualitySwannproduct butmanyadvanced capabilities require detailed setup to function correct...

Page 4: ...VGA input LAN Where you can connect the DVR to a network typically directly into the router or network switch AUDIO IN RCA port for audio input Used to connect audio source such as the camera s built in microphone VIDEO IN These are your video inputs The number of video inputs on your DVR varies depending on the DVR model you have Each accepts a standard composite video signal and connects via a B...

Page 5: ...fyou vegotaTVormonitor with HDMI in connect to the HDMI port on the DVR Connect an Ethernet cable from the LAN port on the DVR to a spare port on your router TheAudioOutportcanbe used to connect a stereo speakers headphones or other external sound device The Audio In ports can be used to connect audio devices to the DVR Obviously your microphone probably won t look like that one they re often buil...

Page 6: ... change any of these settings later you can find these options Main Menu System General Basic DVR Operation The USB Mouse Recommended The easiest way to operate the DVR is to use the included USB optical mouse we put together the look and feel of the menu system specifically for mouse friendly navigation The controls are pretty easy to remember heck there are only two buttons It couldn t be simple...

Page 7: ...his indicates there s something wrong with the SMTP server details you ve entered If the DVR reports success but you don t receive the email then it s likely there s something amiss with the recipient email in particular check the Spam folder settings Other Allows for custom definition of an outgoing email server See Network Advanced Email Settings on page 41 if you want to use an email server oth...

Page 8: ...ends in your locale Account Configuration User Name The name you d like to use for the account An account can be called anything you like up to 16 characters in length except the default Admin account which is always called Admin We suggest using this as the default all access account for the DVR Password The password you d like to be associated with the selected account A password can be between ...

Page 9: ...ate other accounts but the default is always called admin Password Enter the admin account password here If you haven t set a password yet then leave this field blank and we suggest that you set a password as soon as possible MyDVR Logging In Default Password Information To ensure your privacy this DVR supports password protection The default all access username is admin If the DVR asks you to log...

Page 10: ...ed by the network Internet connection you re using to access the DVR You can select a single camera or multi channel viewing by using the Viewing Mode buttons in the lower right corner Playback Opens the Playback interface which operates in much the same way as the playback interface on the DVR itself Setup Configuration Allows access to both the Local Config screen and Remote Configuration menus ...

Page 11: ...ollow the prompts to create your account MyDVR Configuration Overview Display Channel Settings see page 28 Channel Name Check Box Whether the channel s name will be displayed on screen or not Channel Name The title you d like to give that camera Record Data Whether the overlays Channel Name Date and so on will be recorded onto the video with your images Mask Check Box Turns the masking function on...

Page 12: ...r share PTZ device control Alarm Motion Detection see page 42 Channel The channel you re configuring the motion detection settings for Enable Whether the motion detection is enabled for the channel currently selected Sensitivity A sliding scale between 1 and 50 The number refers to the number of pixels as a percentage that have to change between frames okay this one is a little more complex than t...

Page 13: ...ng has gone wrong Click the icon to access the Event Log where you ll get more information about exactly what has gone wrong Default Password Information To ensure your privacy this DVR supports password protection The default all access username is admin If the DVR asks you to log in before you ve set a password enter admin as your username and leave the password blank This will give you access t...

Page 14: ...se the DVR s built in interface Quick Reference Some of the more common reasons to have a look in the Advanced Configuration include Altering the Recording Schedule The recording schedule is one of the most important things to get right when configuring the DVR More information about the schedule can be found at Recording Schedule on page 32 Configuring the Auto Email Functions If you want the DVR...

Page 15: ...need to use a standard HD resolution This is due to the way that HDMI embeds audio information around video information The two resolutions that will stream audio correctly are 720p 1280 x 720 and 1080p 1920 x 1080 Selecting any other resolution will prevent audio being sent via HDMI Display Output Display Camera Camera No Choose the camera channel you want to edit here The Camera No is the same t...

Page 16: ...record audio or not If you don t have any audio devices connected it s a good idea to disable audio as it will save some space on your HDD Resolution How many little dots are going to make up your image There are three options available D1 About the same resolution as a DVD 704 x 480 for NTSC or 704 x 576 for PAL This is the default resolution for all channels and we suggest leaving this setting w...

Page 17: ...ted on screen applies to one channel on one specific day of the week only Use the CopyTo functions to quickly assign identical schedule layouts to multiple days channels at once Be careful when programming your schedule It s one of the most important aspects of setting up your DVR and if it s wrong in any way it could lead to disastrous complications later Copy To Channel Located at the base of th...

Page 18: ...cted to the front USB port AVI Format File When checked the DVR will transcode the footage into a file format that can be played back on a computer About transcoding to AVI Don t be put off by the complex word transcoding is just a shortening of translating code Transcoding while a straight forward process is very processor intensive You may notice significant slow down or apparent non responsiven...

Page 19: ...the Internet is located via an IP address however for ease of use we associate domain names such as www exampledomainname com with those IP addresses This index is accessible in many locations online and we call those locations DNS servers DNS for STATIC configuration Under most circumstances you can set the DNS Server address to be the same address as your router this is usually the same address ...

Page 20: ...omatically sync time with an online server Email Settings Where you can configure the DVR to work with an email account of your choice This must be correctly configured for the DVR s auto email feature to work IP Filter An advanced feature which allows you to exercise precise control over what devices IP address es are allowed to communicate with the DVR and which are not Recommended for advanced ...

Page 21: ...ver you re using followed by and then the email server For example youraddress gmail com or similar Sender Password The password for the outgoing email account Recipient Address The email address you want the DVR to sendemailsto Thiscanbeanyemailaddressyoulike however bear in mind that the DVR might send a large number of automatic emails under certain conditions Attach Picture When this is select...

Page 22: ...ange in the picture However this does not necessarily need to be something moving in the frame For example a light being turned on or off a lightning flash or even the sun coming out momentarily on a cloudy day might be enough to trigger the motion detection on the DVR However as these events last only a moment and are relatively rare they will only create a few very short redundant clips which wi...

Page 23: ...k the Motion Detection settings both during the day and at night In low light conditions or when your cameras are using infrared night vision the DVR may be more or less sensitive to motion depending on your unique circumstances The difference might be very dramatic Image Sensors CMOS and CCD There are two kinds of CCTV cameras out there CMOS and CCD Neither technology is inherently better but the...

Page 24: ...e except for these events Exception Type What event type you d like the DVR to react to By configuring the Action for these events you can create any combination of audio alerts see below or auto emails to be sent for different event types HDD Full As the name suggests this event occurs when the DVR runs out of space on the hard drive to save new footage This event is redundant if you ve got overw...

Page 25: ...nfigure the DVR to be able to operate PTZ devices PTZ stands for Pan Tilt Zoom The DVR is compatible with many but not all PTZ devices available For the best results we suggest using a Swann PTZ camera as we know what they re compatible with and we ll be able to offer support for both devices at once should you need it Camera No The camera you d like to associate a PTZ device with Baudrate Check t...

Page 26: ... not to change this setting unintentionally it might be tricky to find the setting to change it back when the DVR is speaking another language VideoStandard Hereyoucanchoosebetween PAL andNTSC PAL is used in Western Europe and Australia NTSC is used in the US Canada and Japan If the DVR s picture is black and white flickering or similar then this is probably caused by the video system being set in...

Page 27: ...ur settings Insert a USB flash drive into the USB port on the front of the DVR Ensure it has enough free space a few MB is sufficient the file is less than 50KB and that it is not write protected Choose Configuration Import Export You ll see a file browser showing the contents of the storage device ClickExporttosaveyoursettings Exporting your settings will overwrite any previous settings you ve sa...

Page 28: ...are a few possibilities The emails are for real events however it is telling me about it multiple times This indicates that the DVR is functioning properly but that the Interval setting for your email alerts is too low Increasing the Interval time will decrease the number of email alerts the DVR sends The DVR sends email alerts when nothing seems to be happening This suggests that there might be s...

Page 29: ...epaired or replaced if the goods fail to be of acceptable quality and the failure does not amount to major failure USA Swann Communications USA Inc 12636 Clark Street Santa Fe Springs CA 90670 USA Australia Swann Communications Unit 13 331 Ingles Street Port Melbourne Vic 3207 Australia United Kingdom Swann Communications LTD Stag Gates House 63 64 The Avenue SO171XS United Kingdom Get up to Date ...

Page 30: ...______________________________________________________ ______________________________________________________________ ______________________________________________________________ ______________________________________________________________ ______________________________________________________________ ______________________________________________________________ ______________________________...

Page 31: ...rs 1 800 627 2799 Option 1 M F 9am 5pm US PT AUSTRALIA 1300 138 324 NEW ZEALAND toll free 0800 479 266 UK 0203 027 0979 Helpdesk Technical Support Details Swann Technical Support All Countries E mail tech swann com Telephone Helpdesk Swann Communications 2013 ...

Reviews: