


English
English
28
29
A
dv
anc
ed C
onfigur
ation
A
dv
anc
ed C
onfigur
ation
The
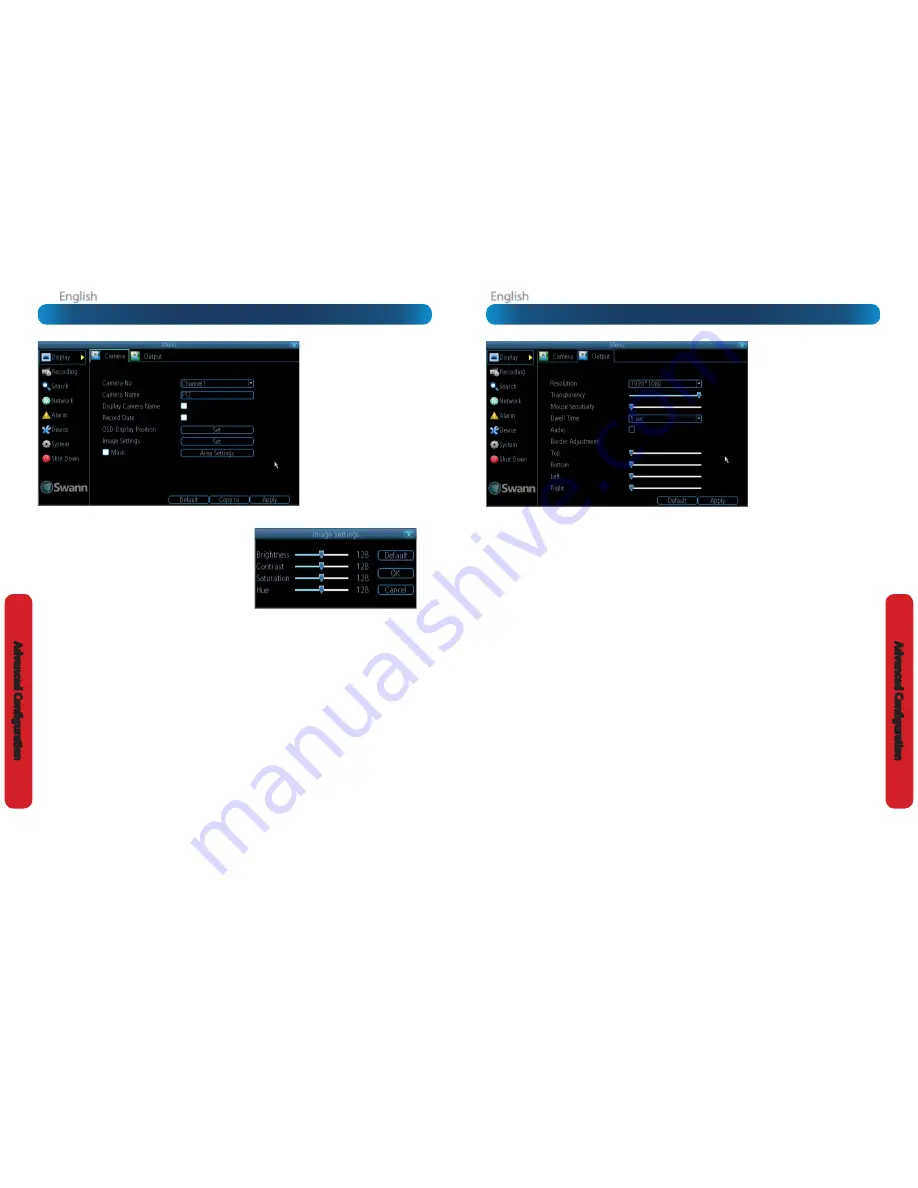
Display: Output
menu is where
you can control how the DVR is going
to deliver an image to your television,
screen or monitor.
You’ll be able to adjust items such as:
•
screen resolution and position on
your monitor
•
the audio output
•
the appearance of the menus
•
the auto-sequence dwell time
•
the sensitivity of the USB mouse
Resolution:
The number of “little dots” that make up an
image. This should be set as high as possible, but equal to
or lower than the maximum resolution your screen/monitor
can display. Things change a little depending on what
kind
of
monitor you’re using, and how it’s connected.
The DVR has many formats available, in four different aspect
ratios:
Standard (4:3)
- 1024 x 768
Standard (5:4)
- 1280 x 1024, or 1400 x 1050
Widescreen (16:10)
-
1280 x 800, 1440 x 900, or 1680 x 1050
Widescreen (16:9)
- 1280 x 720 (720p), 1600 x 900
,
or 1920 x 1080 (1080p)
Note:
1280 x 1024 and 1400 x 1050 are considered standard aspect
ratios, and are best displayed on monitors with anamorphic pixels.
“Anamorphic” is a fancy term for “not quite square”.
Most televisions are 16:9 widescreen. Computer monitors are
still commonly produced in multiple aspect ratios, with 4:3,
16:9 and 16:10 being the most popular aspects.
Standard Monitor via VGA:
Use one of the 4:3 formats to
correctly align the DVR’s output on your screen. Using a
widescreen format will “stretch” the image vertically.
Widescreen Monitor via VGA:
If possible, use the widescreen
(16:9 or 16:10) format. If your monitor can’t display those
resolutions, you might need to enable letter-boxing on your
monitor and use a 4:3 format.
PC Monitor via HMDI:
Choose a format appropriate for your
monitor. If it’s a widescreen, use a widescreen format. Set to
the highest option that is
equal to or less
than the screen’s
maximum resolution.
Widescreen Plasma/LCD HDTV via HDMI:
The resolution
should be set to the maximum your television can
process
not
display
. Typically, this will be 1080p, as even screens which
don’t have that many pixels can still display the image, just
with less detail. Check your television’s documentation to
learn this value. If your television can’t display 1080p, then use
720p instead.
Transparency:
You can set the DVR’s menus to be partially
transparent (see-though) - in case you need to keep an eye on
things while adjusting settings (or it makes you feel like you’re
living in the future because it’s so tech - we don’t judge). The
best way to set this is to simply experiment over time and see
what works for you.
Mouse Sensitivity:
How sensitive the mouse will be. On
lowest, large and dramatic arm movements are required to
move the mouse but a few inches onscreen. At the other end
of the spectrum, a tiny bump or knock can send the cursor
from one side of the screen to the other. Try somewhere
around the lower end for starters, and then increase it little by
little if it’s moving too slowly.
Dwell Time:
How long channels will be displayed when using
auto-sequence mode.
Audio:
Whether the DVR will output an audio signal. When
checked, the DVR will output audio to a compatible device (via
the HDMI
[see note below]
or the RCA Audio Output). When
unchecked, the DVR will not output an audio signal at all.
Border Adjustment:
Changes the size and position of the
DVR’s images on the screen. Altering the border size can be
useful if you’ve got parts of the DVR’s image extending beyond
the part of the screen you can see.
The border adjustment is more likely to be required for older,
CRT computer monitors connected via the VGA output. HDMI
should (in theory) automatically adjust the DVR’s image to
perfectly fit your screen.
Note:
Audio via HDMI
If you want to send audio via the HDMI, then you’ll need to
use a standard HD resolution. This is due to the way that HDMI
embeds audio information around video information.
The two resolutions that will stream audio correctly are
720p
(1280 x 720) and
1080p
(1920 x 1080). Selecting any other
resolution will prevent audio being sent via HDMI.
Display: Output
Display: Camera
Camera No.:
Choose the camera / channel you want to edit
here. The
Camera No
is the same thing as the number written
on the rear panel next to the BNC socket used to connect the
camera.
Camera Name:
Select a name for the camera you’ve selected.
By default, all channels are named as the
Camera No.
field, but
this can be set to anything you’d like up to 16 characters.
Display Camera Name:
When checked, the name you’ve
selected for the camera/channel will be displayed on-screen
as an overlay.
Record Date:
When checked, the date (as displayed) will be
recorded directly on to your videos. This can be useful, as it
creates an inseparable record of exactly when the footage was
captured.
OSD Display Position:
Gives you access to a screen where
you can easily set the exact positions of any overlaid text, such
as the camera name and the date and time.
Simply select any item you want to move (such as the
Channel
Name
and/or the
Date and Time
) and click and drag it to the
position you’d like it to be.
To exit the
OSD Display Position
screen, press the right click
button. A context menu will appear with two options: Save
and Exit. To exit without saving, simply choose
Exit
. If you
want to save your changes, choose
Save
first.
Image Settings:
Gives you access to image adjustment tools,
allowing you to adjust the way the DVR interprets and displays
video images. See opposite for more information.
The Image Settings you choose will affect your recorded
footage.
Rather than applying the changes after the video has
been processed (like many older DVRs) the Image Settings affect
how the DVR decodes the video it is receiving from the cameras.
The upside of this is that you can use the Image Settings to
dramatically improve the quality of the images being recorded
by the DVR. This can be particularly useful for improving the
accuracy of your Motion Detection settings.
Mask:
When checked, allows you to create, place and shape
a “privacy mask” which obscures part of the image on the
associated channel.
Brightness:
Changes how light the image appears to be.
However, it can’t make the camera see further in the dark, or
increase the clarity of an ill-lit image.
Contrast:
Increases the difference between the blackest black
and the whitest white in the image. Useful if sections of the
image “grey out” but setting the contrast too high will degrade
image quality.
Saturation:
Alters how much color is displayed in the image. The
higher the saturation, the more bright and vivid colors will appear
to be. Again, setting this too high can degrade image quality.
Hue:
Changes the color mix of the image (this can have
very dramatic results). It’s somewhat like moving through a
rainbow.
Remember:
Your image settings
will
affect your recordings!
You can use the Image Settings to help fine-tune your Motion
Detection sensitivity. At night, your camera’s images may seem
to flicker slightly, or to have increased “noise”. In video, “noise”
is random fluctuations of pixels, a little like an old television
that is not set to a station, often called “static”.
By tweaking the
Brightness
and the
Contrast
you can eliminate
much of this video noise, increasing the quality of your images
and the accuracy of the Motion Detection.
The
Display: Camera
menu is where
you can make adjustments to how the
DVR displays the feed coming from your
cameras.
You can adjust aspects of each channel/
camera, such as:
•
the camera’s name
•
what information will be displayed
on-screen, and where this
information will be displayed
•
whether information such as the
date will be recorded directly onto
your videos
•
any areas of the video you want
“masked” - that is, left blank