Figure 18: Circulating Chamber Assembly
Preparing the Firebox for Installation
3.1.
a) Remove the door by opening it, lifting it, and pulling it towards the bottom until the rod exits
from the hinge holes (see Section 2.6).
b) Install the adjustable legs (see Section 2.11). The adjustable legs must extend 1 ¼ inch from
the bottom of the firebox.
NOTE: To avoid damages during shipping/handling, the
adjustabl
e legs aren’t factory installed.
c) Push the chimney sweeping cap upwards and place it to the side (see Section 2.5).
Liner Installation
3.2.
a) Determine the required length of liner by measuring the bottom of the hearth to the top of the
existing chimney. NOTE: Additional length of the liner is needed for proper installation of the
flashing and chimney cap.
WARNING: The minimum and maximum height of the liner is
15’ and 35’ respectively.
b) Slide the stainless steel liner down the existing chimney.
c) Lower the liner 24 inches from the hearth.
d) Fill the space between the liner and the baffle of the existing chimney with Stone Wool
insulation to prevent heat from escaping.
Adjustable Circulating Chamber
3.3.
3.3.1 Assembly
i.
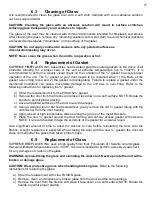
Remove the front cover of the unit and cut along
the perforated lines to later use as the bottom cover
within the masonry fireplace (Figure 17).
ii.
Secure the bottom cover to the back wall of the
circulating chamber and bend inwards the metal
brackets at the front bottom (Figure 18).
CAUTION: Ensure that the text on the Metal Tag
(Section 2.13) is facing upwards before installing
the bottom cover.
3.3.2 Installation
i.
Measure the width of the existing fireplace.
ii.
Extend the width of the Circulating Chamber
(Section 2.10) to the width of the existing fireplace
and fasten with the wing nuts provided.
iii.
Secure the side brackets of the to the bottom cover
of the Circulating Chamber using the provided self-
tapping screws.
iv.
Loosen the wing nuts of the adjustable liner hole
(Figure 18).
v.
Position the circulating chamber into the existing
masonry fireplace.
vi.
Lower the liner through the adjustable liner hole of
the circulating chamber.
vii.
Adjust the front height of the circulating chamber to
the height of the existing masonry fireplace and
secure the wing nuts.
Figure 17: Circulating Chamber - Front Cover
7

