


Premier VS Infrared Heating System
Page 57
June 04, 2014
INSTALLATION -
Part 5
C
- System Wiring Connections
1.
Ensure that field wiring maintains the required clearances when being routed near equipment
2.
Mount ALL Electrical components as required by Code(s) and system layout / plan.
Reminder:
Ensure that all Electricity to the supply locations involved has been ‘disconnected’ and ‘locked
out’ as per local and national safety requirements before proceding with any part of the electrical
installation.
3.
Mount the Thermostat(s) as per plan & as described on Page 53. Wire the Thermostats into the system
Relay(s) / Control Panel as shown in Figure 43, Figure 44 or Figure 45 respectively and according to the
device OEM Manual.
4.
Mount the Electrical Power Outlets (120 VAC, 60 Hz, 0.2 A) for each Burner. Outlets are required to be
within reach of the Burner Power Cord while maintaining the minimum clearances around the equipment.
5.
Wire the Electrical Power Outlets to the Relay(s) / Control Panel according to the device OEM Manual: as
required for the Heating Zone system Plan/Layout.
6.
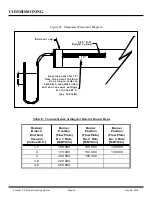
Mount / position the Vacuum Switch onto the Radiant System as shown in Figure 35. Connect the Vacuum
Switch to the Vacuum Pump and the Relay(s) / Control Panel as shown in Figure 43, Figure 44 or Figure 45
and according to the device OEM Manual.
7.
Depending on System layout, wire the Modulating Damper controls to respective panel(s) as per the device
OEM Manual(s) as required.
8.
Connect the Electrical Power Supply to the Relay(s) / Control Panel and all other equipment as shown in
Figure 43, Figure 44 or Figure 45 and according to the device OEM Manual.
9.
Test all connections / wires as necessary.
DO NOT
energize Relay(s) / Control Panel with Electrical Power until it is time to complete the
COMMISSIONING of the System.
10.
Confirm that the Vacuum Pump’s impeller rotates in the same direction indicated by the arrow on the pump
scroll. To reverse rotation, see instructions on the motor.
WARNING
- DO NOT OPERATE THE VACUUM PUMP WHEN NOT INSTALLED
- Unguarded openings can entangle clothing and severe injury can result
- Unrestricted air flow into Vacuum Pump can cause the motor to overload