2
Once Motion Activated Security Light & Video Camera
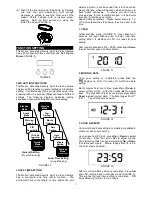
is powered up, it enters PIR warm up time. The LCD
displays as below (FIGURE 2).
FIGURE 2
After 3 seconds, the unit enters standby mode (as
shown in FIGURE 3). It implies the unit is ready for
function setting.
FIGURE 3
SD CARD INSTALLATION
Once the unit is powered up, if no SD card is found, a
beep sound will be played for 10 seconds once an hour.
Once the unit is powered up, if no SD card is found, a
beep sound will be played for 10 seconds once an hour.
After function setting is completed, the most
appropriate timing to insert the SD card is before
you start AC wiring connection.
For security reason, the 2GB SD card is sealed in the
Cam specially by using a hex design screw. There is
no need to take it out unless an irregular condition has
occurred (e.g. detection of an intruder or breaking
attempts), or to upgrade it with a larger capacity SD
card up to 32GB.
Note:
Make sure the unit is powered off before
inserting or removing a SD card. In case the unit is
not powered off, press
Set
to enter scene mode and
then press
Up
or
Down
to choose Scene 4. After the
unit is set in Scene 4, insert or remove a SD card
accordingly. To insert a SD card:
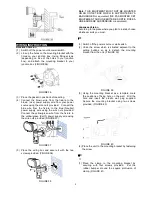
(1) Insert the wrench provided in screw pack.
(/-4
56-40
4. '% +)7
, +5:-7 ;0
9
/ 9
/- ;7
- 4+/ 0
4#!
$
)49
0
!
+2
5+1;0
8- +0
7
+2
- 89
/-4+)482
0
, - , 5;49
/- +5:-7
9
/- 8+7
- ;;54=
9*- 3 5:-, );)<9
5 ):50
, 8+7
- ;3 0
880
4."
(FIGURE 4)
FIGURE 4
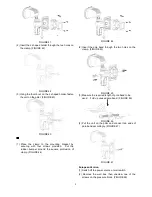
(2) Insert SD card into the card slot (FIGURE 5).
FIGURE 5
(3) Refit the cover, and fasten the screw clockwise
(FIGURE 6).
FIGURE 6
(4) Once Motion Activated Security Light & Video
Camera is powered up, it will detect
the existence of LIGHT folder. All recorded files will be
saved onto it. If the folder isn’t found, the SD card will
be formatted while a LIGHT folder will be generated.
(5) Once a recording is taken, it will be saved in .asf
format under the path
LIGHT\YMD\time+serial
no.asf
. Below is an example of a self generated
file name:
17075600
Note:
Oldest images are deleted and overwritten as the
card reaches capacity to ensure records of recent
events are always available.
BULB INSTALLATION
CAUTION
: Always handle quartz halogen bulb with a
soft cloth. Do not touch the bulb with your bare hand
as it will shorten the bulb life.
(1) Do not touch the light while it is in use or still hot.
Allow it to cool off (about 5 minutes) before
touching it.
(2) Do not use halogen bulb rated higher than 150/300
watts.
(3) Disconnect the power cord or wall switch and then
use a cross head screwdriver, loose the screw at
the bottom edge of the front surround (FIGURE 7).
FIGURE 7
Hour
Minute Seconds Serial no.


