


20
Sun Blade 1000 and Sun Blade 2000 UltraSPARC III Cu Module Installation Guide • June 2004
4. Do one of the following:
a. If you have torque tool A, perform steps 10-16
(
FIGURE 6
).
b. If you have torque tool B, perform steps 5-9 and 14-16
(
FIGURE 6
)
.
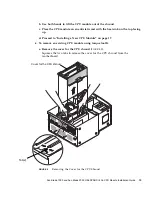
5. Use torque tool B to rotate the left captive screw one turn clockwise
(
FIGURE 13
)
.
Caution –
Do not use a torque tool from another Sun product. The Sun Blade 1000
and Sun Blade 2000 torque tools are designed specifically for your workstation.
6. Use torque tool B to rotate the right captive screw one turn clockwise
(
FIGURE 13
)
.
FIGURE 13
Alternately Rotating Left and Right Captive Screws One Turn Clockwise
Caution –
If you under-torque the CPU module captive screws, the contact between
the CPU module and the motherboard connector might be insufficient and the
workstation might not boot. Over-torquing the CPU module captive screws might
cause severe damage to the module and a potential workstation failure.
Left captive screw
Torque tool B
Right captive screw


