


Sun Blade 1000 and Sun Blade 2000 UltraSPARC III Cu CPU Module Installation Guide
17
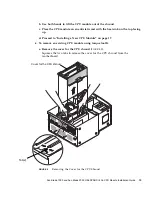
7. Proceed to “Installing a New CPU Module” on page 17.
Installing a New CPU Module
Caution –
Perform the procedures described in
TABLE 3
when unpacking a new
CPU module from its packing carton.
TABLE 3
CPU Module Handling Procedures
Step
Description
1
Use proper ESD grounding techniques when handling components.
Wear an antistatic wrist strap and use an antistatic mat. Store ESD-
sensitive components in antistatic bags before placing them on any
surface.
2
When you remove the CPU module from its packing carton, use
both hands to support the module along its sides. Do not grip the
module by the heat sink.
3
As you remove the module from its antistatic bag, handle it only by
its captive screws. Do not touch the connectors on the bottom edge
of the module. The connectors for the module are easily bent or
damaged by improper handling.
4
Do not remove the plastic cover from the CPU module connectors
until you are ready to install the module into the workstation.
5
Before you install the module, carefully inspect the connector pins
to ensure that they are not damaged. Never attempt to install a
module that has bent or damaged connectors.


