background image

Sun StorEdge™ L25 Tape Library and Sun StorEdge™ L100 Tape Library Installation Guide
Document 6423015-01, Ver. 1, Rel. 0
June 2002

26

Preparing and Inserting Tape Cartridges

4

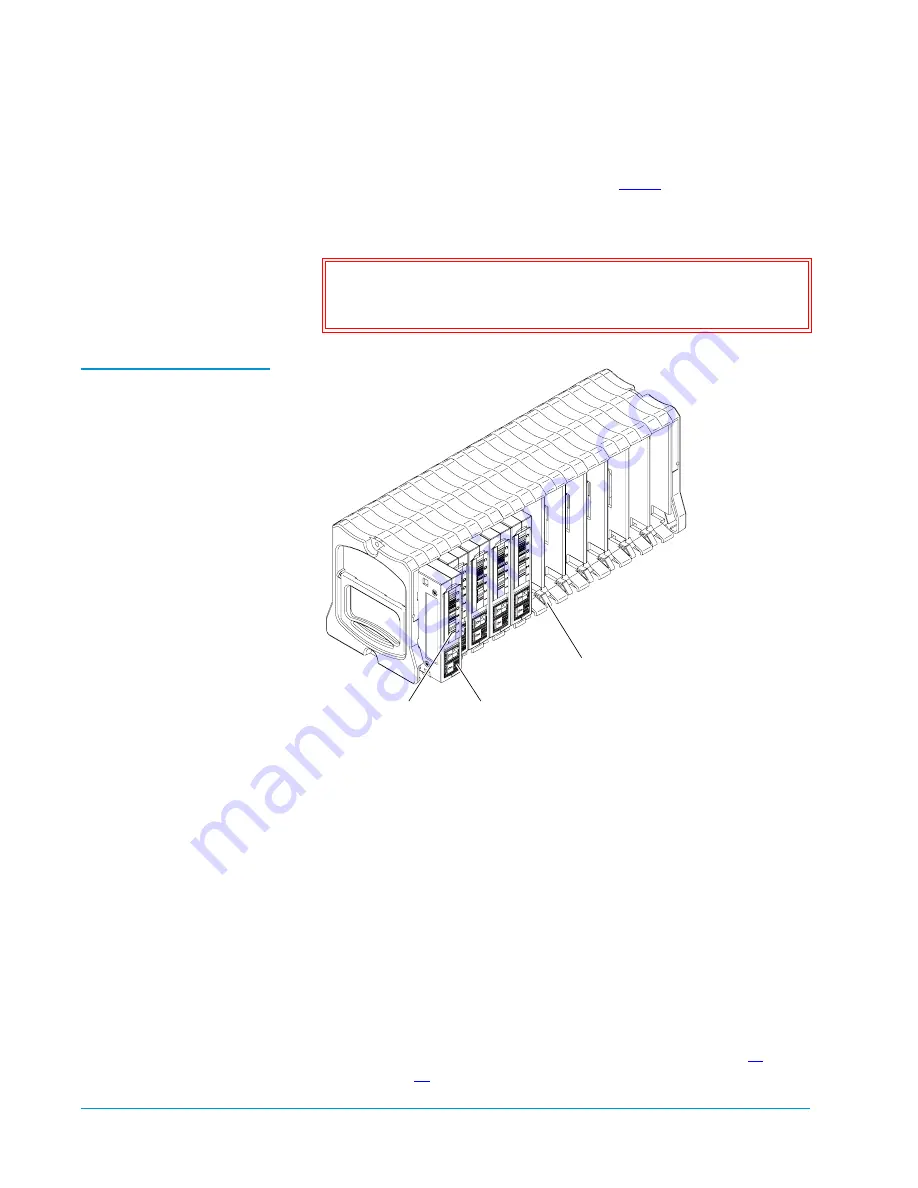
Insert cartridges into each of the magazine slots:

a

Orient the cartridges as described in 

step 3

.

b

Push each cartridge into a slot until the cartridge retaining latch 

clicks to hold the cartridge in place.

Figure 19  Inserting DLT 
Cartridges into a Magazine

5

Insert the magazines into the library, sliding them back until they 

click into place.

6

Close the magazine access doors.

Placing Tape Cartridges in an L100 Library

0

To place tape cartridges in an L100 library:

1

Press the white buttons next to the magazine access doors.
The magazine access doors open.

2

Remove the level 1 left magazine:

a

Grasping the handle at the front of the level 1 left magazine, 

pull it forward until it stops.

b

If the magazine stops after the first slot, perform steps 

2c


through 

2e

 to release it.

Caution:

The magazines are designed so that you cannot insert 

cartridges incorrectly. Do not try to force the 

cartridges into the slots.

Cartridge 

retaining latch

Label

Write-protect 

switch

Summary of Contents for storedge L100

Page 1: ...quirements 5 Power and Grounding 5 Installing a Desktop or Deskside Library 6 Installing a Desktop L25 Library 6 Installing a Deskside L100 Library 6 Installing a Rack Mount Library 7 Determining the Position of the Shelves in the Rack 7 Installing the Rack Mount Shelves 8 Installing the Library in the Rack 15 Installing Drives in the Library 18 Installing Tape Drives in an L25 18 Installing Tape ...

Page 2: ...ridges 22 Labeling Tape Cartridges 22 Setting the Write Protect Switch 23 Placing Cartridges in the Library 25 Connecting the Library to AC Power 29 L25 Power Requirements 29 L100 Power Requirements 32 Connecting the Library to the Host Computer 34 SCSI Cabling Guidelines 34 Terminator Power 34 SCSI Cabling Diagrams 35 Powering Up the Library 36 Disabling Unused Drive Bays 39 ...

Page 3: ...n installation site for the library consider the following requirements Space Requirements Cooling Considerations Environmental Requirements Power and Grounding Space Requirements 0 Table 1 lists the dimensions of the L25 and L100 libraries Table 1 Library Dimensions Note To install an L25 or L100 library module in a multiple library stack refer to the StackLink Installation Instructions PN 642302...

Page 4: ...ure that the library is adequately ventilated Place the library on a hard level surface or in a standard 19 inch rack If the library will be placed in a rack the rack must be open or ventilated so that the air temperature behind the library at the air outlets is less than 104 F 40 C Verify that no cables obstruct the vents at the back of the library see figure 1 and figure 2 Verify that nothing ob...

Page 5: ...or the interior of the rack rack mount library must meet the following environmental requirements Humidity 20 to 80 non condensing Temperature 50 F to 104 F 10 C to 40 C Altitude 100 to 10 000 feet 30 to 3 000 meters Power and Grounding 0 The L25 and L100 power supplies accept 88 VAC to 264 VAC input power at 47 Hz to 63 Hz The library must be connected to a grounded power outlet If the library is...

Page 6: ...y in the installation location preferably on a sturdy desk or tabletop 3 Proceed to Installing Drives in the Library on page 18 to continue the installation procedure Installing a Deskside L100 Library 0 To install a deskside L100 1 Convert the L100 to a deskside unit by performing the procedures detailed in the Sun StorEdge L100 Tape Library Rack Mount to Deskside Conversion Instructions PN 64230...

Page 7: ...13 5U of vertical space The StackLink mounting hardware uses 1U of vertical space at the top of the rack and either 1U or 5U at the bottom of the rack see the StackLink Installation Instructions PN 6423029 for more information 2 Use a pencil to mark the desired shelf position on the rack rails Note The procedures in this section assume that you have already unpacked the library If you have not do ...

Page 8: ...t shelves in a half U position 1 Position the left shelf in the rack aligning the bottom of the shelf with the pencil marking you made in step 2 on page 7 2 Use six screws PN YS42086 and washers PN 217406 to secure the shelf to the rack rails as shown in figure 3 3 Repeat steps 1 and 2 to install the right shelf Part No Description Qty 217395 Shelf right 1 217396 Shelf left 1 217397 Front shelf cl...

Page 9: ...Rack Mount Library 9 Figure 3 Securing the Shelf in the Half Position 4 Install the front shelf clamps see figure 4 a Position a front shelf clamp PN 217397 on the front left rack rail b Secure the shelf clamp to the rack rail using two countersink screws PN YS40986 c Repeat these steps to install a shelf clamp on the front right rack rail ...

Page 10: ...ghten the screws securing the right and left shelves to the rack rails 6 Install the clamp strips see figure 5 a Position a front shelf clamp PN 217397 at the front of the front left rack rail with the bottom of the clamp approximately 9U above the bottom of the rack mount shelf Caution The top of the front shelf clamp must be no more than 22 75 in 580 mm above the bottom of the rack mount shelf F...

Page 11: ...in the front shelf clamp through the rack rail and into the upper hole in the clamp strip d Insert a screw PN YS40986 through the bottom hole in the front shelf clamp through the rack rail and into the bottom hole in the clamp strip e Repeat steps 6a through 6d to install the front shelf clamp and clamp strip on the right rack rail Figure 5 Installing the Clamp Strips The shelf installation is now...

Page 12: ...n the rack aligning the bottom of the shelf with the pencil marking you made in step 2 on page 7 2 Use six screws PN YS42086 and washers PN 217406 to secure the shelf to the rack rails as shown in figure 6 3 Repeat steps 1 and 2 to install the right shelf Figure 6 Securing the Shelf in the Half Position Note In full U position the bottom of the rack mount shelf lines up with the bottom of a U Note...

Page 13: ...YS40986 c Repeat these steps to install a shelf clamp on the front right rack rail Figure 7 Installing the Front Shelf Clamps 5 Fully tighten the screws securing the right and left shelves to the rack rails 6 Install the clamp strips see figure 8 a Position a front shelf clamp PN 217397 at the front of the front left rack rail with the bottom of the clamp approximately 9U above the bottom of the r...

Page 14: ... hole in the front shelf clamp through the rack rail and into the upper hole in the clamp strip d Insert a screw PN YS40986 through the bottom hole in the front shelf clamp through the rack rail and into the bottom hole in the clamp strip e Repeat steps 6a through 6d to install the front shelf clamp and clamp strip on the right rack rail Figure 8 Installing the Clamp Strips The shelf installation ...

Page 15: ...ore installing the library If you are installing the library in a rack with other equipment place the heaviest equipment at the bottom of the rack 2 Verify that the rack mount shelves are level and securely fastened to the rack 3 With the help of another person lift the library onto the rack mount shelves 4 Slide the library all the way into the rack 5 Press the white button next to the left magaz...

Page 16: ...f a rack with no equipment at the bottom of the rack purchase a rack stabilization kit from the rack manufacturer and install it before installing the library If you are installing the library in a rack with other equipment place the heaviest equipment at the bottom of the rack 2 Verify that the rack mount shelves are level and securely fastened to the rack 3 With the help of another person lift t...

Page 17: ...des from the side of the library and presses against the back side of the rack rail 8 Tighten the remaining rack mount clamp screw in the same manner 9 Press the white button next to the right magazine access door The right magazine access door opens 10 Repeat steps 6 through 8 to secure the right side of the library to the rack 11 Close the magazine access doors Caution Do not overtighten the rac...

Page 18: ...his procedure Installing Tape Drives in an L25 0 To install tape drives in an L25 1 At the back of the library use a TORX T 20 screwdriver to remove the cover plate protecting the drive bay in which you will install the tape drive 2 Insert the tape drive into the drive bay slowly until the connectors are seated see figure 11 3 Tighten the tape drive thumbscrew using a flat blade screwdriver 4 Repe...

Page 19: ...l the tape drive 2 Insert the tape drive into the drive bay slowly until the connectors are seated see figure 12 Figure 12 Installing a Tape Drive in an L100 Library 3 Tighten the tape drive thumbscrew using a flat blade screwdriver 4 Repeat steps 1 through 3 to install any additional tape drives Caution If you are installing fewer than six drives in an L100 library do not install a drive in drive...

Page 20: ...azine access doors open b Remove the level 3 left magazine by grasping the handle at the front of the magazine and sliding it forward and out of the library Note The level 3 left magazine and fixed slot prevent the robotic hand from accessing the tape drive in drive bay 1 on level 2 of the library Note Library levels are numbered from top to bottom The level 3 left magazine is the left magazine th...

Page 21: ...aptive screws spring forward slightly when they are fully loosened Figure 14 Loosening the Captive Screws d Reach into the library and carefully move the hand assembly to the right front of the library away from the fixed slot e Reach into the level 3 magazine slot and grasp the right side of the level 3 fixed slot f Gently pull the fixed slot to the right and remove it from the library g Close th...

Page 22: ...ch cartridge enables the library to identify tape cartridges quickly speeding the inventory process Bar Code Label Requirements 0 Bar code labels must meet the requirements of the latest revision of the ANSI MH10 8M standard and should use industry standard Code 39 3 of 9 code The basic requirements are listed in table 3 Table 3 Bar Code Label Requirements Note The L25 and L100 libraries are capab...

Page 23: ...etters CLN Setting the Write Protect Switch 0 The write protect switch see figure 16 controls whether the tape cartridge is write protected or write enabled Write protecting a cartridge protects the data it contains from being erased or overwritten Typically you use this setting when removing the cartridges for storage outside the library Write enabling a cartridge allows new data to be written to...

Page 24: ...le a DLT or SDLT cartridge move the write protect switch to the right The orange tab is not visible when the cartridge is write enabled Figure 16 Setting the Write Protect Switch DLT and SDLT Cartridges Setting the Write Protect Switch LTO Cartridges 0 To write protect an LTO cartridge move the write protect switch to the right see figure 17 To write enable an LTO cartridge move the write protect ...

Page 25: ...front of the left magazine pull it forward until it stops c Using a slender object such as a pen press and hold the magazine release button see figure 18 d Pull the left magazine the rest of the way out of the library Figure 18 Magazine Release Button 2 Remove the right magazine a Press the white button next the right magazine access door and open the door b Grasping the handle at the front of the...

Page 26: ...ry sliding them back until they click into place 6 Close the magazine access doors Placing Tape Cartridges in an L100 Library 0 To place tape cartridges in an L100 library 1 Press the white buttons next to the magazine access doors The magazine access doors open 2 Remove the level 1 left magazine a Grasping the handle at the front of the level 1 left magazine pull it forward until it stops b If th...

Page 27: ...27 c Remove the level 2 left magazine see figure 20 Figure 20 Removing the Level 2 Left Magazine d Reach into the library underneath the level 1 left magazine and press up on the release latch see figure 21 Figure 21 Pressing the Release Latch e While holding the release latch pull the level 1 left magazine forward and out of the library see figure 22 Release latch ...

Page 28: ...facing outward and the write protect switch Down if it is a DLT or SDLT cartridge Up if it is an LTO cartridge 5 Insert cartridges into each of the magazine slots see figure 19 a Orient the cartridges as described in step 4 b Push each cartridge into a slot until the cartridge retaining latch clicks to hold the cartridge in place 6 Insert the magazines into the library sliding them back until they...

Page 29: ...on unit s for your library configuration and input voltage 2 Connect the power cable provided in the accessories kit to the power inlet on the back of the library see figure 23 and to the AC distribution unit Figure 23 Power Inlet Warning AC distribution units power strips must be certified for safety by an agency acceptable to the country of use For use in the United States and Canada distributio...

Page 30: ...ct one of the following options Connect no more than 2 libraries to each AC distribution unit rated minimum 10A minimum 1 00mm2 HAR cord with minimum 10A plug Must be 3 wire grounding plug and wall outlet The AC distribution units must be plugged into separate outlets served by separate circuit breakers or fuses Connect all libraries to one AC distribution unit rated minimum 10A minimum 1 00mm2 HA...

Page 31: ...e AC distribution unit rated minimum 10A minimum 1 00 mm2 HAR 3 wire cord permanently wired to the electrical supply Must be connected with a 3 wire cable and have a ground warning label Select one of the following options Connect no more than 4 libraries to each AC distribution unit rated 15A or 20A with a minimum 14AWG 3 wire cord and a 15A or 20A plug Must be 3 wire grounding plug and wall outl...

Page 32: ... cable connect the bottom power supply to the AC distribution panel see figure 24 4 Connect the power cable provided in the accessories kit to the power inlet on the back of the library see figure 24 and to the wall outlet or AC distribution unit Figure 24 Power Inlet Warning AC distribution units power strips must be certified for safety by an agency acceptable to the country of use For use in th...

Page 33: ... 3 Select one of the following options Connect each library to a separate wall outlet rated minimum 10A minimum 1 00mm2 HAR cord with minimum 10A plug Must be three wire grounding plug and wall outlet Connect all libraries to one AC distribution unit rated minimum 10A minimum 1 00mm2 HAR 3 wire cord with 3 wire IEC60309 rated 16A Must be 3 wire grounding plug and wall outlet and have a ground warn...

Page 34: ...I bus must have a unique SCSI ID The default settings for the L25 are library robotics 0 tape drive 1 1 tape drive 2 2 The default settings for the L100 are library robotics 0 tape drive 1 1 tape drive 2 2 tape drive 3 3 tape drive 4 4 tape drive 5 15 tape drive 6 14 You can change these SCSI ID settings using the Drive ID and Library ID options on the GUI Configuration screen Termination must be ...

Page 35: ...ple SCSI cabling configurations for L25 and L100 libraries SCSI Cabling Diagrams L25 0 Figures 25 through 27 illustrate sample SCSI cabling configurations for a single L25 library module Figure 25 SCSI Cabling Diagram L25 Single SCSI Bus Figure 26 SCSI Cabling Diagram L25 Two SCSI Buses Figure 27 SCSI Cabling Diagram L25 Three SCSI Buses To host computer Terminator To host computer Terminator To h...

Page 36: ...ingle L100 library module Figure 28 SCSI Cabling Diagram L100 Powering Up the Library 0 To power up the library press the power switch or switches on the back panel of the library see figure 29 and figure 30 To minimize the effects of inrush current always turn on the library using these library power switches instead of using the power switches that may be on the AC distribution unit Figure 29 Po...

Page 37: ...rary Installation Guide Document 6423015 01 Ver 1 Rel 0 June 2002 Powering Up the Library 37 Figure 30 Power Switches L100 The GUI displays a welcome screen see figure 31 and the library runs a power on self test POST Figure 31 Welcome Screen L100 Power switches ...

Page 38: ...e main screen see figure 32 Figure 32 Main Screen L100 At the bottom of each GUI screen are up to five button labels These labels indicate the functions of the five push buttons below the GUI To select a function press the push button directly below the button label on the GUI screen see figure 33 Figure 33 Using the GUI Buttons To select this function press this button Button labels Push buttons ...

Page 39: ...0 To complete the library installation disable any unused drive bays as follows 1 On the main screen press Menu The GUI displays the Menu screen see figure 34 Figure 34 Menu Screen 2 Press Config The GUI displays the Configuration screen see figure 35 Figure 35 Configuration Screen 3 Press the Up or Down buttons until the drive ID for the unused drive bay is highlighted 4 Press Select ...

Page 40: ...ackLink is a trademark of Quantum Corporation Sun StorEdge L25 Tape Library and Sun StorEdge L100 Tape Library are trademarks of Sun Microsystems Inc Other trademarks may be mentioned herein which belong to other companies 5 Press the Down button until the Disabled setting is selected 6 Press Select 7 Repeat steps 3 through 6 to disable any other unused drive bays 8 Press Main to return to the mai...

Reviews: