


Chapter 2
Section 2.2
Installing the JDBC/ODBC eWay
ICAN 5.0 Project Migration Procedures
JDBC/ODBC eWay Adapter User’s Guide
20
Sun Microsystems, Inc.
2
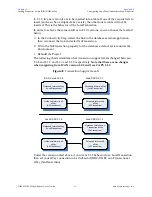
From the Project Explorer, right-click your Project and select
Export
from the
shortcut menu. Th
e
Export Manager appears.
3
Select the Project that you want to export in the left pane of the Export Manager and
move it to the Selected Projects field by clicking the
Add to Select Items
(arrow)
button, or click
All
to include all of your Projects.
4
In the same manner, select the Environment that you want to export in the left pane
of the Export Manager and move it to the Selected Environments field by clicking
the
Add to Select Items
(arrow) button, or click
All
to include all of your
Environments.
5
Browse to select a destination for your Project ZIP file and enter a name for your
Project in the
ZIP file
field.
6
Click
Export
to create the Project ZIP file in the selected destination.
Install Java CAPS 5.1.2
1
Install
Java CAPS 5.1.2
, including all eWays, libraries, and other components used
by your ICAN 5.0 Projects.
2
Start the Java CAPS 5.1.2 Enterprise Designer.
Import the Project
1
From the Java CAPS 5.1.2 Enterprise Designer’s Project Explorer tree, right-click the
Repository and select
Import Project
from the shortcut menu. The Import Manager
appears.
2
Browse to and select your exported Project file.
3
Click
Import
. A warning message,
“Missing APIs from Target Repository
,” may
appear at this time. This occurs because various product APIs were installed on the
ICAN 5.0 Repository when the Project was created that are not installed on the Java
CAPS 5.1.2 Repository. These APIs may or may not apply to your Projects. You can
ignore this message if you have already installed all of the components that
correspond to your Projects. Click
Continue
to resume the Project import.
4
Close the Import Manager after the Project is successfully imported.
Deploy the Project
1
A new Deployment Profile must be created for each of your imported Projects.
When a Project is exported, the Project’s components are automatically
“checked in”
to Version Control to write-protected each component. These protected components
appear in the Explorer tree with a red padlock in the bottom-left corner of each icon.
Before you can deploy the imported Project, the Project’s components must first be
“checked out”
of Version Control from both the Project Explorer and the
Environment Explorer. To
“check out”
all of the Project’s components, do the
following:
A
From the Project Explorer, right-click the Project and select
Version Control >
Check Out
from the shortcut menu. The Version Control - Check Out dialog box
appears.
B
Select
Recurse Project
to specify all components, and click
OK
.


