Page 10
7-21
#7031931 - Revision A - June, 2014
UNDER COUNTER SERIES
UNDER COUNTER SERIES
(SWS #3603000)
(SWS #3603000)
Component Removal
MODEL UC-24C UNIT TRAY MECHANICAL COMPONENTS
Main Control Board Assembly (Model UC-24C)
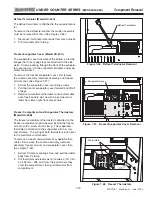
The control board assembly sits at the front left side of
the unit tray, held in place with dual-lock fasteners,
which is similar to velcro.
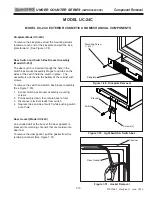
To remove the main control board assembly, first
remove the kickplate, then (See Figure 7-52):
1.
Lift control assembly up to separate the dual-lock
fasteners.
2.
Pull control assembly forward to expose wire har-
ness electrical connectors at back of control assem-
bly, then disconnect the wire harnesses.
Condenser Fan Assembly (Model UC-24C)
The condenser fan motor is secured to the condenser
bracket with screws. The bracket is secured at the
back of the unit tray by screws passing up from under
the unit tray into threaded stand-offs.
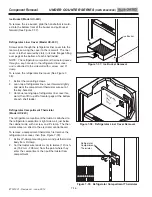
To remove the condenser fan assembly, the appliance
will need to be removed from it’s installation in order to
access the fan from the rear.
NOTE:
If removing a Model UC-24C from its installa-
tion, an anti-tip bracket and a countertop bracket may
have been used to make a solid installation.
After
pulling the appliance from its installation, (See
Figure 7-53):
1.
Remove unit cover from bottom back of appliance.
2.
Disconnect fan motor electrical leads.
3.
Extract grounding screw.
4.
Carefully lean appliance toward side and extract
bracket mounting screws, then lift assembly from
unit tray.
Figure 7-52. Main Control Board Assembly
Figure 7-53. Condenser Fan Assembly Removal


