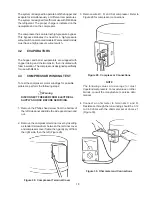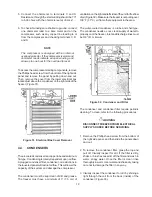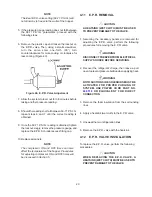
8
C. PUSH TO FREEZE SWITCH
The PUSH TO FREEZE switch is a "snap" switch
used to start the freezing cycle. During initial freeze
down, the OFF-ON switch is placed in the ON
position. Then the PUSH TO FREEZE switch is
pressed until the drive motor and compressor come
"ON".
NOTE
After the gearmotor starts, there is a 3 second
delay before the compressor starts.
During the normal operation, the red PUSH TO FREEZE
switch light will illuminate after the freezer has been idle
for the preset cycles. Before drawing product, press the
red PUSH TO FREEZE switch if it is illuminated. Wait
until the green light is illuminated before dispensing.
NOTE
If the freezer shuts off and the PUSH TO
FREEZE light flashes, you have an error condi-
tion. Turn the OFF-ON switch to the OFF
position, correct the problem and turn the
freezer back on. (See Troubleshooting.)
D. GREEN LIGHT
The green light is used to indicate that the product
has reached the proper consistency and is ready to
be dispensed. The light begins to flash at 98% of
consistency.
NOTE
If the PUSH TO FREEZE red light is illuminated,
push the PUSH TO FREEZE switch and wait
until the green light illuminates before dispens-
ing.
E. CLEAN SWITCH
The CLEAN switch is a "snap" switch. When the switch
is pushed the refrigeration system will be OFF and the
auger will rotate for cleaning. When the switch is
pushed again, the auger will stop and the CLEAN light
will flash indicating the freezer is in the CLEAN mode.
To exit the CLEAN mode turn the OFF-ON switch to
the OFF position. If the freezer is left in CLEAN for
more than 30 minutes or is pushed three times in ten
seconds, it will go in error.
F. DRIVE MOTOR OVERLOAD
The internal drive motor overload will trip if the drive
motor is overloaded. It will reset after approximately
10-12 minutes. If the drive motor continues to trip,
refer to Section 4-Troubleshooting.
G. RED MIX LOW LENS
The red MIX LOW light is designed to alert the
operator to a low mix condition. The lens will illumi-
nate with approximately one gallon of mix in the
hopper. When the MIX LOW lens is lit, refill hopper
immediately.
NOTE
Failure to immediately refill hopper may result in opera-
tional problems.
H. HOLD READY SWITCH
The HOLD READY switch is a push button switch.
When pushed in and held for 5 seconds, the hold ready
mode will be activated. The product will remain ready
to serve and the freezer will not go to idle. To return to
normal operation push and hold for 5 seconds.
I. HIGH PRESSURE CUTOUT
The HIGH PRESSURE CUTOUT switch is a safety
switch designed to protect the compressor from dam-
age due to excessive head pressure. When tripped,
the lever will be out, push in to reset.
J. DISPENSE RATE ADJUSTER
The DISPENSE RATE ADJUSTER limits the opening
of the spigot.
To adjust product dispense rate, turn the adjusting
knob clockwise for slower flow and counterclockwise
for faster flow.
K. DOOR INTERLOCK SWITCH
When the door is securely fastened, the freezer will
operate normally. When the door is removed, the
drive and compressor will not run.
3.3 SANITIZING
Sanitizing must be done after the freezer is clean and
just before the hopper is filled with mix.
Sanitizing the
night before is not effective.
However, you should
always clean the freezer and parts after using it.
WARNING
THE UNITED STATES DEPARTMENT OF AGRICUL-
TURE AND THE FOOD AND DRUG ADMINISTRATION
REQUIRE THAT ALL CLEANING AND SANITIZING SO-
LUTIONS USED WITH FOOD PROCESSING EQUIP-
MENT BE CERTIFIED FOR THIS USE.
When sanitizing the freezer, refer to local sanitary
regulations for applicable codes and recommended
sanitizing products and procedures.
The frequency of
sanitizing must comply with local health regula-
tions.
Mix sanitizer according to manufacturer’s instruc-
tions to provide a 100 parts per million strength solution.
Mix sanitizer in quantities of no less than 2 gallons (7.5
liters) of 120°F of water. Allow sanitizer to contact the
surfaces to be sanitized for 5 minutes. Any sanitizer
must be used only in accordance with the
manufacturer’s instructions.
CAUTION
PROLONGED CONTACT OF SANITIZER WITH FREEZER
MAY CAUSE CORROSION OF STAINLESS STEEL
PARTS.
Summary of Contents for E131G
Page 1: ...Model E131G F131G SERVICE MANUAL Manual No 513537 3 Mar 2004...
Page 2: ......
Page 14: ...6...
Page 38: ...30 Figure 51 Power Board...
Page 39: ...31 Figure 52 Program Module...
Page 54: ...46...
Page 66: ...58...
Page 68: ...60...
Page 69: ...61 666786...
Page 70: ...62...
Page 71: ...63...
Page 72: ...64...
Page 73: ...65...
Page 74: ...66...
Page 75: ...67...
Page 76: ...68...
Page 77: ...69...
Page 78: ...70...
Page 80: ......


