


stewmac.com
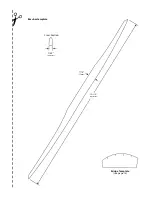
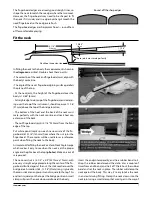
The bass bar is glued under the top, beneath the bass side
of the bridge. A pattern is supplied for shaping the bass
bar. First, cut the rough bar stock to the sizes indicated on
the
Bass bar template
(next page): 10-1/2" (267mm) long,
7/16" (11mm) tall, and 7/32" (5.5mm) wide. Next, cut out the
paper template
and glue it to the side of the bass bar and
cut the bar to shape.
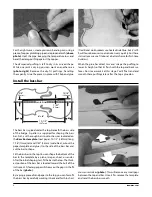
Fit the bass bar to the top. You can shape the bottom of the
bar to the template by a plane, scraper, chisel, or sander.
After the initial shaping, test-fit the bar to the top. The thick-
est portion of the bass bar is located toward the butt of the
instrument. A feeler gauge will show you the gaps in the fit
of the bar
(photo)
.
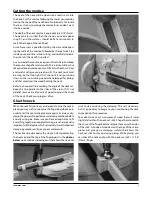
By taping a piece of sandpaper to the top, you can form-fit
the bass bar by carefully working it back and forth in short
Install the bass bar
(Traditional violin makers use heated Hide Glue, but it’s dif-
ficult to use because it cools and sets very quickly. For these
instructions we use Titebond, a better choice for first-time
builders.)
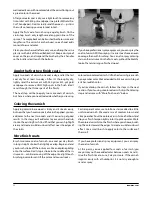
When the glue has dried, trim and scrape the purfling to
lower its height so that it’s flush with the top and back sur-
faces. Don’t overwork it at this stage. You’ll final-sand and
smooth these purflings later, after the top is glued on.
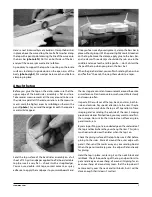
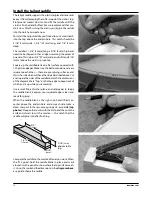
For the tight curves, create your own bending iron using a
piece of copper plumbing pipe and a propane torch
(above
photo)
. Heat the pipe, keeping the temperature low, and
bend the damp purfling against the copper.
The dampened purfling is left to dry in its curved shape.
While one joint is drying, you can work on another area
(photo right)
. Remove the dry-fit purflings, handling
them gently. Glue the pieces in place with Titebond glue.
������
��������
����
������
��
��
��������
�����
�������
�������
�������
����������
cross-wise strokes
(photo)
. This will remove any small gaps
between the top and bar. Once it fits, remove the template
and sand the bass bar smooth.
4
Summary of Contents for 5342
Page 1: ...Violin Kit 5342 Assembly Instructions www stewmac com ...
Page 2: ......
Page 9: ... ...
Page 10: ......
Page 23: ......