stewmac.com
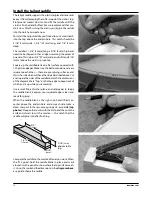
The tailgut saddle supports the plastic tailpiece fastener and
keeps it from damaging the softer wood of the violin’s top.
Professional makers don’t cut and fit the saddle until the
violin is finished and buffed, but we recommend that you
do it now. After finishing the violin, you’ll glue the saddle
into the notch you create now.
To install the tailgut saddle you’ll need to cut a small notch
into the top above the endpin hole. This notch should be
3/16" (5mm) wide, 1-3/8" (35mm) long, and 1/8" (3mm)
deep.
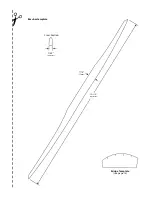
The saddle is 1-3/8" (35mm) long x 5/16" (8mm) high and
needs to be shaped so that a ridge rises along the center of
one side. This ridge is 3/4" (19mm) wide, and will stand 3/16"
(5mm) above the violin’s spruce top.
Square-up the saddle blank on a flat surface covered with
100-grit sandpaper. Make sure the bottom and one side are
square to each other — these are your gluing surfaces, and
this is the side which will have the ridge described above. Cut
and square the sides of the saddle to match the dimensions
of the diagram. Mark “Top” on the top edge to keep track of
which end is up while you’re working.
Use a small file, a chisel or plane, and sandpaper to shape
the saddle blank, keeping your squared edges clean and
ready for gluing.
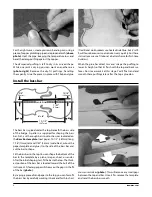
When the saddle blank is the right size, hold it firmly on
center above the endpin hole and on each side make a
clean, sharp cut in the spruce top using an X-acto knife
(top
photos)
. Deepen these cuts with the knife, and then use the
knife and chisels to cut the mortise — the notch that the
saddle will glue into after finishing.
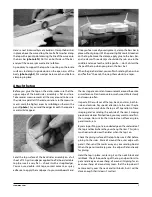
Compare the saddle to the mortise often as you work. When
the fit is good, hold the saddle blank in place and mark
around it with a pencil to show where the top surface meets
it. Using this mark and the dimensions in the
diagram above
as a guide, shape the saddle.
Install the tailgut saddle
������
������
����
������
�����
�����
�����
�������
���������������
���
10
Summary of Contents for 5342
Page 1: ...Violin Kit 5342 Assembly Instructions www stewmac com ...
Page 2: ......
Page 9: ... ...
Page 10: ......
Page 23: ......


