Stevens AeroModel Swift 100 Build Instructions Download Page 1

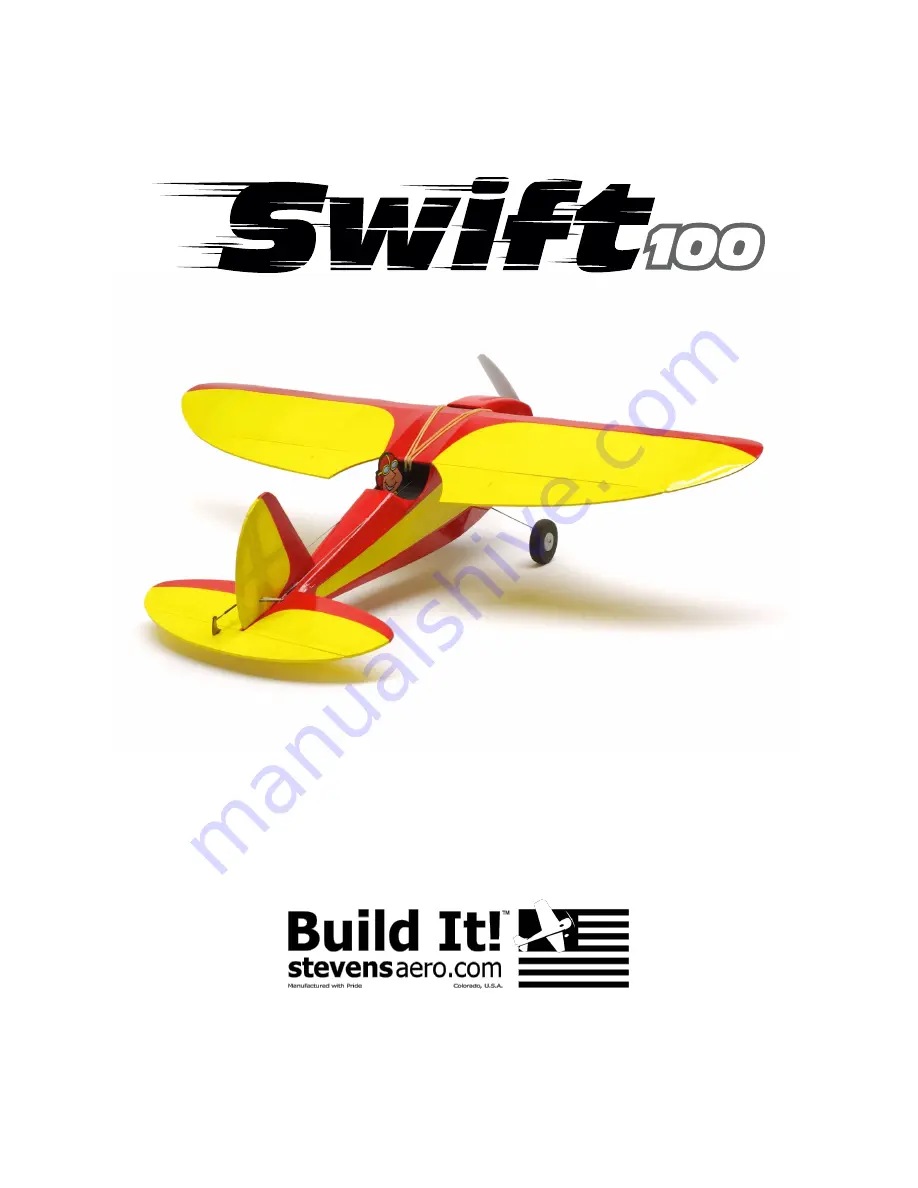
AR6410LBL Based Micro Aerobat!

Wing Span:

 21 inches | 

Wing Area:

 92 square inches | 

Average Flying Weight:

 3.3 ounces

Build Instructions - 

Version 1.18 

(revised 05.15.2014)

Build Instructions                                                                                                                

Swift (100) 

- Build Instructions © 2014 Stevens AeroModel, all rights reserved.

!

Page 1

Summary of Contents for Swift 100

Page 1: ...t Wing Span 21 inches Wing Area 92 square inches Average Flying Weight 3 3 ounces Build Instructions Version 1 18 revised 05 15 2014 Build Instructions Swift 100 Build Instructions 2014 Stevens AeroModel all rights reserved Page 1 ...

Page 2: ...is kit immediately in new and unused condition to the place of purchase THIS PRODUCT IS NOT INTENDED FOR CHILDREN 12 YEARS OF AGE OR YOUNGER WARNING This product may contain chemicals known to the state of California to cause cancer and or birth defects or other reproductive harm PRODUCT SUPPORT This product has been engineered to function properly and perform as advertised with the suggested powe...

Page 3: ...019 1 Pair 1 1 8 in dia plastic wheels SIGSH540 2 Part W13 balsa servo cuffs 2 Motor shims 4 nylon washers 3018 3 Screws 2 x 1 4 in 3011 6 Rubber bands 16 Swift 100 Background Loosely inspired by the 1930 Comper Swift The Stevens AeroModel Swift 100 is a toon version of the British classic and features spunky lines and solid sport aerobatic performance Designed to receive popular E Flite micro ele...

Page 4: ...lied to this model 3 4 PatchPaks AeroLITETM 2 3 base color 1 trim color Sealing Bare Wood While not required it is suggested that a high quality clear lacquer be used to protect and seal any unfinished wood One single light coat of clear lacquer should be sufficient to protect the model from moisture without adding significantly to the model s final flying weight Many parts of this model may be co...

Page 5: ...Sheet Wood Inventory Build Instructions Swift 100 Build Instructions 2014 Stevens AeroModel all rights reserved Page 5 ...

Page 6: ...Builder s Notes Build Instructions Swift 100 Build Instructions 2014 Stevens AeroModel all rights reserved Page 6 ...

Page 7: ... interlock like a 3D puzzle We strongly suggest that when fitting parts you dry fit use no glue the parts together first It is advised to work 1 2 steps ahead in the instructions using this dry fit technique This allows the opportunity to inspect the fit and location of assembled components and shows the benefits of our construction technique As each successive part is added it contributes to pull...

Page 8: ...Fit center crutch F2 sheet 02 09 1 20 in balsa to right fuselage side F1 sheet 01 09 1 20 in balsa observing Top orientation etched on part F2 2 Fit and bond F3a sheet 01 09 1 20 in balsa to F3b sheet 02 09 1 20 in balsa to make former F3 Note Upper tab on F3 extends beyond outer surface of fuselage side 3 Fit and tack glue formers F3 and F4 sheet 04 09 1 20 in balsa at each end of crutch F2 as in...

Page 9: ...tructions 2014 Stevens AeroModel all rights reserved Page 9 Step 1 Step 2 Step 3 Step 4 Step 8 Step 7 Step 6 Step 5 F1 F2 Top F r o n t F3a F3b Build part F3 F3 F4 F2 F1 Bottom F1 F3 F5 F1 F6 F7 F5 Bottom View Bottom View F5 F1 F1 F8 F9 F2 ...

Page 10: ...selage doubler F14 sheet 06 09 3 32 in balsa to right and left fuselage side with thick or medium CA 14 Bond second doubler F15 sheet 07 09 3 32 in balsa over F14 Align F15 using a 1 8 in drill bit or length of 1 8 in dowel in the forward alignment holes Remove alignment dowel before the glue sets 15 Fit and glue the edge of nose sheeting F16 sheet 06 09 3 32 in balsa to the top of F3 16 now wrap ...

Page 11: ...Build Instructions Swift 100 Build Instructions 2014 Stevens AeroModel all rights reserved Page 11 Step 9 Step 10 Step 11 Step 12 Step 16 Step 15 Step 14 Step 13 F2 F10 F9 F11 F12 F6 F13 F14 F15 F16 ...

Page 12: ... top of F18 Bond F17 and F20 permanently to fuselage sides each other F4 and F18 21 Fit and bond F21 sheet 08 09 3 32 in balsa to rear edge of cockpit against F4 Note Lower edge of F21 will extend beyond exterior edge of cockpit F21 will later be sanded flush with edge of fuselage 22 Assemble and bond parts F22a sheet 04 09 1 20 in balsa and F22b sheet 03 09 1 20 in balsa to form a right and left ...

Page 13: ...ctions Swift 100 Build Instructions 2014 Stevens AeroModel all rights reserved Page 13 Step 17 Step 18 Step 19 Step 20 Step 22 Cont Step 22 Step 21 Cont Step 21 F17 F18 F19 F20 F21 F22a F22b Bottom View Bottom View ...

Page 14: ...eft fuselage sides 27 Fit and bond short stringers F27 sheet 02 09 1 20 in balsa along top edge of fuselage sides aft of cockpit 28 Assemble doubler F28 from parts F28a sheet 04 09 1 20 in balsa and F28b sheet 03 09 1 20 in balsa and install along lower edge of fuselage sides F1 F11 Bottom profile of F28 should match lower profile of fuselage side Reference detail sheet for part positioning 29 Fit...

Page 15: ...ructions Swift 100 Build Instructions 2014 Stevens AeroModel all rights reserved Page 15 Step 23 Step 24 Step 25 Step 26 Step 29 Step 28 Step 27 Step 26 Cont F23 F24 F25 F26 F26 F27 F28a and F28b Bottom View F29 ...

Page 16: ...e ribs and tip sheeting Wing parts are designated with a W followed by a numeric Parts have been numbered so that the wing assembly and required parts follows in numeric order from W1 to W15 The wing is assembled one half at a time left side first then mirror build sequence to the right side When a part is required in the build sequence for instance W3 refer to the detail sheet for part placement ...

Page 17: ...ift 100 Build Instructions 2014 Stevens AeroModel all rights reserved Page 17 Step 30 Step 30 Cont Step 30 Cont Step 31 Step 35 Step 34 Step 33 Step 32 H1 H2 H3 H4 H4 H5 H5 E V1 V2 V4 V3 V5 R1 R2 R3 R4 W2 W1a and W1b W3 W4 ...

Page 18: ...s Bond with medium CA to retain the leading edge within the wing assembly 40 Assemble two wing tips W8 from parts W8a sheet 05 09 1 16 in balsa and W8b sheet 05 09 1 16 in balsa Bond W8a b with thin CA 41 Fit left wing tip W8 to tab on leading edge of left rib W3 Align Leading edge of wing tip along back surface of leading edge stock and against forward portion of rib W6 Tack glue along leading ed...

Page 19: ...ctions Swift 100 Build Instructions 2014 Stevens AeroModel all rights reserved Page 19 Step 36 Step 37 Step 38 Step 39 Step 43 Step 42 Step 41 Step 40 W6 W5 W7 1 4 in Leading edge W8a W8b Tack Glue Trim Bottom View ...

Page 20: ...inforcement W14 sheet 09 09 1 32 in ply within notch of part W4 at trailing edge of wing Bond with medium CA glue 49 Use the detail sheet as a guide for proper positioning of balsa diagonal sub ribs W15 sheet 05 09 1 16 in balsa Fit right and left sub ribs to assembly hold wing flat against your building board and bond with medium CA to retain parts 50 Sand the leading edge to shape Match the cont...

Page 21: ...d Instructions 2014 Stevens AeroModel all rights reserved Page 21 Step 44 Step 45 Step 46 Step 47 Step 51 Step 50 Step 49 Step 48 W12 W11 W10 W9a W9b W12 W13 W14 W15 Round leading edge A2 A1 A3 A4 A5 Bottom View Bottom View Bottom View ...

Page 22: ...n detail sheet 56 Install landing gear within fuselage and retain with 1 32 ply part F30 sheet 09 09 1 32 in ply as illustrated on detail sheet Retain F30 and landing gear within fuselage using CA glue 57 Fit and bond ply tail skid TS sheet 09 09 1 32 in ply to slot in F19 58 Using a warm soldering iron open the covering over the wing dowel holes in front of the wing saddle 59 Cut the provided 3 1...

Page 23: ...00 Build Instructions 2014 Stevens AeroModel all rights reserved Page 23 Step 52 Step 52 Step 53 Step 56 Step 60 Step 59 Step 58 Step 57 F30 031 Landing gear wire Bottom View Bottom View Bottom View TS 1 8 in Dowel 1 8 in Dowel ...

Page 24: ...the right slot on top of the fuselage and the right holes in F4 and F9 F10 The elevator pushrod will pass through the left slot in the fuselage top and through the left holes in F4 and F9 F10 Keep pushrods from sliding out by applying a small amount of tape to each end 64 With pushrods in place follow the General Pushrod Detail on the wing plan sheet to make snake bends on the ends of the push rod...

Page 25: ...Build Instructions Swift 100 Build Instructions 2014 Stevens AeroModel all rights reserved Page 25 Snake Bends Step 61 Step 63 Step 64 Step 68 Step 67 Step 66 Step 65 Bottom View Rudder Step 62 E R ...

Page 26: ...ugh the pocket through Ribs W2 and out exit hole in W9 attach servo leads to a y harness SPA2002 or two 3 in extension leads SPA2000 and plug into one of the aileron ports refer to receiver diagram on plans Note The servos may initially operate together in the same direction To correct this follow the Servo Reversing instructions on the wing plan sheet or on the servo manufacturer s web site Insta...

Page 27: ...Build Instructions Swift 100 Build Instructions 2014 Stevens AeroModel all rights reserved Page 27 Step 69 Step 70 Step 71 Step 72 Complete Step 74 Cont Step 74 Step 73 Bottom View ...

Page 28: ...check list Get in the habit of always preflighting your models before every flight Weight and Balance Check the balance of your model C G center of gravity For proper performance the model should balance between 1 8 and 1 4 inch aft of the main wing spar W1 Use a permanent marker or trim tape to mark the underside of the left and right wing half at the CG measurement as given above Now place your ...

Page 29: ...ng rudder and elevator controls Crosswind landings should be avoided until you are comfortable with the model s in flight behavior Congratulations Once you ve completed your first flights you will have noticed that the Stevens AeroModel Swift 100 is a very stable model airplane When built straight and trimmed for level flight it should readily return to wings level from any attitude When flying we...

Reviews: