


14
15
TROUBLESHOOTING
lIquId SoaP dISPenSeRS
lIquId SoaP dISPenSeRS
SPARE PARTS LIST
Illustration
Solution
Cause
Investigation
Indication
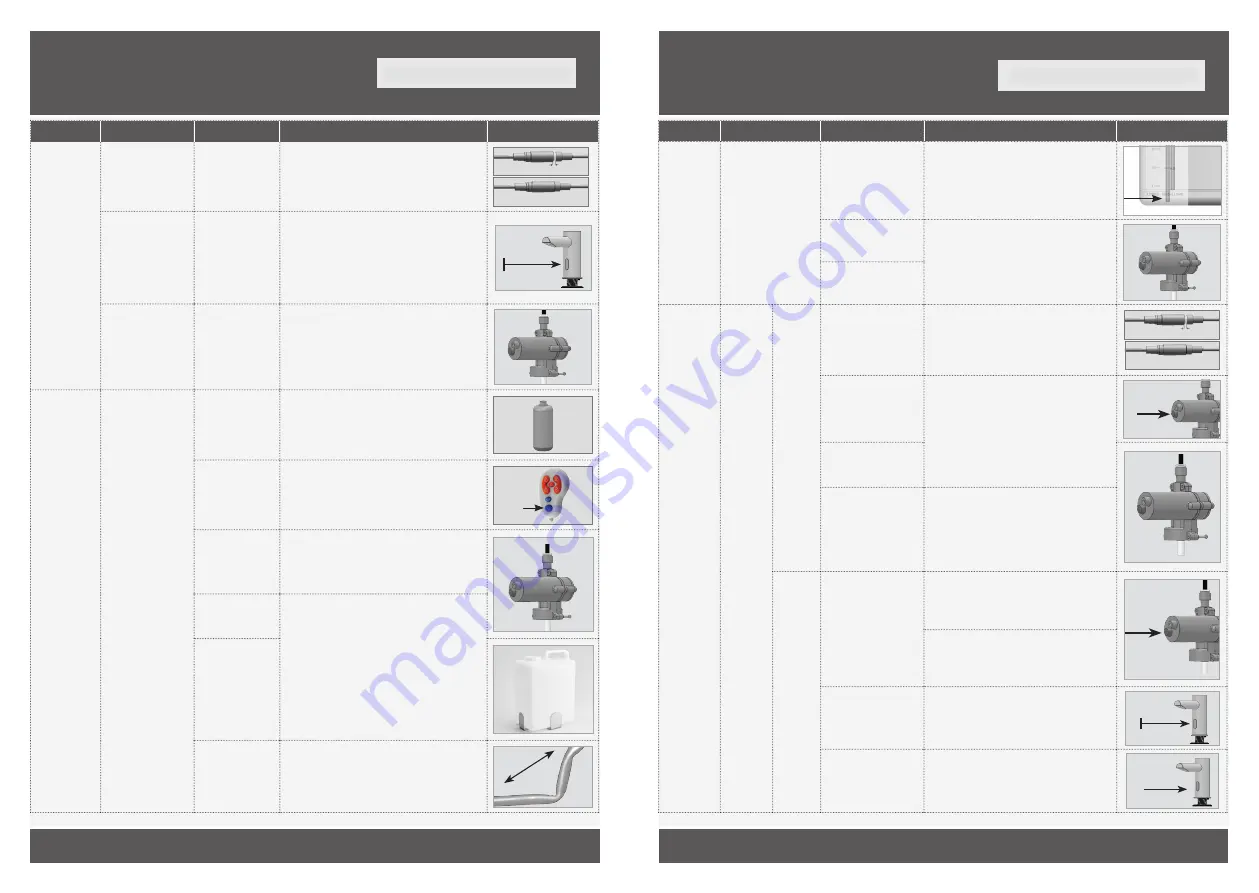
O-RING VISIBLE –
NOT CONNECTED PROPERLY
ONLY THE GROOVES ARE VISIBLE –
CONNECTED PROPERLY
The connector should be inserted fully until
white o-ring is not visible. Remove the o-ring if
necessary
AUx connector not
fully inserted
Continuous
discharge from the
nozzle
False
activation:
Soap
dispensing
Min 1.5 M
Eliminate any cause of reflection and if
necessary use appropriate remote control to
shorten detection range.
Reflection issue
from other object
Random discharge
from the nozzle
Replace the Pump. Rinse warm water through
the pipe and the body of the soap dispenser all
the way to the nozzle.
Damaged pump
due to high
viscosity or debris
in pipes
Soap discharging
from pump housing.
Fill with soap with correct viscosity (100 - 3800
cPs) and prime pipes using the fill button on
remote control.
Soap tank is
empty
Pump is making
sounds when sensor
is activated
Soap not
dispensing
Press
FIll
Button
Prime the soap dispenser by pressing the fill
button on the remote or by pressing the refill
button located at the bottom of the pump, until
soap exits the nozzle.
Soap dispenser
has not been
primed
Replace the Pump
Damaged pump
(discharge from
housing)
Run warm water through pipe, pump, and body
all the way to the nozzle. Replace with soap of
correct viscosity.
NOTE: Using the soap dispenser with high
viscosity soap may cause permanent damage to
the pump and shorten the lifecycle.
Debris or dried
soap in the pipe
or tank
Soap Viscosity
(100 - 3800 cPs)
High viscosity
soap
(> 3800 cPs)
Unbend or straighten pipes.
Bent pipes
Illustration
Solution
Cause
Investigation
Indication
Ensure that the tip of the inlet pipe is fully
immersed in the soap. For earlier models
check that the pipe has not been pushed so
far that the tip has risen above soap level.
The new models have an additional sleeve
for the pipes preventing this from occuring.
Tip of inlet pipe is not
immersed in soap
Pump is making
sounds when sensor
is activated
Soap not
dispensing
Check that all pipes are connected firmly to
the pump. If necessary remove pipe, cut 7
mm and replace firmly.
6mm pipe connecting
pump to dispenser
outlet has come loose
8 mm pipe connecting
pump to tank has come
loose
O-RING VISIBLE –
NOT CONNECTED PROPERLY
ONLY THE GROOVES ARE VISIBLE –
CONNECTED PROPERLY
The connector should be inserted fully until
the white o-ring is not visible. Remove the
o-ring if necessary
AUx connector not fully
inserted
Sensor is
blinking
when
hand is
placed in
front
Pump
is not
making
sound
when the
sensor is
activated
Soap not
dispensing
Press
Replace the Pump. Rinse warm water through
the pipe and the body of the soap dispenser
all the way to the nozzle.
Refill button o n pump
does not activate the
pump.
Damaged pump
(discharge from
housing).
Run warm water through pipe, pump, and
body all the way to the nozzle. Replace with
soap of correct viscosity.
NOTE: Using the soap dispenser with high
viscosity soap may cause permanent damage
to the pump and shorten the lifecycle.
Debris or dried soap in
the tank or tubing
Refill
button
Transformer: Check operation with functioning
transformer. Where necessary replace with
appropriate transformer. For part numbers see
spare parts list.
Refill button on pump
does not activate the
pump.
Sensor
is not
blinking
when
hand is
placed in
front
Battery: Check operation with functioning
battery pack. Where necessary, replace
batteries or replace the battery pack: Battery
pack (without batteries)
Min 1.5 M
Eliminate any cause of reflection and use
appropriate remote control to shorten
detection range.
Reflection issue from
other object
Replace
sensor
If the above two solutions have not resolved
this issue replace with appropriate sensor. For
part numbers see spare parts list.
Damaged sensor