


PC CONTROL
PC CONTROL
LINE OUTPUT
LINE OUTPUT
POWER
POWER
USB
USB
A
A
B
B
C
C
D
D
E
E
F
F
G
G
H
H
POWER INPUT
POWER INPUT
LINE INPUT
LINE INPUT
FL
FL
FR
FR
RL
RL
RR
RR
SUB L
SUB L
SUB R
SUB R
INPUT
INPUT
OPTICAL
OPTICAL
CONTROL HIGH LEVEL INPUT
CONTROL HIGH LEVEL INPUT
REMOTE
REMOTE
CONTROL
CONTROL
AUX IN
AUX IN
GND
GND
+12V
+12V
REM IN
REM IN
REM OUT 1
REM OUT 1
REM OUT 2
REM OUT 2
POWER INPUT
POWER INPUT
LINE INPUT
LINE INPUT
FL
FL
FR
FR
RL
RL
RR
RR
SUB L
SUB L
SUB R
SUB R
INPUT
INPUT
OPTICAL
OPTICAL
CONTROL HIGH LEVEL INPUT
CONTROL HIGH LEVEL INPUT
REMOTE
REMOTE
CONTROL
CONTROL
AUX IN
AUX IN
GND
GND
+12V
+12V
REM IN
REM IN
REM OUT 1
REM OUT 1
REM OUT 2
REM OUT 2
PRODUCT BRIEF INTRODUCTION
[ 5 ]
PRODUCT BRIEF INTRODUCTION
[ 6 ]
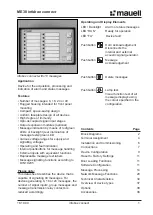
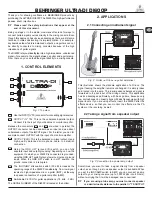
4.2 Output signals
1.FRONT1/A+B To Midrange
FRONT2/C+D To Tweeter
Rear/E+F To Midbass
Subwoofer /G+H To Subwoofer
2.USB
USB(type B)connection plug, to connect the processor to a PC and manage its funcitions
through the DSP 3 Software. The connection standard is USB 1.1/2.0 compatible.
4.3 Input - remote control outputs and power supply
1. POWER SUPPLY
.
+12V
:Positive connection terminal for car 12V power supply.
GND
:Power supply negative connection terminal(GND).
WARNING:
make sure the connection polarity is as indicated on the terminals.A misconnection.
May result in damage to the DSP. After applying power,wait at least 10 seconds
Before turning the DSP on.
2. REMOTE IN-OUT
.
REM IN:input to turn on the processor remotely along with the audio signal remote Out.
REM OUT:output to turn on other devices/amplifers connected after the processor.
From the REMOTE-IN signal, the processor only takes 1second to supply the signal to the
REM OUT output. The 130-mA output current capability can also drive an automotive relay
3. OPTICAL INPUT
WARNING
:the DSP must be switched on before any amplifiers are turned on.
The system sources Remote Out must be connected to the product REM IN,and the product
REM OUT. is then to be connected to the Remote In of other devices/amplifiers.
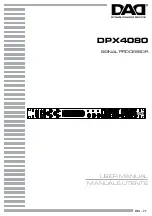
5.CONNECTIONS
5.1 Power supply and remote turn on
WARNING:
to power the device,use 1 mm (16 AWG) cables.
Remark:
the DSP is intermally protected by a
Fuse-resistor soldered on its printed circuit board
To replace it contact a service center. Using an
External fuse is recommended, though it is not required.
2
MASTER-INPUT
1.post GND
2.post +12V
3.post REM IN
4.post REM OUT 1
5.post REM OUT 2
1
(Making sure it does not exceed 130 mA).
REM IN
REM OUT
REM IN
REM OUT 2
REM OUT 1
REM IN
REM OUT
REM IN
REM IN
REMOTE OUT
-BATT
Ground
+ BATT +12V
16 AWG
Fuse Holder
Not Provided
Suggested Fuse
T1A-delayed
+
-
12V
Ground
2
1
2
3