Minghe Instruments MHS-5200A Series, Operating Manual
The Minghe Instruments MHS-5200A Series offers a range of versatile and high-performance electronic testing equipment. Unlock the full potential of your device by accessing the comprehensive Operating Manual, available for free download at our website manualshive.com. Enhance your user experience with this essential manual that guarantees seamless product usage.
Share
Download


Reviews:
No comments
Related manuals for MHS-5200A Series
GM-1000
Brand: Oberheim Pages: 84
SGT100A
Brand: R&S Pages: 593
INTEGRAL Series
Brand: D.A.S. Pages: 18
ME30 infobox connect
Brand: Mauell Pages: 40
DPX4080
Brand: DAD Pages: 52
DSP 6TO8
Brand: Steg Pages: 10
Links
Brand: Mutable Instruments Pages: 2

HDSP-V Series
Brand: zapco Pages: 50
PowerTrench MOSFET FDD6690A
Brand: Fairchild Pages: 6
IrDA SIR Endec Chip (SOP8) IFSYS -7000
Brand: IFoundry Systems Pages: 2
2099-1318
Brand: Cross Technologies Pages: 21
DSPOT DS-EQ230
Brand: Galaxy Audio Pages: 40
Signal Processing Engineering Educational Device NI SPEEDY-33
Brand: National Instruments Pages: 45

Signal Processing Engineering Educational Device NI...
Brand: National Instruments Pages: 45
MTX Series
Brand: Yamaha Pages: 157
XG3
Brand: ELECRAFT Pages: 31
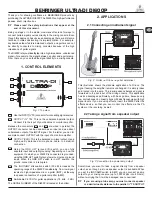
ULTRA-DI DI600P
Brand: Behringer Pages: 2

SGP10 S Series
Brand: FeelTech Pages: 7


