


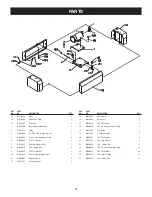


16
REMOVING THE SANDING BELTS
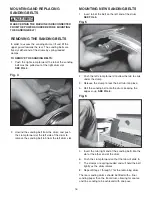
In order to access the sanding drums, lift and tilt the
upper guard towards the rear. The sanding belts are
fixed at either end of the drums by spring-loaded
clamps.
TO REMOVE THE SANDING BELTS:
1.
Push the right clamp forward; the tab of the sanding
belt must be pulled out of the right drum slot.
SEE FIG. 4.
Fig. 4
2.
Unwind the sanding belt from the drum, and push
the clamp forward at the left side of the drum to
remove the sanding belt tab from the left drum slot.
Fig. 5
MOUNTING AND REPLACING
SANDING BELTS
MAKE CERTAIN THE MACHINE IS DISCONNECTED
FROM THE POWER SOURCE BEFORE MOUNTING
THE SANDING BELT!
WARNING
!
MOUNTING NEW SANDING BELTS
1.
Insert tab of the belt on the left end of the drum.
SEE FIG. 5.
2.
Push the left clamp forward to allow the tab to slide
under the clamp.
3.
Release the clamp to lock the belt tab into place.
4.
Roll the sanding belt onto the drum, keeping the
edges snug.
SEE FIG. 6.
Fig. 6
5.
Insert the tab (right end of the sanding belt) into the
slot at the other end of the drum.
6.
Push the clamp forward so that the tab will slide in.
7.
The clamps are spring-loaded and will hold the belt
tightly as the drum rotates.
8.
Repeat Steps 1 through 7 for the remaining drum.
The rear sanding drums should be fitted with a finer
sanding paper than the front drum, allowing for coarse
and fine sanding to be achieved with one pass.
Summary of Contents for 55220
Page 28: ......


