background image

16

You will then be asked if a filament cartridge is already installed.  Initially this will be 

‘No’

 as this is the first time a 

filament cartridge has been loaded; but when changing a cartridge in future you will select 

‘Yes’

.  Selecting 

‘Yes’

 will 

uninstall the existing filament before allowing you to load a new filament.

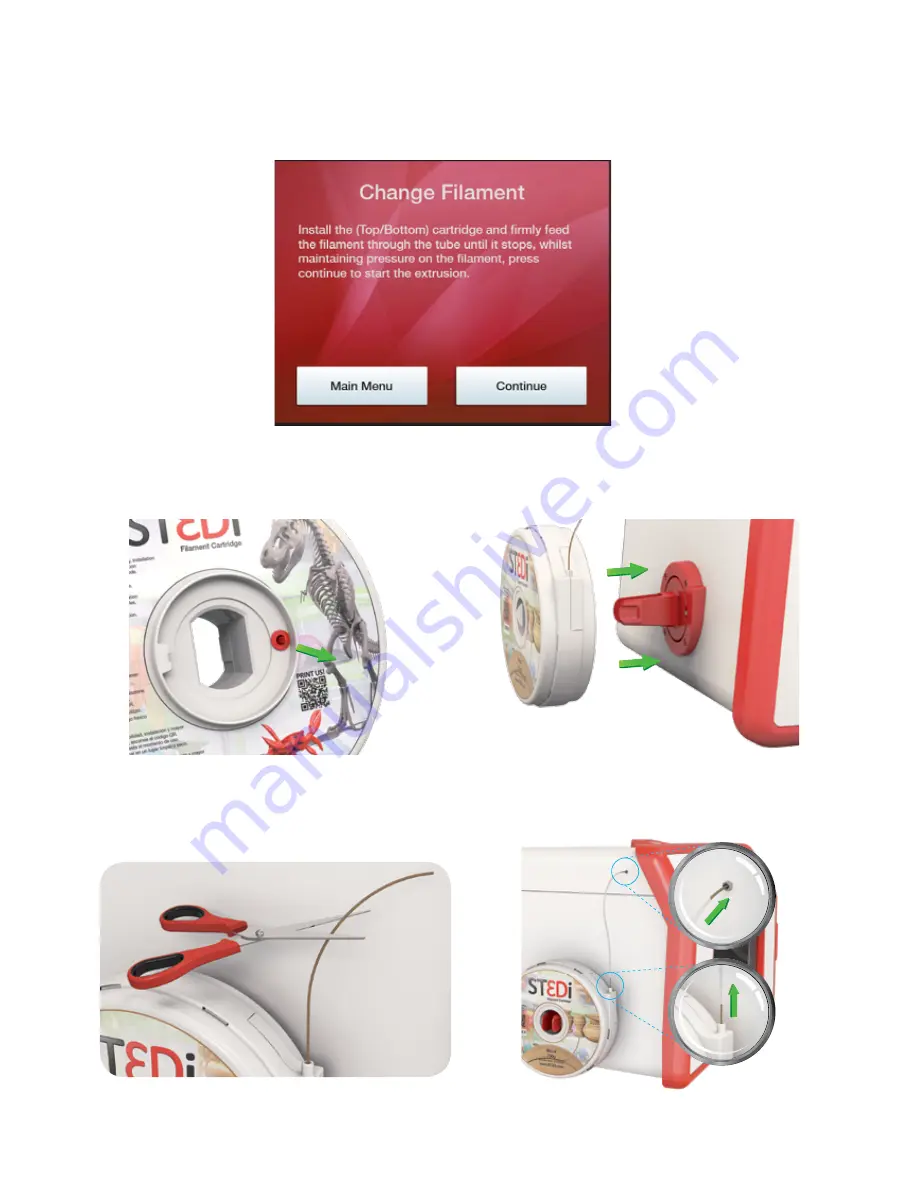
You then need to install the cartridge onto the side of the printer.  Firstly, remove the filament cartridge from 

the outer packaging and take out the red plug from the side of the cartridge casing.  Slide the cartridge onto the 

filament holder on the side of the printer and gently push until you hear it click into place.

Next, Gently pull out sufficient filament from the cartridge (5cm to 15cm). Cut off the first 5cm of the filament and 

push through the filament tube (item H). Feed the filament through the filament tube into the corresponding fitting 

on the side of the printer.

5.

Feed the filament into the printer until it stops.  Approximately 30cm of filament will be required.

Summary of Contents for ModelSmart Pro 200

Page 1: ...1 User Guide ModelSmart Pro 280 ModelSmart Pro 200...

Page 2: ...erating System Mac Operating System Installing Cartridges Z Axis Sheets How to print Printing via your ST3Di 3D Printer Other LCD Functionality Cleaning and maintenance Technical Specifications Contac...

Page 3: ...e printing areas of up to 200mm ModelSmart Pro 200 or even 280mm wide P S If you have wonderful and exciting ideas about what you would like to be able to print but are struggling to find a model desi...

Page 4: ...gh misuse abuse or failure to provide reasonable care as outlined within the User Guide If the product has been altered without written authorisation from the ST3Di team then the guarantee will not be...

Page 5: ...ensure that the printer is located in an area that is close to the intended power supply and that the socket is easily accessible well ventilated clean and dry a consistent and stable temperature and...

Page 6: ...x2 for the ModelSmart Pro 280 Cartridge Filament Holder x2 for the ModelSmart Pro 280 Extra Long 3m USB Cable Filament tubes x2 for the ModelSmart Pro 280 2m Power Cable 512MB SD Card Z Axis Sheets 24...

Page 7: ...to the rear of the filament cartridge holder Please refer to the illustration for details and correct orientation b Repeat as necessary for the ModelSmart Pro 280 by connecting the B1 cable to the re...

Page 8: ...r 9 Download and install the ST3Di Edit Software from www ST3Di com download st3di edit Firstly please insert your serial number Your serial number can be found on the outer box pack aging or on the r...

Page 9: ...ils The installation process will then begin www st3di com www st3di com 3D Printers Consumables Guides Tools Software Model Library In order to validate your printer guarantee please register your pr...

Page 10: ...10 WINDOWS OPERATING SYSTEM Please follow the on screen pop up messages to install the ST3Di Edit Software as below...

Page 11: ...then please follow the process below After clicking download on the website allow the dmg file to download onto your computer and then double click to open as shown above When the folder has opened a...

Page 12: ...ilable or 3D printing related applications or even new print material that you can try out You may also get unique promotional offers each and every time you print ST3DI For help related to your Helpf...

Page 13: ...ial number to download the software ST3Di Helpful Printer Driver Helpful Printer Driver ST3DI For help related to your Helpful Printer Driver please visit the support page Why Buy ST3Di Learn more ST3...

Page 14: ...14...

Page 15: ...ease follow the process below From the Main Menu please select Change Filament If you have the ModelSmart Pro 280 please select the cartridge that you wish to install change You will not be presented...

Page 16: ...ove the filament cartridge from the outer packaging and take out the red plug from the side of the cartridge casing Slide the cartridge onto the filament holder on the side of the printer and gently p...

Page 17: ...ess button Once the filament has been installed push the end of the filament tube onto the top of the cartridge and into the fitting on the side of the printer ensuring that no filament is exposed If...

Page 18: ...the Z Axis sheet The model then also easily peels from the sheet leaving you with a smooth and blemish free model APPLYING THE Z AXIS SHEET 1 Please ensure that the glass bed is clean and free from g...

Page 19: ...you will first be asked to confirm if you have a ModelSmart Pro 200 or a ModelSmart Pro 280 The list of files on the left hand side shows you the model samples that are provided free when you purchas...

Page 20: ...elow the bed during editing RESET CHANGES The button will return the model to the exact state it was when first loaded undoing any editing changes you have applied REMOVE SCENE The button will remove...

Page 21: ...appear on both the ModelSmart Pro 280 and 200 but will only include the applicable information i e only one extruder for the 200 RETURN TO HOME SCREEN The button will return you to the Home Screen clo...

Page 22: ...Firmware Update before you start printing for the first time to ensure you have access to all of the up to date functionality Clicking the Update button will either generate the following information...

Page 23: ...the cartridges you have installed You can also decide to print your model with a support structure if it has complex or moving parts see our Filament page for more information and in addition choose...

Page 24: ...t to your printer model name Once the print file has been created you are provided with an estimated time of print and given two options Print options Estimated time of printing 2 hours 11 minutes SEL...

Page 25: ...after transfer is complete you are able to turn off or disconnect your computer and it will continue to print If you select this option you will be informed of the estimated transfer time to allow yo...

Page 26: ...dels in order to ensure you can locate them easily on the SD card when printing via the LCD Once you have selected the correct model please press Print 3 The on screen display will then confirm the mo...

Page 27: ...Position returns the extruders and the print bed to their default position the extruders in the rear right hand corner of the printer and the print bed being reset to its lowest position Other Settin...

Page 28: ...xtruder remains clean and free from any residual filament prior to each print otherwise the nozzle could get blocked and the print may not be successful To do this please ensure that the extruder has...

Page 29: ...arranty 180 Days Speed mm s 80 Filament Size 1 75mm Operating Tool Easy to use LCD Control Panel Lighting Brilliant white internal operating light ModelSmart Pro 280 1 200 micron 0 2mm 200 x 150 x 150...

Page 30: ...d or close to each other e g the interference that you hear when your mobile phone is near your TV or radio The ST3Di ModelSmart Pro 280 and 200 printers are tested and approved under this Directive R...

Page 31: ...ge Filament process again to retract the filament whilst gently pulling the filament by hand from the top of the printhead Try this process a maximum of two times should the first time be unsuccessful...

Page 32: ...p layer of adhesive which you will print onto directly This will mean that when your model is completed it will be affixed to the bed In order to remove the Z Axis sheet and therefore your model pleas...

Page 33: ...e 4 corners as well Question 5 I can t read my full file name from the LCD Question 6 I only want to print a small object why do I have to use a full size Z Axis sheet Once the plastic tubing has been...

Page 34: ...pplied to the bed in order for the model to adhere during the first layers of printing If you have a Z Axis sheet applied and you still have some warping then please double check your settings when sa...

Page 35: ...wnload the DirectX from the microsoft download center by using the URL provided on the pop up screen http www microsoft com en us download details aspx id 8109 Extract the files to your preferred loca...

Page 36: ...36 Once all the files are extracted click on the DXSETUP exe file to begin installation...

Page 37: ...37...

Page 38: ...ectly via the ST3Di Edit Software i e selected the correct extruder with the correct filament then the problem could be because the filament cartridge holders were installed the wrong way around when...

Page 39: ...inished moving Even then please be aware that the nozzle on the printhead will still be very hot Question 12 I am trying to download the ST3Di Edit Software The Helpful Printer Driver but it is not re...

Page 40: ...ead to allow you to reinstall To do this simply continue following the installation process by feeding the filament through once again This time the filament should successfully feed through and extru...

Reviews: