


Switching On and Off
To
start
the machine, press the On/Off switch
7
and keep it
pressed.
The power light
4
lights up when the On/Off switch
7
is
slightly or completely pressed, and allows the work area to
be illuminated when lighting conditions are insufficient.
To switch
off
the machine, release the On/Off switch
7
.
Adjusting the Speed
The speed of the switched on power tool can be variably
adjusted, depending on how far the On/Off switch
7
is
pressed.
Light pressure on the On/Off switch
7
results in a low
rotational speed. Further pressure on the switch results in
an increase in speed.
4.2 Adjustment operation
Before any work on the machine itself (e. g.
maintenance, tool change, etc.) as well as during
transport and storage, remove the battery from
the power tool. There is danger of injury when
unintentionally actuating the On/Off switch.
Inserting
Pull the locking sleeve
3
forward, push the insert tool to the
stop into the tool holder
2
and release the locking sleeve
3
to
lock the insert tool.
Use only screwdriver bits with ball catch
1
.
Other screwdriver bits can be used with a universal bit
holder with ball catch
12
.
Removing
Pull the locking sleeve 3 forward and remove the insert tool.
5. Operating instructions / PBL120
Use only original Stayer lithium ion batteries with
the voltage listed on the nameplate of your power
tool.
Using other batteries can lead to injuries and pose a fire
hazard.
Starting Operation
Set the rotational direction switch
8
to the centre position in
order to avoid unintentional starting. Insert the charged
battery
5
into the handle so that it can be felt to engage and
faces flush against the handle.
Reversing the Rotational Direction
The rotational direction switch
8
is used to reverse the
rotational direction of the machine.
However, this is not possible with the On/Off switch
7
actuated.
Right Rotation:
For drilling and driving in screws, push the
rotati onal direction switch
8
left to the stop.
Setting the Torque / Setting the Operating Mode
The required torque can be preselected in 10 steps with the
torque preselection ring
3
. With the correct setting, the
insert tool is stopped as soon as the screw is screwed flush
into the material or when the set torque is reached.
4
Bulb
5
Battery
6
Handle
7
On/Off switch
8
Rotational direction switch
9
Battery unlocking button
10 Battery charge-control indicator
11 Charger
12 Universal bit holder
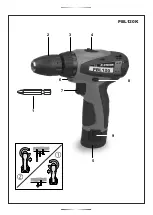
3.5 Illustrated description
/ PBL120
1 Screwdriver bit
2 Tool holder
3 Ring preset torque setting for
4 Speed ?
?
selector
5
Battery
6
Bulb
7
On/Off switch
8
Rotational direction switch
9
Battery unlocking button
10 Battery charge-control indicator
11 Charger
4. Operating instructions / ISL120
Method of Operation
The tool holder
2
with the tool is driven by an electric motor
via a gear and impact mechanism.
The working procedure is divided into two phases:
Screwing in and tightening
(impact mechanism in
action).
The impact mechanism is activated as soon as the screwed
connection runs tight and thus load is put on the motor. In
this instance, the impact mechanism converts the power of
the motor to steady rotary impacts. When loosening screws
or nuts, the process is reversed.
4.1 Placement and testing
Use only original lithium ion batteries with the voltage
listed on the nameplate of your power tool.
Using other
batteries can lead to injuries and pose a fire hazard.
Use of batteries not suitable for the machine can
lead to malfunctions of or cause damage to the
power tool.
Set the rotational direction switch
8
to
the centre position in order to avoid unintentional starting.
Insert the charged battery
5
into the handle so that it can be
felt to engage and faces flush against the handle.
Reversing the Rotational Direction
The rotational direction switch
8
is used to reverse the
rotational direction of the machine. However, this is not
possible with the On/Off switch
7
actuated.
Right rotation:
For driving in screws and tightening nuts,
press the rotational direction switch
8
through to the left
stop.
Left Rotation:
For loosening and unscrewing screws and
nuts, press the rotational direction switch
8
through to the
right stop.
ENGLISH
17
17
Summary of Contents for PBL120K
Page 2: ...4 2 3 6 9 5 7 1 12 1 ISL120K 8...
Page 3: ...2 3 4 6 7 8 9 5 1 PBL120K...
Page 4: ...PBL120K ISL120K 9 10 11 5...


