background image

6 / 16


6 / 16


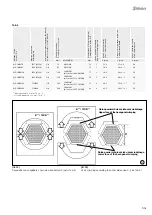
Tab. 2

8

>2 mm

>2 mm

Y

9

10

L

11

Ø E

12

13

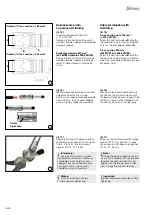
Przygotowanie gumowej usz-

czelki dławika kablowego

Preparing the rubber seal of 

the cable gland

(ill. 8)

Dławiki kablowe w złączach 16BL-CS 

/… i 16BL-CP/… zawierają dwuczę-

ściową gumową uszczelkę, którą 

należy wyregulować, aby pasowała do 

zewnętrznej średnicy  

kabla (patrz Tab� 2)�

Nie wyrzucać nieużytej części gumowej 

uszczelki�

(ill. 8)

The cable glands on the 16BL-CS/… 

and 16BL-CP/… connector types con-

tain a two-part rubber seal that must be 

adjusted to fit the outer diameter of the 

cable (see Tab� 2)�

Please discard the unused part of 

the rubber seal.

(ill. 13)

Zacisnąć kabel za pomocą narzędzia 

do zaciskania Elpress V1311C lub 

V1311C-A i odpowiedniej wkładki� 

Przestrzegać strefy zaciskania Y i liczby 

zaciśnięć! (patrz Tab� 3, strona 7)�

(ill. 13)

Crimp the cable with the Elpress crimp-

ing tool V1311C or V1311C-A and the 

correct insert� 

Observe crimping zone 

Y

 and the num-

ber of crimping! (see Tab� 3, page 7)�


Informacja:


Tuleję zaciskaną należy zacisnąć 

raz dla każdego punktu zaciskania�


Note:


The crimp sleeve should be 

pressed once for each crimp point�

Dławik kablowy

Cable gland

Z wewnętrzną gumową 

uszczelką 

With inside rubber seal

Ø (mm)

Bez wewnętrznej gumowej 

uszczelki 

Without inside rubber seal

Ø (mm)

M32

15-20

20-25

M40

20-26

26-32

M50

31-35

35-41

Pierwsze zaciskanie

First crimping

Drugie zaciskanie

Second crimping

Przygotowanie kabla

Cable preparation

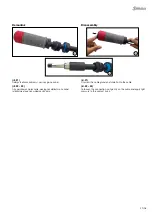
(ill. 9 - 10)

Wsunąć dławik kablowy na kabel i zdjąć izolację kabla na długo-

ści 

L

 (patrz Tab� 3 strona 7 dla wersji zaciskanej i Tab� 4, strona 9 

dla wersji AxiClamp)�

(ill. 9 - 10)

Slip cable gland onto the cable and strip cable insulation to length 

L

 (see Tab� 3 page 7 for crimp version and Tab� 4, page 9 for 

AxiClamp version)�

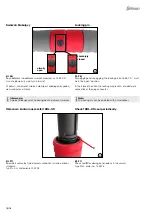
Zaciskanie (wersja zaciskana)

Crimping (crimp version)

(ill. 11 - 12)

Włożyć wszystkie przewody do tulei zaciskowej, aż do oporu� 

Drut musi być widoczny w otworze�

(ill. 11 - 12)

Insert all wires into the crimping sleeve until it stops� The wire 

must be visible in the sight hole�

Sichtloch

Sight hole

Summary of Contents for 16BL-CP

Page 1: ...u 5 Przygotowanie gumowej uszczelki d awika kablowego 6 Przygotowanie kabla 6 Zaciskanie wersja zaciskana 6 Zako czenie kabla za pomoc AxiClamp 8 Monta 10 Demonta 11 Oznakowanie 12 Procedury pod czani...

Page 2: ...al connection with long term stability and for safety reasons must not be plugged together with St ubli elements St ubli therefore does not ac cept any liability for any damage resulting from mating s...

Page 3: ...Any additional evaluation and testing for use at more than 600 V should be considered in the end use These devices full assembly have been subjected to a Temperature test with the rated currents The...

Page 4: ...metryczny i wk adka do d awika kablowego M32 10 Nm A F 36 mm M40 14 5 Nm A F 45 mm M50 20 Nm A F 57 mm ill 3 Torque wrench and insert for cable gland M32 10 Nm A F 36 mm M40 14 5 Nm A F 45 mm M50 20 N...

Page 5: ...wa Crimp termination Widok Overview Gniazdo Socket Wtyk Plug Uwaga Przed monta em nale y upewni si e dysponuje si odpowiednim zestawem cz ci plastikowych metalowych gniazdo wtyk Attention Make sure be...

Page 6: ...d the num ber of crimping see Tab 3 page 7 Informacja Tulej zaciskan nale y zacisn raz dla ka dego punktu zaciskania Note The crimp sleeve should be pressed once for each crimp point D awik kablowy Ca...

Page 7: ...28 S P 16BL95 B20 V1330 5 6 95 AWG 4 0 15 1 16 4 30 3 1 30 S P 16BL120 B22 V1330 5 6 120 250 MCM w tym incl 262 6 MCM 17 1 16 3 30 3 1 30 S P 16BL150 B25 V1330 5 6 150 300 MCM w tym incl 313 3 MCM 19...

Page 8: ...czeg lne pasma y y by y widoczne w otworze ill 16 Firmly push lead and all individual wire strands into the AxiClamp sleeve until the lead insulation comes up against the AxiClamp sleeve so the indivi...

Page 9: ...pping length ill 10 Klucz dynamometryczny A F Torque wrench size A F Klucz p aski do kontrowania A F Open end spanner to counter A F Moment dokr cania Tightening torque mm2 AWG MCM E mm L mm mm mm Nm...

Page 10: ...dokr ci momentem 14 5 Nm Nast pnie dokr ci nakr tk za pomoc klucza dyna mometrycznego Moment dokr cania M32 10 Nm M40 14 5 Nm M50 20 Nm ill 20 Screw cable gland on to the insulator and tighten with 1...

Page 11: ...un go na kabel ill 21 Unscrew the cable gland and slide it onto the cable ill 22 23 Aby poluzowa po czenie poci gn delikatnie za kabel i delikatnie docisn wk adk stykow ill 22 23 To loosen the connect...

Page 12: ...i zapewnia optymalne bezpiecze stwo u ytkownika Dost pne s nast puj ce kolory 20 21 22 23 24 25 26 27 28 29 30 31 Przyk ady oznacze kolorowych zgodnie z HD308 S2 2001 IEC60445 2017 NEC2017 In additio...

Page 13: ...m blokuj cy jest za czony Podj pr b roz czenia i sprawdzi czy b dzie ono mo liwe By twisting the connectors test that the locking mechanism is engaged By attempting to simply pull the connectors apart...

Page 14: ...z cza In the closed position the locking pin prevents accidental dis connection of the plug connector Informacja Sworze blokuj cy mo na obs ugiwa za pomoc wkr taka Note The locking pin can be operated...

Page 15: ...PC Order No 15 5881 16BL CP PC Order No 15 5882 Are used to protect the connectors from dust and water when unplugged ingress protection IP65 and IP68 The lanyard can be used to attach the cover to t...

Page 16: ...23 Allschwil Switzerland Tel 41 61 306 55 55 Fax 41 61 306 55 56 mail ec ch staubli com www staubli com electrical by St ubli Electrical Connectors AG Switzerland MA408 12 2020 Index c Marketing Commu...

Reviews: