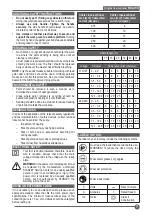
background image

8

ENGLISH (

Original Instructions)

W

Watts

Earthing 

Terminal

min

minutes

Safety Alert 

Symbol

Alternating 

Current

/min.

Revolutions or 

Reciprocation 

per minute

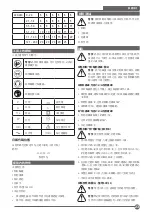
Position of date code 

The Date Code, which also includes the year of manufacture, 

is printed into the housing. 

Example:

2020 XX   JN 

Year of manufacturing

 PACKAGE CONTAINS

The package contains:

1 Angle Grinder

1 Guard

1 Flange set

1 Spanner

1 Handle(SG7100 only)

1 Instruction manual

• Check for damage to the tool, parts or accessories

which may have occurred during transport.

• Take the time to thoroughly read and understand this

manual prior to operation.
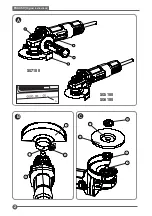
 FEATURES (Fig A)

WARNING

: Never modify the power tool or any 

part of the tool, otherwise it may cause damage 

to the tool or result in personal injury.

1. ON/OFF Switch

2. Spindle Lock

3. Guard

11. Side  Handle

ASSEMBLY 

WARNING

: To prevent accidental operation, 

turn off and unplug tool before performing the 

following operations. Failure to do this could 

result in serious personal injury.

Attaching and removing the wheel guard (Fig B)

WARNING

: To minimize the danger of serious 

personal injury, please switch off the tool power 

and disconnect all plugs before adjusting or 

removing/installing any accessory. Before 

reassembling the tool, press and release the 

trigger switch to make sure the tool is already 

switched off.

Attaching the guard (Including Type27/41/42 Guard)

1. Place the angle grinder on a work bench, with the spindle 

facing the operator .

2. Pick up the guard and make sure that the bump(10) of

the guard is aligned with the groove(9) of the gear case

cover.

3. Release the guard(3) and turn the guard counterclockwise 

by 180 degrees.

4. Tighten screw(12) and make sure the guard does not

turn.

Removing the guard (Including Type27/41/42 Guard)

1. Loosen the screw(12) on the guard collar .

2. Turn the guard counterclockwise by 180 degrees.

3. Pull up the guard(3).

Attaching and removing grinding wheels(Fig C and D)

WARNING

: Do not use damaged grinding 

wheels.

1. Place the tool on a work bench, the spindle facing the

operator.

2.  Attach the inner flange (4) correctly on the spindle (5).

3.  Place  the  grinding  wheel  (6)  on  the  inner  flange 

(4).When attaching a grinding wheel with a raised

center,make sure that the raised center (7) faces the

innerflange (4).

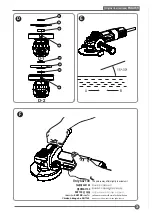
4. Tighten the outer flange (h) onto the output shaft (5).

5. When attaching the grinding wheel, the ring on top of

the outer flange (8) must face towards the wheel (Fig 

D-1); When attaching the cutting wheel, the ring on top

of the outer flange (8) must face away the wheel (Fig 

D-2).

6. Press the spindle lock (2) and prevent the spindle (5)

from rotating until it locks in place.

7.  Use the pin spanner to tighten the outer flange (8).

Attaching the Side Handle (Fig A) (Only SG7100)

WARNING

: Before using the tool, check that the 

handle is tightened securely.

WARNING

: The side handle should always be 

used to maintain control of the tool at all times.

Screw the side handle (11) tightly into one of the 

holes on either side of the gear case.

Preparation before use

• Attach the safety guard and appropriate abrasive or

grinding wheels. Do not use abrasive or grinding wheels 

that are overly worn.

•  Make sure that the inner and outer flanges are attached 

correctly.

• Make sure that the abrasive or grinding wheels are

rotating in the direction of the arrows on the accessories 

and tool.

WARNING

!

• Make sure all materials to be grinded are secured in

position.

• Apply slight pressure to the tool. Do not apply side

pressure to the abrasive disc.

•  Avoid overloading. If the tool becomes hot, let it spin for

a few minutes with no load.

•  Be sure to hold the tool tightly with both hands (one hand 

on housing, the other on side handle). Start the tool and

bring the grinding wheel on the workpiece.

Summary of Contents for SG5100

Page 1: ...SG7100 SG6100 SG5100 English 4 13 20 27 BAHASA INDONESIA 36 47 TI NG VI T 58...

Page 2: ...2 ENGLISH Original Instructions n A B C 1 11 3 2 SG7100 SG5100 SG6100 8 7 6 4 5 3 10 12 9...

Page 3: ...tructions ENGLISH D E F 15o 30o A B D 1 D 2 5 4 8 6 8 6 5 4 The picture may differ slightly to actual unit Only SG7100 SG7100 SG7100 SG7100 SG7100 H nh nh c th h i kh c v i s n ph m th c t Ch d nh ri...

Page 4: ...power tool will increase the risk of electric shock d Do not abuse the cord Never use the cord for carrying pulling or unplugging the power tool Keep cord away from heat oil sharp edges or moving par...

Page 5: ...maximum speed marked on the power tool Accessories running faster than their rated speed can break and y apart e The outside diameter and the thickness of your accessory must be within the capacity r...

Page 6: ...er tool was not designed cannot be adequately guarded and are unsafe b The grinding surface of the centre depressed wheels must be mounted below the plane of the guard lip An improperly mounted wheel...

Page 7: ...ing particles Risk of burns due to accessories becoming hot during operation Risk of personal injury due to prolonged use Risk of dust from hazardous substances ELECTRICAL SAFETY Your tool is double i...

Page 8: ...1 Loosen the screw 12 on the guard collar 2 Turn the guard counterclockwise by 180 degrees 3 Pull up the guard 3 Attaching and removing grinding wheels Fig C and D WARNING Do not use damaged grinding...

Page 9: ...witch For continuous operation slide the switch toward the front of the tool and press the forward part of the switch inward To stop the tool while operating in continuous mode press the rear part of...

Page 10: ...ing on usage Tools used on heavy duty jobs and tools exposed to heat may require more frequent lubrication This lubrication should be attempted only by trained power tool repairperson s such as those...

Page 11: ...notice Standard equipment and accessories may vary by country Product specifications may differ by country Complete product range may not be available in all countries Contact your local STANLEY deale...

Page 12: ...Wheel diameter mm 100 100 100 Spindle diameter M10 M10 M10 Max disc thickness mm Grinding discs 6 6 6 Weight kg 1 7 1 7 1 7 SMALLANGLE GRINDER SG5100 SG6100 SG7100 B1 B1 XD KR A9 B1 XD KR A9 TW Volta...

Page 13: ...13 Original Instructions ENGLISH 4 STANLEY SG5100 SG6100 SG7100 1 a b c 2 a b c d e f RCD RCD 3 a b c d e f g h 4 a b c d e f g h...

Page 14: ...14 ENGLISH Original Instructions 5 5 a a b c d e f g 1 min h i j k l m n o p a b c d e a b c d e f...

Page 15: ...00 25 A 110 127 0 2 0 6 6 6 6 6 10 2 1 3 4 6 6 6 6 15 15 3 5 5 0 6 6 10 15 20 20 5 1 7 0 10 10 15 20 20 25 7 1 12 0 15 15 20 25 25 12 1 20 0 20 20 25 220 240 0 2 0 6 6 6 6 6 6 2 1 3 4 6 6 6 6 6 6 3 5...

Page 16: ...H Original Instructions 7 V A n Hz II W min min 2020 XX JN 1 1 1 1 1 SG7100 1 A 1 2 3 11 B 27 41 42 1 2 10 9 3 3 180 4 12 27 41 42 1 12 2 180 3 3 C D 1 2 4 5 3 6 4 7 4 4 h 5 5 8 D 1 8 D 2 6 2 5 7 8 A...

Page 17: ...17 Original Instructions ENGLISH 8 15 30 B A B A o F A F A 1 A 2 RCD RCD STANLEY 1 2 3 4 5...

Page 18: ...18 ENGLISH Original Instructions 9 F 30 10 15 STANLEY STANLEY 1 2 STANLEY STANLEY STANLEY STANLEY STANLEY STANLEY STANLEY STANLEY STANLEY STANLEY www 2helpU com STANLEY STANLEY STANLEY...

Page 19: ...VAC 220 240 220 240 220 240 220 220 240 220 240 220 110 Hz 50 60 50 60 50 60 50 50 60 50 60 50 60 B1 B1 XD KR A9 B1 XD KR A9 TW W 580 620 750 min 1 12 000 12 000 12 000 mm 100 100 100 M10 M10 M10 mm...

Page 20: ...20 ENGLISH Original Instructions 4 STANLEY SG5100 SG6100 SG7100 1 a b c 2 a b c d e f RCD RCD 3 a b c d e f g h 4 a b c d e f g...

Page 21: ...21 Original Instructions ENGLISH 5 h 5 a STANLEY STANLEY STANLEY STANLEY b a b c d e f g h i j k l m n o p a b c d e a b c d...

Page 22: ...e f 11 NIOSH 4 STANLEY STANLEY 1 5 mm2 A 0 75 6 1 00 10 1 50 15 2 50 20 4 00 25 m 7 5 15 25 30 45 60 A 110 127 0 2 0 6 6 6 6 6 10 2 1 3 4 6 6 6 6 15 15 3 5 5 0 6 6 10 15 20 20 5 1 7 0 10 10 15 20 20...

Page 23: ...5 5 0 6 6 6 6 10 15 5 1 7 0 10 10 10 10 15 15 7 1 12 0 15 15 15 15 20 20 12 1 20 0 20 20 20 20 25 V A n Hz II W min min 2020 XX JN 1 1 1 1 1 SG7100 1 A 1 2 3 11 B 27 41 42 1 2 10 9 3 3 180 4 12 27 41...

Page 24: ...24 ENGLISH Original Instructions 8 15 30 B A B A o F A F A 1 A 2 RCD RCD STANLEY 1...

Page 25: ...25 Original Instructions ENGLISH 9 2 3 4 5 F E 30 10 15 STANLEY 1 2 STANLEY STANLEY STANLEY STANLEY STANLEY STANLEY STANLEY STANLEY STANLEY...

Page 26: ...ANLEY 33 2 02 28341741 137 02 29994633 27 41 42 41 42 27 27 B1 B1 XD KR A9 B1 XD KR A9 TW V 220 240 220 220 240 220 240 220 110 AC Hz 50 60 50 60 50 60 50 50 60 50 60 50 60 W 580 620 750 min 1 12 000...

Page 27: ...27 Original Instructions ENGLISH 4 STANLEY SG5100 SG6100 SG7100 1 a b c 2 a b c d e f RCD RCD 3 a b c d e f g...

Page 28: ...28 ENGLISH Original Instructions 5 h 4 a b c d e f g h 5 a a b c d e f g 1 h i j k...

Page 29: ...29 Original Instructions ENGLISH 6 l m n o p a b c d e a b c d e f a b c d e...

Page 30: ...25 110 127 0 2 0 6 6 6 6 6 10 2 1 3 4 6 6 6 6 15 15 3 5 5 0 6 6 10 15 20 20 5 1 7 0 10 10 15 20 20 25 7 1 12 0 15 15 20 25 25 12 1 20 0 20 20 25 220 240 0 2 0 6 6 6 6 6 6 2 1 3 4 6 6 6 6 6 6 3 5 5 0...

Page 31: ...al Instructions ENGLISH 8 V A n Hz II W min min 2020 XX JN 1 1 1 1 1 SG7100 1 A 1 2 3 11 B 27 41 42 1 2 10 9 3 3 180 4 12 27 41 42 1 12 2 180 3 3 C D 1 2 4 5 3 4 6 7 4 4 h 5 5 8 D 1 8 D 2 6 2 5 7 8 A...

Page 32: ...32 ENGLISH Original Instructions 9 15 30 B A B A o F F A A GFI ground fault interrupter 1 A 2 RCD RCD STANLEY...

Page 33: ...33 Original Instructions ENGLISH 10 RCD 1 2 3 20 30 4 5 F E 30 10 15 2 STANLEY STANLEY STANLEY...

Page 34: ...34 ENGLISH Original Instructions 11 1 2 STANLEY STANLEY STANLEY STANLEY STANLEY STANLEY STANLEY STANLEY STANLEY STANLEY A S www 2helpU com STANLEY STANLEY 27 27 41 42 41 42 27...

Page 35: ...5100 SG6100 SG7100 B1 B1 XD KR A9 B1 XD KR A9 TW VAC 220 240 220 240 220 220 240 220 240 220 110 Hz 50 60 50 60 50 60 50 50 60 50 60 50 60 W 580 620 750 mnt 1 12 000 12 000 12 000 mm 100 100 100 M10 M...

Page 36: ...an yang memiliki potensi menyebabkan ledakan misalnya lingkungan yang terdapat cairan gas atau debu Alat ini menghasilkan percikan yang dapat menyulut debu atau gas c Jauhkan anak anak dan orang yang...

Page 37: ...kan bekerja lebih baik dan aman pada tingkat kelajuan yang telah dirancang untuk perkakas itu b Jangan gunakan perkakas listrik ini jika tombol tidak dapat menghidupkan dan mematikan perkakas Perkakas...

Page 38: ...kecepatan tanpa beban maksimum selama satu menit Aksesori yang rusak biasanya akan jebol melalui ujian ini h Kenakan peralatan pelindung diri Tergantung pada aplikasi gunakan topeng pelindung kacamat...

Page 39: ...i balik e Jangan memasang pisau ukir gergaji mesin atau pisau gergaji bergerigi Pisau pisau semacam ini seringkali mengakibatkan reaksi balik dan hilangnya kendali PETUNJUK KESELAMATAN TAMBAHAN UNTUK...

Page 40: ...saat Pakai klem penjepit atau cara lain untuk memperkuat dan menyokong benda yang sedang dikerjakan pada bidang yang stabil Memegang benda yang dikerjakan dengan tangan atau bagian tubuh membuatnya ti...

Page 41: ...a pengguna harus membaca buku petunjuk sebelum digunakan Kenakan kacamata pengaman atau pelindung Gunakan pelindung telinga Kenakanlah masker debu V Voltase Arus Langsung DC A Ampere n Kecepatan nomin...

Page 42: ...e poros keluaran 5 5 Ketika memasang roda gerinda cincin di atas pinggiran luar 8 harus menghadap ke arah roda Gbr D 1 Ketika memasang roda pemotong cincin di atas pinggiran luar 8 harus menghadap ke...

Page 43: ...sokan listrik pada alat misalnya aktivasi pemutusan arus bumi pemutusan sirkuit kabel tercabut tanpa sengaja atau listrik mati Jika sakelar penggeser terkunci menyala saat listrik terhubung alat akan...

Page 44: ...h untuk menerima semburan percikan api saat cakram menyentuh logam Jga sudut antara cakram dan permukaan benda yang dikerjakan Gbr E sekitar 30 saat menggerinda dan 10 15 saat mengampelas agar dapat m...

Page 45: ...n bergantung pada aksesori yang digunakan Aksesori STANLEY dirancang untuk standar kualitas tinggi serta didesain untuk meningkatkan performa peralatan listrik Dengan memakai aksesori STANLEY Anda aka...

Page 46: ...Baut klem berulir Baut klem berulir Flange pendukung Cakram penggerinda tengah tekan Roda pemotong abrasive DATA TEKNIS PENGGERINDASUDUT KECIL SG5100 SG6100 SG7100 B1 B1 XD KR A9 B1 XD KR A9 TW Voltas...

Page 47: ...47 Original Instructions ENGLISH 4 STANLEY SG5100 SG6100 SG7100 1 a b c 2 a b c d e f RCD RCD 3 a b...

Page 48: ...48 ENGLISH Original Instructions 5 c d e f g h 4 a b c d e f g h 5 a a b c d...

Page 49: ...49 Original Instructions ENGLISH 6 e f g h i j k l m n o p a...

Page 50: ...50 ENGLISH Original Instructions 7 b c d e a b c d e f a b c d e f...

Page 51: ...1 50 15 2 50 20 4 00 25 7 5 15 25 30 45 60 110 127 0 2 0 6 6 6 6 6 10 2 1 3 4 6 6 6 6 15 15 3 5 5 0 6 6 10 15 20 20 5 1 7 0 10 10 15 20 20 25 7 1 12 0 15 15 20 25 25 12 1 20 0 20 20 25 220 240 0 2 0...

Page 52: ...ginal Instructions 9 7 1 12 0 15 15 15 15 20 20 12 1 20 0 20 20 20 20 25 V A n Hz II W min min 2020 XX JN 1 1 1 1 1 SG7100 1 A 1 2 3 4 B Type 27 41 42 1 2 10 9 3 3 180 4 12 Type 27 41 42 1 12 2 180 3...

Page 53: ...53 Original Instructions ENGLISH 10 3 6 4 7 4 4 h 5 5 8 D 1 8 D 2 6 2 5 7 8 A SG7100 4 10 11 15 30 B A B A o F A G A...

Page 54: ...54 ENGLISH Original Instructions 11 1 A 2 RCD RCD STANLEY RCD 1 2 3 20 30 4 5 F E 30 10 15...

Page 55: ...55 Original Instructions ENGLISH 12 STANLEY STANLEY STANLEY STANLEY STANLEY STANLEY...

Page 56: ...56 ENGLISH Original Instructions STANLEY STANLEY STANLEY STANLEY STANLEY STANLEY STANLEY STANLEY www 2helpU com STANLEY STANLEY STANLEY STANLEY STANLEY TYPE 27 TYPE 41 42 TYPE 41 42 TYPE 27 Type 27...

Page 57: ...0 SG7100 B1 B1 XD KR A9 B1 XD KR A9 TW VAC 220 240 220 240 220 240 220 220 240 220 240 220 110 Hz 50 60 50 60 50 60 50 50 60 50 60 50 60 W 580 620 750 min 1 12 000 12 000 12 000 mm 100 100 100 M10 M10...

Page 58: ...c ph i s ch s v nh s ng Nh ng khu v c b a b n ho c thi u nh s ng d g y tai n n b Kh ng v n h nh d ng c i n c m tay trong c c m i tr ng d ch y n nh m i tr ng c ch t l ng kh ho c b i d ch y D ng c i n c...

Page 59: ...S d ng ng d ng c i n c m tay cho m c ch c a b n D ng c i n c m tay ph h p s gi p b n l m vi c hi u qu v an to n h n theo ng t c c thi t k b Kh ng s d ng d ng c i n c m tay n u c ng t c kh ng b t v t t...

Page 60: ...ng ng i xung quanh n n ng tr nh xa m t ph ng quay c a ph ki n v ch y d ng c i n c m tay t c kh ng t i t i a trong m t ph t C c ph ki n b h ng th ng s v th nh t ng m nh trong th i gian ch y th n y h e...

Page 61: ...ng t i khi x y ra hi n t ng gi t ng c L c gi t l i s y d ng c theo h ng ng c l i v i h ng chuy n ng c a a m i t i i m k t d c bi t ch khi l m vi c v i c c g c c nh s c v v Tr nh l m n y v k t ph ki n...

Page 62: ...d ng c c ph ki n kh ng ph h p c th d n n ch n th ng Lu n lu n s d ng tay c m b n s n Th t ch t tay c m an to n Tay c m b n s n lu n lu n c s d ng duy tr ki m so t c ng c m i l c S d ng k p ho c m t p...

Page 63: ...15 3 5 5 0 6 6 10 15 20 20 5 1 7 0 10 10 15 20 20 25 7 1 12 0 15 15 20 25 25 12 1 20 0 20 20 25 220 240 0 2 0 6 6 6 6 6 6 2 1 3 4 6 6 6 6 6 6 3 5 5 0 6 6 6 6 10 15 5 1 7 0 10 10 10 10 15 15 7 1 12 0 1...

Page 64: ...c tr n b n l m vi c tr c ch nh i m t v i ng i v n h nh 2 G n m t b ch b n trong 4 v o tr c ch nh 5 m t c ch ch nh x c 3 t b nh m i 6 v o m t b ch b n trong 4 Khi g n b nh m i v i t m c n ng l n m b o...

Page 65: ...nh n v o ph n tr c c a c ng t c r i nh ra m b o c ng t c tr t v tr t t nh m t b n tr n n u ngu n c p i n v o m y b gi n o n nh l c b t thi t b ng t m ch t ng g t c u dao v t nh r t ph ch c m ho c m t...

Page 66: ...t H y chu n b cho t nh hu ng c m t lu ng tia l a khi a ch m v o kim lo i Duy tr m t g c gi a a v b m t gia c ng H nh E kho ng 30 khi m i v 10 15 khi ch nh m ki m so t c ng c t t nh t lo i b v t li u v...

Page 67: ...guy c ch n th ng ch n n s d ng STANLEY ph ki n c khuy n ngh n n s d ng v i s n ph m n y Hi u su t c a c c c ng c i n ph thu c v o c c ph ki n c s d ng C c ph ki n c a STANLEY c thi t k theo ti u chu n...

Page 68: ...ndung Tipe 41 42 M t b ch l i M t b ch l i B nh xe c t m i m n ai c k p ren ai c k p ren a m i trung t m n n B nh xe c t m i m n Lo i b ph n b o v B ph n b o v Lo i 27 B ph n b o v Lo i 27 a m i trung...

Reviews: