© 2005, The STANLEY WORKS. ALL RIGHTS RESERVED.
203936 Rev. C
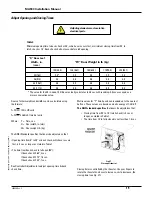
MA900 Installation Manual
23
Electric Lock Function
To program the timing and sequencing module for a lock delay
refer to the Time Delay Module Installation Instructions.
Safety Checks
The following safety checks must be made daily to assure proper
door operation:
• For safe operation, refer to the Daily Safety Check Sheet
for safety procedures. If you need a copy, call your local
Stanley distributor.
• Test the doors daily, and after any power outage. Verify
operation of any sensors and/or mats.
• Check the condition of the door, hinges, and safety decals,
as well as rails, finger guards, door pivots and mat mold-
ings (if applicable).
• If there are any problems, DISCONTINUE DOOR
OPERATION IMMEDIATELY! Notify your local authorized
Stanley distributor for repair.
Safety Decals
The installation is not complete until the safety
decals are in place.
This section provides procedures for installing the MA900 safety
decals. The decals will help pedestrians to use the doors safely.
Decals Included
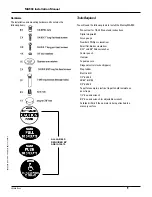
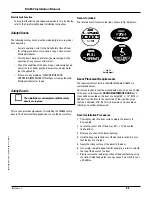
The safety decal kit contains the items shown in Fig. 35, below:
Fig. 35
Safety decals
Decal Placement Requirements
The requirements set forth in the ANSI Standard A156.19 are
summarized below.
All low energy doors shall be marked with signs, one on each side
of the door, with the words
CAUTION AUTOMATIC DOOR.
Each
sign shall be mounted on the door at a height 50” +/- 12” (1270 +/-
305 mm) from the floor to the center line of the sign. Each sign
shall be a minimum of 6” (152 mm) in diameter, and have black
lettering on a yellow background.
Decal Installation Procedures
1. Thoroughly clean the door surface where the decal is to
be mounted.
2. Locate the center line of the decal, 50” +/- 12” above the
finished floor.
3. Remove a section of the decal backing.
4. Hold the decal up to the door at the desired location. Be sure
that the decal is straight.
5. Apply the sticky surface of the decal to the door.
6. Use a rigid, straight-edged tool (for example, a ruler) to smooth
the top of the decal on the door.
7. Slowly remove the remaining section of the decal backing, using
the rigid, straight-edged tool as a squeegee. This will force out
air bubbles.
★
Summary of Contents for MA900n
Page 3: ...MA900 Installation and Owner s Manual 203936 Rev C ...
Page 4: ... 2005 The STANLEY WORKS ALL RIGHTS RESERVED 203936 Rev C MA900 Installation Manual 2 ...
Page 29: ... 2005 The STANLEY WORKS ALL RIGHTS RESERVED 203936 Rev C MA900 Installation Manual 27 Notes ...
Page 30: ... 2005 The STANLEY WORKS ALL RIGHTS RESERVED 203936 Rev C MA900 Installation Manual ...

