background image

Page 64

HX870E

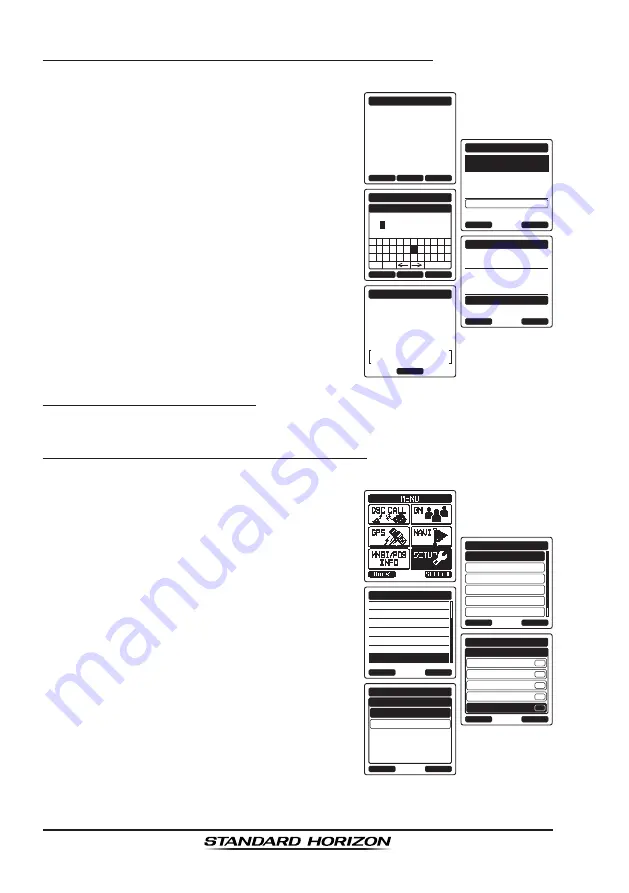
9.8.4  Saving the Reported Position as a Waypoint

The 

HX870E

 can save a position report call in the radio’s memory as a waypoint.

1.  After the position report call has been 

received, press the 

[SAVE]

 soft key.

CATEG:

 SAFETY

RX POS REPORT

Horizon

987654321

POS:

 24

°

25.975

N

 118

°

59.456

W

POS TM:

 12:

SINCE:

 00:05

56

AM LOC

SAVE

QUIT

INFO

NAME:

001WPT----------

SELECT

WAYPOINT DIR.

BACK

SAVE

POSITION:

 24

°

25.975

N
W

 118

°

59.456

BACK

SELECT

FINISH

WAYPOINT DIR.

NAME

Z

Y 1 2

a&

[

3 4 5 6 7 8 9 0

N

M O P Q R

S

T U V W X

B

A C D E F G H I J K L

Delete

-

--------------

S

NAME:

Horizon----------

ENTER

WAYPOINT DIR.

BACK

SAVE

POSITION:

 24

°

25.975

N

 118

°

59.456

W

RX POS REPORT

Horizon

987654321

OK

CATEG:

 SAFETY

POS:

 24

°

25.975

N

 118

°

59.456

W

POS TM:

 12:56

AM LOC

Saved

2.  If you want to change the name of the 

waypoint, press the 

CH▼

/

CH▲

 key to select 

NAME

”, then press the 

[SELECT]

 soft key. 

3.  Enter the name of the waypoint you want to 

reference in the directory. For details, refer to 

9.5.1  Setting up the Individual / Position 

Call Directory

”. 

4.  Press the 

CH▼

/

CH▲

 key to select “

SAVE

”, 

then press the 

[ENTER]

 soft key to save the 

waypoint into memory.

5.  Press the 

[OK]

 soft key to return to the posi-

tion report display.

Navigating to a Saved Waypoint

Refer to section “

10.1  WAYPOINT OPERATION

” for details.

9.8.5  Setting up a Position Report Ringer

The 

HX870E

 has the capability to turn off the position report ringer.

1.  Press the 

MENU

 key to display “

MENU

”.

DSC SETUP

GM SETUP

BACK

SETUP

WAYPOINT SETUP

CH SETUP

GPS SETUP

ATIS SETUP

SELECT

GROUP DIR.

AUTO POS POLLING

AUTO POS TIME

CH SWITCH TIMER

NO ACT TIMER

POS FIX WAIT

DSC BEEP

DSC SETUP

BACK

SELECT

INDIVIDUAL

BACK

DSC SETUP

GROUP

ALL SHIPS

POS REQUEST

POS REPORT

SELECT

DSC BEEP

ON

ON

ON

ON

ON

OFF

BACK

DSC BEEP

ON

ENTER

POS REPORT

2.  Press the 

CH▼

/

CH▲

/

/

 key to select 

SETUP

”, then press the 

[SELECT]

 soft key.

3.  Select “

DSC SETUP

” menu with the 

CH▼

/

CH▲

 key.

4.  Press the 

[SELECT]

 soft key, then select 

DSC BEEP

” with the 

CH▼

/

CH▲

 key.

5.  Press the 

[SELECT]

 soft key, then select 

POS REPORT

” with the 

CH▼

/

CH▲

 key.

6.  Press the 

[SELECT]

 soft key, then select 

OFF

” with the 

CH▼

/

CH▲

 key.

7.  Press the 

[SELECT]

 soft key to store the 

selected setting.

8.  Press the 

CLR

 key to return to radio opera-

tion.

To re-enable the ringer tone, repeat the above procedure, pressing the 

CH▼

/

CH▲

 key to select “

ON

” in the step 6 above.

Summary of Contents for HX870E

Page 1: ...HX870E 6 Watt VHF FM Floating Class D DSC Marine Transceiver with GPS Owner s Manual...

Page 2: ...ion Call Directory 43 9 5 2 Setting up the Individual Call Reply 44 9 5 3 Enabling the Individual CallAcknowledgment 45 9 5 4 Transmitting an Individual Call 45 9 5 5 Receiving an Individual Call 47 9...

Page 3: ...CTORY 106 14 2 INDIVIDUAL REPLY 106 14 3 INDIVIDUALACKNOWLEDGMENT 106 14 4 INDIVIDUAL RINGER 106 14 5 GROUP DIRECTORY 106 14 6 AUTO POS POLLING 107 14 7 AUTO POS INTERVAL 107 14 8 CHANNEL SWITCH TIMER...

Page 4: ...e the on screen menus to right left CLR Press to cancel a function or menu selection MENU Press to access MENU DISTRESS Activates a DSC distress call Lift the red cover press the DISTRESS once then pr...

Page 5: ...understand the capabilities of the HX870E Technical support information and assistance can be obtained in Europe from our Website www standardhorizon co uk RADIO CARE Before using the radio 1 It is re...

Page 6: ...anadian regulations Emergency channel 16 can be immediately selected from any channel by pressing the red 16 S key With the internal high performance 66 Channel GPS receiver WAAS and QZSS satellites c...

Page 7: ...OX Headset SSM 55A Earpiece Microphone CN 3 Radio to Ship s Antenna Adapter SBR 13 LI 7 4V 1800mAh Li ion Battery Pack SBT 13 Alkaline Battery Case AAA x 5 pcs SBH 12 Charger Cradle E DC 19A DC Cable...

Page 8: ...r VHF Marine channel assignments refer to page 121 section 18 4 2 DISTRESS AND HAILING CHANNEL 16 Channel 16 is known as the Hail and Distress Channel An emergency may be defined as a threat to life o...

Page 9: ...ropriate channel for communications after initial contact For example Channels 68 and 69 of the U S VHF Charts are some of the channels available to non commercial recreational boaters Monitor your de...

Page 10: ...nd then link your radio transmission to the telephone lines The marine telephone company managing the VHF channel you are using may charge a link up fee in addition to the cost of the call 4 5 BRIDGE...

Page 11: ...on battery providing high capacity in a compact package SBR 13LI Rechargeable Battery Pack Capacity 1800 mAh Nominal Voltage 7 4 V Temperature Range Minimum Maximum C F C F Charge 5 41 35 95 Discharge...

Page 12: ...her charger may cause permanent damage to the battery Follow charging instructions provided with the chargers Keep the battery contacts clean Battery Storage Store the batteries in a cool place to max...

Page 13: ...ery pack turn the transceiver off open the battery cover then push and lift up the bottom end of the battery pack NOTE The battery lock must be set to LOCK position to ensure water integrity and keep...

Page 14: ...BH 12 the antenna should be at the left side when viewing the charger from the front If the HX870E is inserted correct ly the HX870E s LCD display will show the battery charging icon A fully discharge...

Page 15: ...the SBT 13 Put three batteries into the compartment on the front side and two on the back side Front Back 3 Slide the battery cover lock switch to the UNLOCK position then press PUSH to open the batt...

Page 16: ...ks in place with a Click 2 To remove pull the Clip 22 tab away from the battery pack to unlock the Clip 22 then slide the Clip 22 upward to remove it 5 3 ATTACHING AN ANTENNA Insert the CAT460 antenna...

Page 17: ...sceiver to turn it on GPS INFO COMPASS ENTER GPS GPS STATUS BACK HI INT LAT LON 23 56 890S 123 56 890W LOC 09 56AM TIME STATUS SEARCH 65A BUSY 2 Press the MENU key to display MENU then select GPS with...

Page 18: ...WAYPOINT SETUP CH SETUP GPS SETUP ATIS SETUP SELECT GPS ON OFF POWER SAVE DIRECTION LOCATION FORMAT TIME OFFSET TIME AREA TIME FORMAT GPS SETUP BACK SELECT ON 09 00 BACK GPS SETUP 08 30 08 00 07 30 07...

Page 19: ...ENTER soft key to store the selected setting 7 Press the CLR key to return to radio opera tion 5 7 CHANGING THE TIME FORMAT This menu selection allows the radio to setup to show time in 12 hour or 24...

Page 20: ...efer to chapter 8 of this manual NOTE When transmitting position your mouth about 1 2 2 5 cm away from the small mic hole Speak slowly and clearly into the micro phone ANT jack Top side The supplied C...

Page 21: ...s key is used to change the operating channel and squelch thresh old level Press the key momentarily the channel or level increases one step Holding the key the channel or level increases continuously...

Page 22: ...ht side Use the USB mini type B jack to output the NMEA data configure the transceiver settings and download the GPS logger data DISTRESS key Right side Used to send a DSC Distress Call To send the di...

Page 23: ...pears This state is known as the squelch threshold 4 Press the CH CH key to select the desired channel Refer to the channel chart on Pages 121 to 122 for avail able channels 5 When a message is receiv...

Page 24: ...when pressed The actual TX Power Level is always shown in the icon on the top line of the display NOTE When the SBT 13 Alkaline Battery Case is used only the low power 1W can be set Depending on the...

Page 25: ...select SETUP with the CH CH key DSC SETUP GM SETUP BACK SETUP WAYPOINT SETUP CH SETUP GPS SETUP ATIS SETUP SELECT CH GROUP SCAN MEMORY SCAN TYPE SCAN RESUME MULTI WATCH SUB CH PRIORITY CH CH SETUP BA...

Page 26: ...WATCH SUB CH PRIORITY CH CH SETUP BACK SELECT DUAL BACK CH SETUP TRIPLE ENTER MULTI WATCH 2 Press the SELECT soft key then press the CH CH key to select CH SETUP 3 Press the SELECT soft key then sele...

Page 27: ...mission stops 7 8 1 Selecting the Scan Type 1 Press the MENU key to display MENU then select SETUP with the CH CH key DSC SETUP GM SETUP BACK SETUP WAYPOINT SETUP CH SETUP GPS SETUP ATIS SETUP SELECT...

Page 28: ...hen you have completed your selection press the CLR key to return to radio operation To check channels to be scanned press the CH CH key repeatedly The MEM icon will appear when the memory channel is...

Page 29: ...ACCESS 10 preset channels can be programmed for instant access Press the key repeatedly then press the PRESET soft key Pressing the PRESET key activates the user assigned channel bank If the PRESET so...

Page 30: ...ss the PRESET soft key to return to the last selected channel The P SET icon will disappear from the display 7 9 3 Deletion 1 Press the key repeatedly then press the PRESET soft key to recall the pres...

Page 31: ...1 2 Editing a Waypoint 3 To transmit a DSC distress message lift the red spring loaded DISTRESS cover on the right side of the transceiver then press and hold the DISTRESS key see section 9 3 1 Trans...

Page 32: ...ived DSC calls DSC LOG Transmits a test call DSC TEST Test the transceiver DSC LOOP BACK GM The GM Group Monitor feature performs group polling and position display of the group members at the same ti...

Page 33: ...INT COMP C UP BUSY 65A 2 Press the SELECT soft key then select COMPASS with the CH CH key 3 Press the ENTER soft key to display the compass display 4 Press the CLR key to return to radio opera tion No...

Page 34: ...ower save operation of the GPS unit is disabled while the logger is activated To utilize the records connect the HX870E to a PC and download the log data from the radio by using the PC Programming Sof...

Page 35: ...ine and urgent maritime safety information broadcasts This system allows mariners to instantly send a distress call with GPS position when connected to the transceiver to the Coast Guard and other ves...

Page 36: ...o select MMSI POS INFO then press the SELECT soft key To cancel press the BACK soft key 3 Press the MMSI soft key 4 Press the CH CH key to select the first number of your MMSI then press the SELECT so...

Page 37: ...S 118 59 456W UTC POS TM 12 56 DISTRESS UNDESIGNATED Transmitting POS 24 25 975S 118 59 456W UTC POS TM 12 56 PAUSE CANCEL DISTRESS UNDESIGNATED Waiting for ACK POS 24 25 975S 118 59 456W UTC POS TM 1...

Page 38: ...soft key 6 Press and hold the DISTRESS key until a distress alert is transmitted Transmitting a DSC Distress Alert by Manually Inputting Location and Time In case the HX870E fails to get a GPS positi...

Page 39: ...POS TM 12 56 TX IN 00 15 CANCEL DISTRESS UNDESIGNATED Retransmission is now pausing TX IN 00 15 RESUME 2 To suspend re transmitting the DSC call press the PAUSE soft key 3 To resume counting down to t...

Page 40: ...t name BACK QUIT TO WPT RX DISTRESS ACK DIST 366901235 DIST INFO Horizon DST 10 00 NATURE UNDESIGNEATED 24 25 975N 118 59 456E UTC NM POS TM POS 12 56 NAME 001WPT POSITION SELECT WAYPOINT SAVE SAVE GO...

Page 41: ...LL SHIPS POS REQUEST POS REPORT DIST ALERT MSG SELECT SAFETY BACK ALL SHIPS CALL URGENCY SELECT CATEGORY CH 16 BACK ALL SHIPS CALL CH 17 CH 67 CH 69 CH 72 SELECT MANUAL INTERSHIP CH ALL SHIPS CALL Do...

Page 42: ...this key to accept the DSC all ships call and to switch to requested channel Note If a key is not pressed for 15 seconds or longer the radio will automati cally change to the requested channel the def...

Page 43: ...SETUP BACK SELECT ADD BACK DSC SETUP EDIT DELETE SELECT INDIVIDUAL DIR NAME MMSI SELECT INDIVIDUAL DIR BACK BACK SELECT FINISH INDIVIDUAL DIR NAME Z Y 1 2 a 3 4 5 6 7 8 9 0 N M O P Q R S T U V W X B A...

Page 44: ...nu item sets up the radio to automatically default setting or manually respond to a DSC individual call requesting you to switch to a working channel for voice communications When Manual is selected t...

Page 45: ...key 4 Press the SELECT soft key then select INDIVIDUAL ACK with the CH CH key 5 Press the SELECT soft key 6 Press the CH CH key to select ABLE or UNABLE 7 Press the ENTER soft key to store the selecte...

Page 46: ...edgment is received the established channel is auto matically changed to the channel which is selected on step 6 above and a ringing tone sounds 9 Press the QUIT soft key to listen to the channel to m...

Page 47: ...e and a ringing tone sounds 11 Press the QUIT soft key to listen to the channel to make sure it is not busy then press the PTT button and talk into the microphone to the other vessel 9 5 5 Receiving a...

Page 48: ...utomatic channel switching and revert to the last selected working channel Note If a key is not pressed for 30 seconds or longer the radio will auto matically change to radio operation 4 After accepti...

Page 49: ...store the selected setting 8 Press the CLR key to return to radio opera tion The HX870E has the capability to turn off the individual call ringer 1 Press the MENU key to display MENU DSC SETUP GM SET...

Page 50: ...denote the country where the ship s MMSI is registered The last 6 digits are specific to the ships ID Ship MMSI Example If your MMSI is 366123456 366 is MID which denote the country and 123456 is your...

Page 51: ...right 9 Repeat steps 7 and 8 until the name is complete The name can consist of up to eleven characters if you do not use all eleven characters select to move to the next space This method can also b...

Page 52: ...OUP CALL Transmitted CATEG ROUTINE Horizon Group 087654321 CH 06 SINCE 00 05 QUIT 2 Press the CH CH key to select GROUP To cancel press the BACK soft key 3 Press the SELECT soft key then press the CH...

Page 53: ...elect GROUP To cancel press the BACK soft key 3 Press the SELECT soft key 4 Select NEW ID with the CH CH key then press the SELECT soft key 5 Press the CH CH key to select the first number of the MMSI...

Page 54: ...g to the requested channel QUIT Press this key to quit the automatic channel switch ing and revert to the last selected working channel RX GROUP ACCEPT QUIT PAUSE Yaesu 036690123 Horizon CATEG ROUTINE...

Page 55: ...POS REPORT SELECT DSC BEEP ON ON ON ON ON OFF BACK DSC BEEP ON ENTER GROUP 2 Press the CH CH key to select SETUP then press the SELECT soft key 3 Select DSC SETUP menu with the CH CH key 4 Press the...

Page 56: ...t key INDIVIDUAL GROUP BACK DSC CALL ALL SHIPS POS REQUEST POS REPORT DIST ALERT MSG SELECT HISTORY MEMORY NEW ID POS REQUEST BACK SELECT KAREN BOB 366901254 Horizon 1 Standard Horizon 2 USCG POS REQU...

Page 57: ...POS REQUEST 3 Press the SELECT soft key 4 Press the CH CH key to select NEW ID then press the SELECT soft key 5 Press the CH CH key to select the first number of the MMSI nine digits which you want to...

Page 58: ...the QUIT soft key Manually reply 1 When a position request call is received from another vessel a ringing sound will be produced and the display will be as shown in the illustration at the right RX P...

Page 59: ...set the position and time If a mistake was made press the CH CH key to select or press the SELECT soft key until the wrong char acter is selected then perform step 4 6 When finished programming the p...

Page 60: ...ff the position request ringer 1 Press the MENU key to display MENU DSC SETUP GM SETUP BACK SETUP WAYPOINT SETUP CH SETUP GPS SETUP ATIS SETUP SELECT GROUP DIR AUTO POS POLLING AUTO POS TIME CH SWITCH...

Page 61: ...REPORT DIST ALERT MSG SELECT HISTORY MEMORY NEW ID POS REPORT BACK SELECT KAREN BOB 366901254 Horizon 1 Standard Horizon 2 USCG POS REPORT BACK SELECT HISTORY POS REPORT Do you want to transmit a Cal...

Page 62: ...SELECT soft key 5 Press the CH CH key to select the first number of the MMSI which you want to contact then press the SELECT soft key to step to the next number 6 Repeat step 5 to set the MMSI number...

Page 63: ...ating to the position of a position report call may be enabled by the procedure below 1 After the position report call has been received press the INFO soft key 2 Press the TO WPT soft key RX POS REPO...

Page 64: ...s the ENTER soft key to save the waypoint into memory 5 Press the OK soft key to return to the posi tion report display Navigating to a Saved Waypoint Refer to section 10 1 WAYPOINT OPERATION for deta...

Page 65: ...ROUTINE Horizon 1 987654321 YES NO POLLING CALL Waiting for ACK CATEG ROUTINE Horizon 1 987654321 SINCE 00 05 RESEND QUIT 2 Press the CH CH key to select POLL ING then press the SELECT soft key 3 Pre...

Page 66: ...key to select NEW ID and press the SELECT soft key 4 Press the CH CH key to select the first number in the MMSI and press the SELECT soft key 5 Repeat step 4 until all the digits of the MMSI are shown...

Page 67: ...with the CH CH key 5 Press the SELECT soft key 6 Press the CH CH key to select the desired operation AUTO POS REQUEST and AUTO POS REPORT and press the ENTER soft key 7 Press the CLR key to return to...

Page 68: ...G BACK SELECT DELETE SELECTED ID KAREN BOB 366901254 Horizon 1 Standard Horizon 2 USCG INDIVIDUAL DIR BACK ENTER MEMORY KAREN AUTO POS POLLING BACK SELECT DELETE SELECTED ID 2 Press the CH CH key to s...

Page 69: ...STOP START BACK AUTO POS POLLING STOP SELECT ACTIVATION 2 Press the CH CH key to select AUTO POS POLLING then press the SELECT soft key 3 Press the CH CH key to select the ACTIVATION then press the S...

Page 70: ...NU key to display MENU select DSC CALL with the CH CH key then press the SELECT soft key DIST ALERT MSG POLLING BACK DSC CALL AUTO POS POLLING DSC LOG DSC TEST DSC LOOP BACK SELECT HISTORY MEMORY NEW...

Page 71: ...y to select the first digit in the MMSI and press the SELECT soft key 5 Repeat step 4 until all the numbers of the MMSI are shown on the display 6 Press the FINISH soft key to show the test call page...

Page 72: ...all 1 Press the MENU key to display MENU then select DSC CALL with the CH CH key DIST ALERT MSG POLLING BACK DSC CALL AUTO POS POLLING DSC LOG DSC TEST DSC LOOP BACK SELECT TRANSMITTED RX DISTRESS RX...

Page 73: ...eview details for the selected station 6 Press the INFO soft key to display more information or press the BACK soft key to go back to the received DSC distress call list 9 12 3 Reviewing Other Logged...

Page 74: ...T soft key then press the CH CH key to select DSC LOG 3 Press the SELECT soft key then press the CH CH key to select LOG DELETE menu 4 Press the SELECT soft key then press the CH CH key to select the...

Page 75: ...ELECT DSC LOOP BACK TEST Do you want to start a test YES NO DSC LOOP BACK TEST Testing YES NO DSC LOOP BACK TEST Passed YES NO 2 Press the SELECT soft key then press the CH CH key to select DSC LOOP B...

Page 76: ...6901254 Horizon 1 Standard Horizon 2 USCG WAYPOINT BACK SELECT HISTORY SOGkph 36 0 DSTkm 35 2 BRG T WPT KAREN HI INT WPT N UP 20nm BUSY 300 25 DW 16 2 Select NAVI with the CH CH key then press the SEL...

Page 77: ...lect NAME with the CH CH key press the SELECT soft key then enter the name For details refer to 9 5 1 Setting up the Individual Position Call Directory 6 Select POSITION with the CH CH key then press...

Page 78: ...with the CH CH key then press the SELECT soft key 3 PresstheCH CH keytoselect WAYPOINT SETUP then press the SELECT soft key 4 Select MARK POSITION with the CH CH key then press the SELECT soft key 5...

Page 79: ...y 3 PresstheCH CH keytoselect WAYPOINT SETUP then press the SELECT soft key 4 Select WAYPOINT DIR with the CH CH key then press the SELECT soft key 5 Select ADD with the CH CH key then press the SELEC...

Page 80: ...key 3 PresstheCH CH keytoselect WAYPOINT SETUP then press the SELECT soft key 4 Press the CH CH key to select WAYPOINT DIR then press the SELECT soft key 5 Select EDIT with the CH CH key then press t...

Page 81: ...then press the SELECT soft key 3 PresstheCH CH keytoselect WAYPOINT SETUP then press the SELECT soft key 4 Press the CH CH key to select WAYPOINT DIR then press the SELECT soft key 5 Select DELETE wi...

Page 82: ...key to store the selected setting 7 Press the CLR key to return to radio operation 10 1 4 Selecting the Arrival Range This menu item allows setting of the range within which the HX870E determines to...

Page 83: ...SELECT MARK POSITION WAYPOINT DIR DISPLAY RANGE ROUTE DIR ARRIVAL RANGE ROUTING OPERATION WAYPOINT SETUP BACK SELECT ADD WAYPOINT SETUP EDIT DELETE ROUTE DIR BACK SELECT NAME 001RUT SELECT ROUTE DIR...

Page 84: ...to radio operation Editing a Route This function allows a previously entered route to be edited 1 Press the MENU key to display MENU DSC SETUP GM SETUP BACK SETUP WAYPOINT SETUP CH SETUP GPS SETUP AT...

Page 85: ...the route to be deleted select OK with the CH CH key then press the ENTER soft key 8 Press the CLR key to return to radio operation 10 2 2 Starting and Stopping Route Navigation 1 Press the MENU key...

Page 86: ...This selection allows you to start navigation to the next target automatically or manually when your vessel has arrived at a target point 1 Press the MENU key to display MENU DSC SETUP GM SETUP BACK...

Page 87: ...ividual Position Call Directory for details 1 Press the MENU key to display MENU DSC SETUP GM SETUP BACK SETUP WAYPOINT SETUP CH SETUP GPS SETUP ATIS SETUP SELECT GM GROUP DIR INTERVAL GM TX GM SETUP...

Page 88: ...soft key to return to the NAME and GM ID screen 14 To store the data select SAVE with the CH CH key then press the ENTER soft key 15 To enter another group directories repeat steps 5 through 14 16 Pr...

Page 89: ...then press the ENTER soft key OFF Disables the transmission during GM operation ON GM Enables the transmission during the GM target display ON ALL Enables the transmission during the GM operation 6 P...

Page 90: ...member will be displayed at the bottom of the screen 4 Press key then press the CALL soft key to transmit a DSC Individual call to the selected member 11 2 2 Starting Navigation to a Group Member 1 Pr...

Page 91: ...radio operation 12 2 LAMP This menu selection is used to setup the illumination time of the display and keypad 1 Press the MENU key to display MENU GM SETUP WAYPOINT SETUP BACK SETUP CH SETUP GPS SET...

Page 92: ...lt 6 Press the ENTER soft key to store the selected level 7 Press the CLR key to return to radio operation 12 4 KEY BEEP This selection is used to select the beep tone volume level when a key is press...

Page 93: ...n 12 6 STROBE LED This selection is used to switch and set the function of the strobe LED 12 6 1 Emergency LED 1 Press the MENU key to display MENU GM SETUP WAYPOINT SETUP BACK SETUP CH SETUP GPS SETU...

Page 94: ...H CH key then press the SELECT soft key 3 Select CONFIGURATION with the CH CH key then press the SELECT soft key 4 Select STROBE LED with the CH CH key then press the SELECT soft key 5 Press the CH CH...

Page 95: ...ith the CH CH key then press the SELECT soft key 6 Press the CH CH key to select the key number to be programmed and press the SELECT soft key 7 Press the CH CH key to select a new function to be assi...

Page 96: ...key to return to radio opera tion 12 8 RESET You may initialize the memories and settings of the setup categories indepen dently or return the transceiver to the original factory setting 1 Press the...

Page 97: ...lights 3 sec CONTRAST Adjusts the contrast of the LCD 10 KEY BEEP Adjusts the volume of beep tone when a key is pressed 3 BATTERY SAVE Selects the battery save mode 50 STROBE LED Sets the operation of...

Page 98: ...E for details 13 2 SCAN MEMORY To be able to scan channels the radio must be programmed This section allows channels to be stored in scan memory Refer to section 7 8 2 Programming Scan Memory for deta...

Page 99: ...R key to return to radio operation 13 5 WATCH TYPE This selection is used to select the watch type between Dual Watch and Triple Watch The default setting is Dual Watch Refer to section 7 7 MULTI WATC...

Page 100: ...CH CH NAME NOISE CANCEL VOX VOX LEVEL VOX DELAY CH SETUP BACK SELECT CH 09 BACK CH SETUP CH 08 CH 07A CH 06 CH 05A ENTER SUB CH 2 Select SETUP with the CH CH key then press the SELECT soft key 3 Selec...

Page 101: ...n press the SELECT soft key 4 Select CH NAME with the CH CH key then press the SELECT soft key 5 Press the CH CH key to select the chan nel to be named then press the SELECT soft key 6 Press the CH CH...

Page 102: ...the ENTER soft key 7 Select RX MODE with the CH CH key then press the SELECT soft key 8 Select the noise level from Level 1 through Level 4 or OFF with the CH CH key then press the ENTER soft key 9 P...

Page 103: ...ey to return to radio operation NOTE During setup the VOX level can be seen directly by speaking into the microphone while the VOX operation is enabled 13 10 3 Setting the VOX Delay Time 1 Press the M...

Page 104: ...X VOX LEVEL VOX DELAY AF PITCH CH SETUP BACK SELECT NORMAL BACK CH SETUP HIGH LOW CUT HIGH LOW BOOST LOW BOOST HIGH BOOST ENTER AF PITCH 2 Select SETUP with the CH CH key then press the SELECT soft ke...

Page 105: ...scanning 2 sec MULTI WATCH Selects Dual Watch or Triple Watch DUAL PRIORITY CH Selects a priority channel CH16 SUB CH Selects a Sub Channel CH09 CH NAME Edit the name of memory channels NOISE CANCEL T...

Page 106: ...vessel is shown allowing you to see who is calling This function is similar to caller id on a cellular phone Refer to section 9 5 2 Setting up the Individual Call Reply for details 14 3 INDIVIDUAL ACK...

Page 107: ...llows the automatic switch time to be changed The default selection is 30 seconds 1 Press the MENU key to display MENU DSC SETUP GM SETUP BACK SETUP WAYPOINT SETUP CH SETUP GPS SETUP ATIS SETUP SELECT...

Page 108: ...s the ENTER soft key 6 Press the CLR key to return to radio opera tion 14 10 WAIT TIME FOR POSITION FIX This menu allows you to select the maximum wait time till obtaining a position information when...

Page 109: ...l call or a position request is received 2 min GROUP DIR Enter or edit addresses used for group call AUTO POS POLLING Selects the AUTO POS POLLING opera tion type AUTO POS REQUEST AUTO POS TIME Select...

Page 110: ...P with the CH CH key then press the SELECT soft key 4 Select GPS ON OFF with the CH CH key then press the SELECT soft key 5 Press the CH CH key to select OFF ON or INT and PWR OFF 6 Press the ENTER so...

Page 111: ...selects the compass direction to be shown on the HX870E display The default setting is course up 1 Press the MENU key to display MENU DSC SETUP GM SETUP BACK SETUP WAYPOINT SETUP CH SETUP GPS SETUP A...

Page 112: ...en press the SELECT soft key 5 Press the CH CH key to select the desired coordinate system The location format can be selected from ddd mm mmm ddd mm mm and ddd mm ss 6 Press the ENTER soft key to sav...

Page 113: ...y to return to radio operation 15 9 PINNING This selection is used to enable or disable position updates when the vessel is not underway The default setting is OFF 1 Press the MENU key to display MENU...

Page 114: ...ew setting 7 Press the CLR key to return to radio opera tion 15 11 OUTPUT SENTENCES This selection is used to setup the NMEA output sentences of the HX870E By default all the NMEA sentences are turned...

Page 115: ...Note Log time for each logger interval setting 5 sec Aprox 8 hours 15 sec Aprox 25 hours 30 sec Aprox 50 hours 1 min Aprox 100 hours 5 min Aprox 500 hours 6 Press the CLR key to return to radio operat...

Page 116: ...m TIME AREA 00 00 TIME AREA Selects the time location to be displayed from UTC or local UTC TIME FORMAT Selects the time format to be displayed 12 hour or 24 hour fixed to 24H when UTC is selected in...

Page 117: ...lete 3 2 Select SETUP with the CH CH key then press the SELECT soft key 3 Select ATIS SETUP with the CH CH key then press the SELECT soft key 4 Select ATIS CODE with the CH CH key then press the SELEC...

Page 118: ...t key 4 Select ATIS GROUP with the CH CH key then press the SELECT soft key 5 Press the CH CH key to select the chan nel group International Canadian or USA you wish to change the setting and press th...

Page 119: ...r facility 17 1 REPLACEMENT PARTS Commonly requested parts and their part numbers are listed below SBH 12 Charger Cradle CB6458001 CAT460 Antenna AY139X001 Belt Clip CLIP 22 CP9672002 MIC SP Plastic C...

Page 120: ...d Program the MMSI number Refer to section 9 2 2 Programming the MMSI Cannot fix the GPS satel lites Internal GPS receiver is off Internal GPS receiver is on Refer to 15 1 GPS ON OFF Poor location for...

Page 121: ...UPLEX INTL 22 157 100 161 700 DUPLEX INTL 23 157 150 161 750 DUPLEX INTL 24 157 200 161 800 DUPLEX TELEPHONE 25 157 250 161 850 DUPLEX TELEPHONE 26 157 300 161 900 DUPLEX TELEPHONE 27 157 350 161 950...

Page 122: ...25 DUPLEX TELEPHONE 85 157 275 161 875 DUPLEX TELEPHONE 86 157 325 161 925 DUPLEX TELEPHONE 87 157 375 157 375 SIMPLEX PORT OPR 88 157 425 157 425 SIMPLEX PORT OPR M1 157 850 157 850 SIMPLEX M2 161 42...

Page 123: ...he Product or part s therein which upon examination by STANDARD HORIZON appear to be defective or not up to factory specifications STANDARD HORIZON may at its option repair or replace parts or subasse...

Page 124: ...ed above STANDARD HORIZON shall not be liable under any circumstances for consequential damag es resulting from the use and operation of this Product or from the breach of this LIMITED WARRANTY any im...

Page 125: ...arinetech yaesu com You can also download the log data from the radio by using the PC Program ming Software which may be downloaded from the Standard Horizon website The PC Programming Software is com...

Page 126: ...Negative Ground Battery Terminal Current Consumption 330 mA Receive 100 mA Standby GPS On 60 mA Standby GPS Off 1 6 A 1 0 A 0 7 A TX 6W 2W 1W Operating Temperature 15 C to 55 C DSC Individual Director...

Page 127: ...hannel Selectivity 70 dB typical Intermodulation 70 dB typical Hum Noise Ratio 40 dB Selectivity 12 kHz 25 kHz 6 dB 60 dB AF Output Internal SP 700 mW 16 for 10 THD 7 4 V 21 4 GPS Receiver Channels 66...

Page 128: ...Page 128 HX870E Note...

Page 129: ...Page 129 HX870E Note...

Page 130: ...tact your local equipment supplier repre sentative or service center for information about the waste collection system in your country This transceiver works on frequencies which are not generally per...

Page 131: ...s Health 1999 5 EC Art 3 1 a EN 50385 2002 Safety 1999 5 EC Art 3 1 a EN 60950 1 2006 A12 2011 EMC 1999 5 EC Art 3 1 b EN 301 843 02 V1 2 1 Radio Spectrum 1999 5 EC Art 3 2 EN 302 885 02 V1 2 2 EN 300...

Page 132: ...out the permission of YAESU MUSEN CO LTD Printed in China YAESU MUSEN CO LTD Tennozu Parkside Building 2 5 8 Higashi Shinagawa Shinagawa ku Tokyo 140 0002 Japan YAESU USA 6125 Phyllis Drive Cypress CA...

Reviews: